background image

12

GB

Performing initial setup
operations

Once you have hooked up the speakers and
turned on the power, clear the receiver’s
memory. Then specify the speaker parameters
(size, position, etc.) and perform any other
initial setup operations necessary for your
system.

Tip

To check the audio output during settings (to set up
while outputting the sound), check the connection
(see page 17).

Clearing the receiver’s
memory

Before using your receiver for the first time, or
when you want to clear the receiver’s memory,
do the following.

1

Turn off the receiver.

2

Hold down 

?/1

 for 5 seconds.

All of the following items are reset or
cleared:

• All sound field parameters are reset to

their factory settings.

• All SET UP parameters are reset to

their factory settings.

• The sound fields memorized for each

program source and preset stations are
cleared.

• The master volume is set to “MIN”.

• The fan control is set to “FAN ON”.

Performing initial setup
operations

Before using your receiver for the first time,
adjust MAIN MENU parameters so that the
receiver correspond to your system. For the
adjustable parameters, see the table on page 31.
See pages 13–16 for speaker settings and pages
25–26 for other settings.

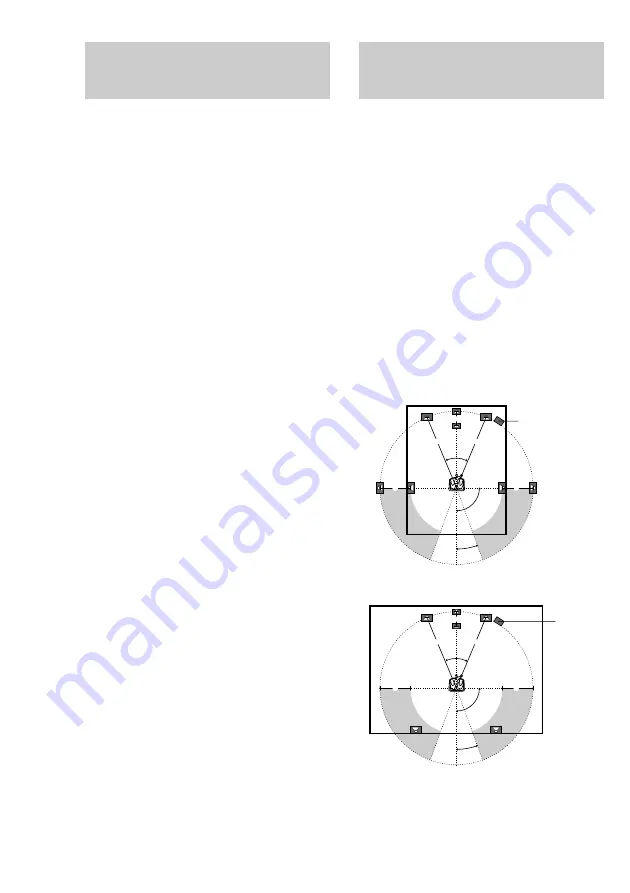
Multi channel surround
setup

For the best possible surround sound, all
speakers should be the same distance from the
listening position (

A

).

However, the receiver lets you to place the
center speaker up to 1.5 meters closer (

B

) and

the surround speakers up to 4.5 meters closer
(

C

) to the listening position.

The front speakers can be placed from 1.0 to
12.0 meters from the listening position (

A

).

You can place the surround speakers either
behind you or to the side, depending on the
shape of your room (etc.).

Place the sub woofer at the same distance from
the listening position as the front speaker (left
or right).

When placing surround speakers to your side

When placing surround speakers behind you

Note

Do not place the center speaker farther away from the
listening position than the front speakers.

45

°

90

°

20

°

B

C

C

A

A

45

°

90

°

20

°

B

C

C

A

A

Sub woofer

Sub woofer

Содержание HT-SL5

Страница 1: ...Home Theater System 4 241 634 11 2 HT SL5 2002 Sony Corporation FR GB ES Operating Instructions ...

Страница 2: ...ste Do not install the appliance in a confined space such as a bookcase or built in cabinet This receiver incorporates Dolby Digital and Pro Logic Surround and the DTS Digital Surround System Manufactured under license from Dolby Laboratories Dolby Pro Logic and the double D symbol are trademarks of Dolby Laboratories DTS and DTS Digital Surround are registered trademarks of Digital Theater System...

Страница 3: ...e component 17 Enjoying Surround Sound Selecting a sound field 18 Understanding the multi channel surround displays 20 Customizing sound fields 21 Receiving Broadcasts Direct tuning 23 Automatic tuning 23 Preset tuning 24 Other Operations Using the Sleep Timer 25 Adjustments using the SET UP menu 25 Additional Information Precautions 27 Troubleshooting 27 Specifications 29 Tables of settings using...

Страница 4: ...7 PLII q 19 PRESET TUNING 8 24 SOUND FIELD qa 18 21 TUNER 6 17 23 24 TV SAT 5 17 VIDEO 3 17 1 power 1 12 16 17 22 Parts Identification Main unit The items are arranged in alphabetical order Refer to the pages indicated in parentheses for details 1 2 3 4 5 6 7 9 q qs qa 8 ...

Страница 5: ...se When connecting optical digital cords insert the cord plugs straight in until they click into place Do not bend or tie the optical digital cord A Audio video cord not supplied Yellow video Yellow video White L audio White L audio Red R audio Red R audio B Video cord not supplied Yellow video Yellow video C Optical digital cord not supplied D Coaxial digital cord supplied Orange Orange Hooking U...

Страница 6: ...onnecting the FM wire antenna keep it as horizontal as possible Do not use the U SIGNAL GND terminal for grounding the receiver ANTENNA L R VIDEO IN IN IN IN OUT OUT IMPEDANCE USE 8 16Ω R FRONT L VIDEO IN VIDEO OUT VIDEO IN MONITOR OUT 75Ω COAXIAL FM AM U VIDEO DVD TV SAT COAX IN DVD TV SAT DIGITAL SUB WOOFER SPEAKERS OPTICAL IN OPTICAL IN FM wire antenna supplied AM loop antenna supplied ...

Страница 7: ...L R IN OUT Ç Ç B A A A A ANTENNA L R VIDEO IN IN IN IN OUT OUT IMPEDANCE USE 8 16Ω R FRONT L VIDEO IN VIDEO OUT VIDEO IN MONITOR OUT 75Ω COAXIAL FM AM VIDEO DVD TV SAT DVD TV SAT DIGITAL SUB WOOFER SPEAKERS U COAX IN OPTICAL IN OPTICAL IN Video component hookups VCR TV monitor For details on the required cords A D see page 5 DVD player Digital satellite tuner ...

Страница 8: ...a movie theater into your home To fully enjoy multi channel surround sound five speakers two front speakers two surround speakers and a center speaker and a sub woofer are required Digital satellite tuner etc Connect to either the COAX IN or OPTICAL IN jack We recommend making connections to the COAX IN jack Notes The OPTICAL IN and COAX IN jacks are compatible with 96 kHz 48 kHz 44 1 kHz and 32 k...

Страница 9: ...ower cord Before connecting the AC power cord of this receiver to a wall outlet connect the speaker system to the receiver see page 10 Connect the AC power cord s of your audio video components to a wall outlet b IMPEDANCE USE 8 16Ω R FRONT L IMPEDANCE USE 8 16Ω R SURR L CENTER SPEAKERS SPEAKERS ...

Страница 10: ...is unit Required cords A Speaker cords supplied B Monaural audio cord supplied Black Black Hooking Up and Setting Up the Speaker System Front speaker L Front speaker R Center speaker Surround speaker L Surround speaker R Active sub woofer To a wall outlet Switch the power POWER to off before connecting the power cord Tip To prevent speaker vibration or movement while listening attach the supplied ...

Страница 11: ...ds of each speaker cord does not touch another speaker terminal the stripped end of another speaker cord or the metal parts of the receiver Examples of poor conditions of the speaker cord Stripped speaker cord is touching another speaker terminal Stripped cords are touching each other due to excessive removal of insulation After connecting all the components speakers and AC power cord output a tes...

Страница 12: ...p operations Before using your receiver for the first time adjust MAIN MENU parameters so that the receiver correspond to your system For the adjustable parameters see the table on page 31 See pages 13 16 for speaker settings and pages 25 26 for other settings Multi channel surround setup For the best possible surround sound all speakers should be the same distance from the listening position A Ho...

Страница 13: ...er distance A on page 12 to a distance 4 5 meters closer to your listening position C on page 12 Tip The receiver allows you to input the speaker position in terms of distance However it is not possible to set the center speaker further than the front speakers Also the center speaker cannot be set more than 1 5 meters closer than the front speakers Likewise the surround speakers can not be set far...

Страница 14: ...SMALL to activate the bass redirection circuitry and output the front channel bass frequencies from the sub woofer When the front speakers are set to SMALL the center and surround speakers are also automatically set to SMALL unless previously set to NO x Surround speaker position SL SR PL XXX This parameter lets you specify the location of your surround speakers Refer to the illustration below Sel...

Страница 15: ...or other LARGE speakers If you do not connect surround speakers select NO 3 Tip 1 3 correspond to the following Dolby Pro Logic modes 1 NORMAL 2 PHANTOM 3 3 STEREO Tip Internally the LARGE and SMALL settings for each speaker determine whether or not the internal sound processor will cut the bass signal from that channel When the bass is cut from a channel the bass redirection circuitry sends the c...

Страница 16: ...in your main listening position To adjust the balance and level of speakers press MAIN MENU repeatedly to select LEVEL menu move the V v B b button up or down to select the parameter you want to adjust page 21 Then move the V v B b button to left or right to select the setting and press the button to enter the selection 7 Press TEST TONE again to turn off the test tone POWER indicator POWER LEVEL ...

Страница 17: ...ter connecting all of your components to the receiver do the following to verify that the connections were made correctly 1 Press 1 to turn on the receiver 2 Press a function button to select a component program source that you connected e g DVD player 3 Turn on the component and start playing it 4 Rotate MASTER VOLUME to turn up the volume If you do not obtain normal sound output after performing...

Страница 18: ... discs are labeled with the logo and Dolby Surround encoded programs are labeled with the logo About DCS Digital Cinema Sound D C S DCS is the concept name of the surround technology for home theater developed by Sony DCS uses the DSP Digital Signal Processor technology to reproduce the sound characteristics of an actual cinema cutting studio in Hollywood When played at home DCS will create a powe...

Страница 19: ...pe of decoding for 2 channel audio sources This receiver can reproduce 2 channel sound in 5 channels through Dolby Pro Logic II or 4 channels through Dolby Pro Logic Press PL PLII repeatedly to select the 2 channel decoding mode The selected mode appears in the display The sound field automatically switches to NORM SURR page 18 DOLBY PL performs Pro Logic decoding The source recorded in 2 channel ...

Страница 20: ...GE Lights up when dynamic range compression is activated See page 22 to adjust the dynamic range compression 8 COAX Lights up when the source signal is a digital signal being input through the COAX terminal 9 OPT Lights up when the source signal is a digital signal being input through the OPTICAL terminal 0 LFE Lights up when the disc being played back contains the LFE Low Frequency Effect channel...

Страница 21: ... are applied to all sound fields 1 Start playing a program source encoded with multi channel surround sound 2 Press MAIN MENU repeatedly to select the LEVEL menu 3 Move the V v B b button up or down to select the parameter you want to adjust 4 Move the V v B b button to left or right to select the setting you want Initial settings Parameter Initial setting L R BAL L R XXX BALANCE CTR XXX dB 0 dB S...

Страница 22: ...range intended by the recording engineer select STD To compress the dynamic range in small steps to achieve the sound you desire select 0 1 0 9 To reproduce a dramatic compression of the dynamic range select MAX Effect level EFFECT Lets you adjust the presence of the current surround effect Adjusting the tone parameters The TONE menu contains parameters that let you adjust the bass and treble The ...

Страница 23: ...NING after entering the value close to the frequency you want The receiver automatically tunes in the station you want If the frequency seems to be higher than the entered value press TUNING and if the frequency seems to be lower than the entered value press TUNING If STEREO flashes in the display and the FM stereo reception is poor press FM MODE to improve the sound You will not be able to enjoy ...

Страница 24: ... preset number start again from step 3 5 Press MEMORY again to store the station If MEMORY goes out before you can store the station start again from step 3 6 Repeat steps 2 to 5 to preset another station Tuning to preset stations You can tune the preset stations by either of the following two ways Scanning the preset stations 1 Press TUNER The last received station is tuned in 2 Press PRESET or P...

Страница 25: ...ET UP menu The SET UP menu allows you to make the following adjustments 1 Press MAIN MENU repeatedly to select the SET UP menu 2 Move the V v B b button up or down to select the parameter you want to adjust 3 Move the V v B b button to left or right to select the setting you want 4 Repeat steps 2 to 3 until you have set all of the parameters that follow Initial settings Parameter Initial setting D...

Страница 26: ...e audio input mode for TV SAT function AUTO gives priority to the analog audio signals input to the TV SAT IN L R jacks when there is no digital audio signals OPT specifies the digital audio signals input to the DIGITAL TV SAT OPTICAL IN jacks ANLG specifies the analog audio signals input to the TV SAT IN L R jacks ...

Страница 27: ...re connecting other components be sure to turn off and unplug the receiver On cleaning Clean the cabinet panel and controls with a soft cloth slightly moistened with a mild detergent solution Do not use any type of abrasive pad scouring powder or solvent such as alcohol or benzine If you have any question or problem concerning your receiver please consult your nearest Sony dealer Troubleshooting I...

Страница 28: ... sure the sound field function is on press SOUND FIELD Select C ST EX A C see page 18 Adjust the speaker level see page 21 Make sure the surround speaker size parameter is not set to NO see page 15 There is no sound from the active sub woofer When you select NORM SP make sure the sub woofer is set to YES see page 15 Check that 2CH ST is not selected see page 19 Radio stations cannot be tuned in Ch...

Страница 29: ...DVD TV SAT Optical Sensitivity Impedance S N 100 dB A 20 kHz LPF Sampling frequency COAX OPT 96 kHz Outputs LINE SUB WOOFER Voltage 2 V Impedance 1 kilohms Video section Inputs Video 1 Vp p 75 ohms Outputs Video 1 Vp p 75 ohms FM tuner section Tuning range 87 5 108 0 MHz Antenna terminals 75 ohms unbalanced Intermediate frequency 10 7 MHz Sensitivity Mono 18 3 dBf 2 2 µV 75 ohms Stereo 38 3 dBf 22...

Страница 30: ...kg CNP2 1 0 kg SA WMSP3 subwoofer Speaker system Active subwoofer magnetically shielded Speaker unit Woofer 20 cm cone type Enclosure type Acoustically Loaded Bass Reflex Continuous RMS power output 6 ohms 20 250 Hz 100 W Reproduction frequency range 28 Hz 200 Hz High frequency cut off frequency 150 Hz Input LINE IN input pin jack Power requirements 230 V AC 50 60 Hz Power consumption 100 W Dimens...

Страница 31: ...10 dB to 10 dB 1 dB steps S W XXX dB 10 dB to 10 dB 1 dB steps L F E XXX dB OFF 20 dB to 0 dB 1 dB steps D RANGE COMP XXX OFF 0 1 to 0 9 0 1 steps STD MAX EFFECT depends on the sound field 15 steps TONE BASS 6 dB to 6 dB 1 dB steps 22 TREB 6 dB to 6 dB 1 dB steps SET UP L R FRONT LARGE SMALL 13 C CENTER LARGE SMALL NO SL SR SURR LARGE SMALL NO SW S W XXX YES NO L R DIST XX X m 1 0 meter to 12 0 me...

Страница 32: ...ONCERT z z z z z z z z GAME z z z z z z z z PCM 96K z Adjustable parameters for each sound field The adjusted LEVEL parameters are applied to all the sound fields The adjusted TONE parameters are stored in each sound field TONE BASS TREBLE GAIN GAIN 2CH ST z z AUTO DEC z z NORM SURR z z C ST EX A z z C ST EX B z z C ST EX C z z HALL z z JAZZ z z CONCERT z z GAME z z PCM 96K PCM96K appears as a sou...

Страница 33: ...e the remote to operate the components in your system The tables below show the settings of each button Remote Operations Function Button SLEEP Receiver Activates the sleep function and the duration which the receiver turns off automatically 1 Receiver Turns the receiver on or off AV 1 TV VCR Turns the audio and CD player video components on or LD player off DVD player MD deck SYSTEM Receiver TV T...

Страница 34: ...eset channels satellite tuner CD player Skips discs multi disc DVD player changer only MD deck ENTER 12 TV VCR After selecting a channel satellite tuner disc or track using the LD player numeric buttons press to MD deck enter the value Remote Operations Function Button DISC CD player Selects a disc directly multi disc changer only DISPLAY TV VCR Selects information LD player displayed on the TV DV...

Страница 35: ...UTO Receiver Auto decoding DEC PL PLII Receiver Selects 2 channel decoding mode Remote Operations Function Button TV 1 TV Turns the TV on or off TV Selects the channel entry mode either one or two digit TV VOL TV Adjust the volume of the TV TV CH TV Select preset TV channels TV TV Selects input signal TV VIDEO input or video input SWAP TV Swaps the small and large picture JUMP TV Toggles between t...

Страница 36: ... command mode VTR 2 2 VCR command mode VTR 3 3 DVD player 4 TV 5 DSS Digital Satellite Receiver 6 Tuner this receiver 10 11 CD player 12 MD deck m LD player M Sony VCRs are operated with a VTR 1 2 or 3 setting These correspond to Beta 8mm and VHS respectively To reset all the function buttons to their factory setting Press 1 AV 1 and MASTER VOL at the same time N X m M VIDEO DVD SYSTEM STANDBY SLE...

Отзывы: