5
Parts Identification
1
Remaining battery indicator
Lights when a battery is inserted.
Green: Ample battery charge remains.
Orange: Battery charge is low.
Red: Battery charge is nearly empty.
When an external power supply is also
connected, this indicator does not light.
2
DC IN (external power input)
indicator
Lights green when an external power
supply is connected.
Even if an external power supply or a
battery is connected, the indicators will not
light if the power switch on the wireless
receiver is turned off.
b
OUTPUT 1 connector (XLR)
Outputs balanced analog audio signals.
When a DWR-S01D is installed, you can
select the output tuner in the UTILITY
menu of the DWR-S01D.
Under factory default settings, audio for
TUNER 1 will be output.
When a WRR-855S is installed, audio
signals will be output from this connector
only.
c
OUTPUT 2 connector (XLR)
Outputs balanced analog audio signals.
When a DWR-S01D is installed, audio for
TUNER 2 will be output.
When a WRR-855S is installed, this
connector does not function.
d
Wireless receiver screw holes
Run in the mounting screws to secure the
receiver/tuner unit.
e
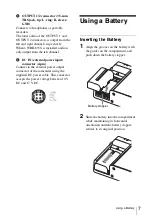
Battery connector
Insert a battery (e.g., NP-F570) here.
The InfoLithium L Series is supported.
If a battery and an external power supply
are connected at the same time, the external
power supply will be used.
The DWA-F01D cannot be used to recharge
the battery. Use a commercially available
battery charger to recharge the battery.
For details on inserting the battery, see “Using a
Battery” on page 7.
f
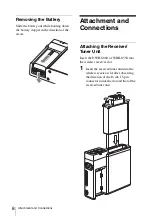
Wireless receiver slot
Insert the optional DWR-S01D or
WRR-855S here.
For details on how to attach the receiver or tuner
unit to the DWA-F01D, see “Attaching the Receiver/
Tuner Unit” on page 8.
g
DC IN (external power input)
connector (DC jack)
Connects to a 10 V to 17 V DC power
supply.
Use a plug that has an outer diameter of
φ
5.5 mm, an inner diameter of
φ
2.1 mm,
and a negative polarity center.
Before beginning operation with an
external power supply, avoid confusing the
polarity of the external battery by checking
the polarity again.
Note
Note
Note


