background image

13

GB

Basic

Operation

Answering/Ending Calls

Incoming calls are indicated by a ringing tone as well as the incoming call
indicator icon on the display. Press the Jog Dial (or          ) to accept the
call.

If the caller is using the Caller ID feature, the caller’s name appears on the
display if the number is saved in the called person’s Phonebook. Only the
number appears on the display even if the number is not saved in the
Phonebook.

Tip

• If the keypad is locked when you receive an incoming call, just press

the Jog Dial (or Send Key) to accept the call. After the call ends, the
keypad will lock again automatically.

If you do not wish to answer the call, press            while the phone is
ringing. The call will be rejected (the caller will hear a busy tone or will be
diverted if a divert has been set). If you do not answer the call, 

 will

appear on the display in standby mode. Press            in Standby mode or
select the Redial List from the Main Menu for information about the
missed call. Press 

c

 or 

 to remove the icon.

If you would like to turn the ringer off during an incoming call, just press

 once. Press 

 once more to turn the ringer on again.

Ending Calls

Press          to end a phone call.

Note

If you have a call waiting, press             to end the current call and then accept the
Call Waiting (see also Network Services, Call Waiting) by pressing           .

Содержание CMD-CD5

Страница 1: ...3 867 714 21 1 Operating Instructions Mobile Telephone GB CMD CD5 1999 by Sony Corporation ...

Страница 2: ...ween the mains socket and the phone when charging for easy accessibility Consult your physician or the manufacturer of personal medical devices pacemakers hearing aids etc regarding any restrictions on the use of a mobile telephone Use only Sony approved CMD CD5 batteries and accessories with your phone Warning Unauthorised batteries chargers and accessories will invalidate any approvals and warra...

Страница 3: ...ng Phonebook Entries 20 Making Calls from the Phonebook 20 Editing the Phonebook 21 Voice Mail 22 Phonebook Menu 23 Menu Operations 24 Divert 25 Messaging 27 Redial List 35 Control 36 Security PIN 36 Network Services 41 Call Waiting 42 Time Cost 43 Preferences 45 Tools 50 Alert Tones 56 Troubleshooting 56 GSM Control Codes 58 Technical Specifications Licensing 60 Index 61 Welcome to Sony CMD CD5 G...

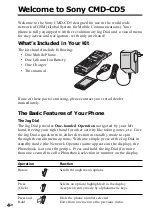
Страница 4: ...handed Operation navigated by your left hand freeing your right hand for other activity like taking notes etc Give the Jog Dial a quick turn in either direction in standby mode to spin through the main menu options With one simple press of the Jog Dial in standby mode the Network Operator name appears on the display the Phonebook is at your fingertips Press and hold the Jog Dial for more than one ...

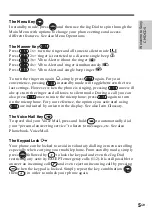
Страница 5: ...t mode During a call you can also press once to mute the microphone press again to turn on the microphone For your reference the options you activated using are indicated by an icon in the display See also Icon Glossary The Voice Mail Key 1 To speed dial your Voice Mail press and hold 1 to automatically dial your personal answering service to listen to messages etc See also Phonebook Voice Mail Th...

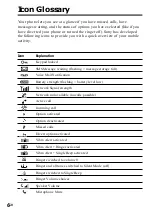
Страница 6: ...sage waiting flashing message storage full Voice Mail Notification Battery strength flashing battery level low Network Signal strength Network not available no calls possible Active call Incoming call Option activated Option deactivated Missed calls Divert option activated Vibra Alert activated Vibra Alert Ringer activated Vibra Alert Single Beep activated Ringer switched to volume 0 Ringer and al...

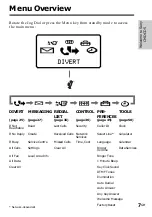
Страница 7: ...ead Last Calls Security Caller ID Clock Reachable If No Reply Create Received Calls Network Select Line Calculator Services If Busy Service Centre Missed Calls Time Cost Language Calendar All Calls Settings Clear All Ringer Data Services Volume All Fax Local Area Info Ringer Tone All Data 1 Minute Beep Clear All Key Click Sound DTMF Tones Illumination Auto Redial Auto Answer Any Key Answer Welcome...

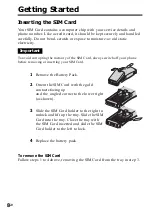
Страница 8: ...lways switch off your phone before removing or inserting your SIM Card 1 Remove the Battery Pack 2 Orient the SIM Card with the gold contacts facing up and the angled corner to the lower right as shown 3 Slide the SIM Card holder to the right to unlock and lift up the tray Slide the SIM Card into the tray Close the tray with the SIM Card inserted and slide the SIM Card holder to the left to lock 4...

Страница 9: ...tes the charging status Charging 0 C 45 C is complete when the battery icon indicates all bars Full charging can take up to approximately 3 hours but may vary depending on certain conditions e g if your phone is switched on temperature is outside the operating range As an energy saving measure disconnect the charger from the mains socket and from the phone after charging Important Use only the Son...

Страница 10: ...ter approximately 2 minutes It is possible but not recommendable to disable the PIN code prompt see Menu Operations Control Warning You only have 3 attempts to enter the correct PIN After the third attempt your SIM is blocked and you must enter your PUK code Personal Unblocking Key see also Troubleshooting Emergency Calls Emergency calls 112 etc are possible when you have network coverage even if ...

Страница 11: ... service If you cannot obtain Service One reason for failure to obtain network service is that the reception strength may be too weak Try moving to a higher elevation to a window or open space Make certain that there is nothing obstructing the antenna Roaming If you are out of range of your Home Network Operator especially when abroad another Network Operator may be selected automatically subject ...

Страница 12: ...r 4 Press the Jog Dial to save the number to the Phonebook Tip If the Auto Redial option is on see page 49 and the number you have called is engaged your phone automatically displays the Auto Redial option to call the number repeatedly at progressive intervals until the number is no longer busy However if there is an incoming call the Auto Redial option will be cancelled International Calls Each c...

Страница 13: ...he call ends the keypad will lock again automatically If you do not wish to answer the call press while the phone is ringing The call will be rejected the caller will hear a busy tone or will be diverted if a divert has been set If you do not answer the call will appear on the display in standby mode Press in Standby mode or select the Redial List from the Main Menu for information about the misse...

Страница 14: ...pad During a call use your phone as a notepad to enter a phone number If you make a second call simultaneously the active call is put on hold see also Call Hold Even when the call has ended the number you entered will reappear on the display Press the Jog Dial for the option to save the number in the Phonebook or simply press and hold the Jog Dial or to call the number Microphone To mute the micro...

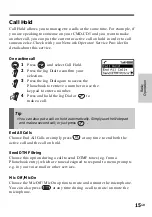
Страница 15: ... to retrieve a number or use the keypad to enter a number 4 Press and hold the Jog Dial or to make a call Tip You can also put a call on hold automatically Simply use the Notepad and make a second call or just press End All Calls Choose End All Calls or simply press at any time to end both the active call and the call on hold Send DTMF String Choose this option during a call to send DTMF tones e g...

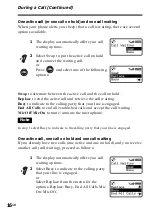
Страница 16: ... to the calling party that your line is engaged End All Calls to end all established calls and accept the call waiting Mic Off Mic On to mute unmute the microphone Note In step 1 select Busy to indicate to the calling party that your line is engaged One active call one call on hold and one call waiting If you already have two calls one active and one on hold and you receive another call call waiti...

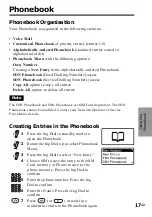
Страница 17: ...lete All option to delete all entries Note The FDN Phonebook and SDN Phonebook are SIM Card dependant The SDN Phonebook cannot be modified Contact your Network Operator or Service Provider for details Creating Entries in the Phonebook 1 Press the Jog Dial in standby mode to open the Phonebook 2 Rotate the Jog Dial up to select Phonebook Menu 3 Press the Jog Dial to select New Entry 4 Choose SIM to...

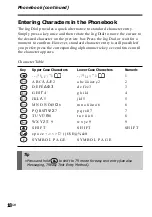
Страница 18: ...ding alphanumeric key several times until the character appears Character Table Key Upper Case Characters Lower Case Characters Numeric 1 1 1 1 A B C Ä Å Æ 2 a b c ä å à æ ç 2 2 D E F É Φ 3 d e f è é 3 3 G H I Γ 4 g h i ì 4 4 J K L Λ 5 j k l 5 5 M N O Ñ Ö Ø Ω 6 m n o ñ ö ø ò 6 6 P Q R S Π Ψ Σ 7 p q r s ß 7 7 T U V Ü Θ 8 t u v ü ù 8 8 W X Y Z Ξ 9 w x y z 9 9 S H I F T S H I F T S H I F T s p a c e ...

Страница 19: ...Rotate the Jog Dial n Press the Jog Dial to S or wait for a moment Note Phonebook memory size number of memory spaces and maximum number of letters and digits depends on your SIM card however names longer than 16 characters cannot be fully displayed b b ...

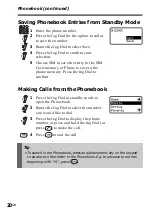
Страница 20: ...memory Press the Jog Dial to confirm Making Calls from the Phonebook 1 Press the Jog Dial in standby mode to open the Phonebook 2 Rotate the Jog Dial to select the number you would like to dial 3 Press the Jog Dial to display the phone number or press and hold the Jog Dial or press to make the call 4 Press to end the call Tip To search in the Phonebook press an alphanumeric key on the keypad to ad...

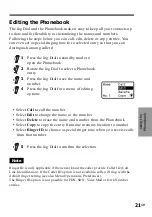
Страница 21: ...mber 4 Press the Jog Dial for a menu of editing options Select Call to call the number Select Edit to change the name or the number Select Delete to erase the name and number from the Phonebook Select Copy to copy the entry from one memory location to another Select Ringer ID to choose a special ringer tone when you receive calls from that number 5 Press the Jog Dial to confirm the selection Note ...

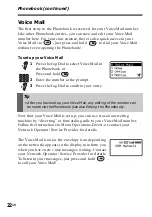
Страница 22: ...og Dial to confirm your entry Tip After you have set up your Voice Mail any editing of the number can be made via the Phonebook see also Editing the Phonebook Now that your Voice Mail is set up you can use it as an answering machine by diverting or forwarding calls to your Voice Mail number Follow the instructions in Menu Operations Divert or contact your Network Operator Service Provider for deta...

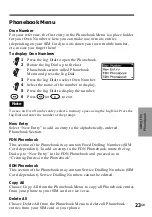
Страница 23: ...ntry select a memory space using the Jog Dial Press the Jog Dial and enter the number at the prompt New Entry Select New Entry to add an entry to the alphabetically ordered Phonebook Section FDN Phonebook This section of the Phonebook may contain Fixed Dialling Numbers SIM Card dependant To add an entry to the FDN Phonebook rotate the Jog Dial up to New Entry in the FDN Phonebook and proceed as in...

Страница 24: ...og Dial or press the Menu key to select the main menu from standby mode and continue rotating the Jog Dial for the main menu options to revolve 2 Press the Jog Dial to select the menu option in the center 3 Press c or MENU to exit a menu or Press and hold the Jog Dial while in a menu to return in steps back to standby mode Note Your phone will automatically default to standby mode after 2 minutes ...

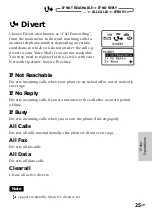
Страница 25: ...ice Provider If Not Reachable Diverts incoming calls when your phone is switched off or out of network coverage If No Reply Diverts incoming calls if you do not answer the call after a certain period of time If Busy Diverts incoming calls when you are on the phone line engaged All Calls Diverts all calls unconditionally the phone will not even ring All Fax Diverts all fax calls All Data Diverts al...

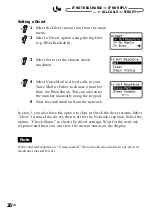
Страница 26: ...er manually using the keypad 5 Wait for confirmation from the network In step 3 you also have the option to clear or check the divert status Select Clear to cancel the divert then wait for the Network response Select the option Check Status to check the divert settings Wait for the network response and then you can view the current status on the display Note If the returned response is Unsuccessfu...

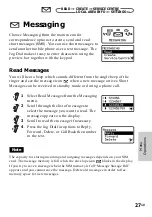
Страница 27: ...ring a phone call 1 Select Read Messages from the Messaging menu 2 Scroll through the list of messages to select the message you want to read The message appears on the display 3 Scroll to read the message if necessary 4 Press the Jog Dial for options to Reply Forward Delete or Call Back the number in the text Note The capacity for storing incoming and outgoing messages depends on your SIM card Th...

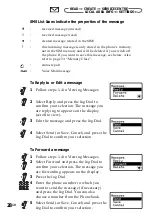
Страница 28: ...firm your selection The message you are replying to appears on the display scroll to view 3 Edit the message and press the Jog Dial 4 Select Send or Save Cancel and press the Jog Dial to confirm your selection To Forward a message 1 Follow steps 1 4 in Viewing Messages 2 Select Forward and press the Jog Dial to confirm your selection The message you are forwarding appears on the display 3 Press th...

Страница 29: ...e message text 1 Follow steps 1 4 in Viewing Messages 2 Select Call Back and press the Jog Dial to confirm your selection The sender s number appears on the display or up to three of the numbers appearing in the message 3 Press the Jog Dial 4 Select Call Back to call the number Tip To save the sender s phone number select save in step 4 and enter the name at the prompt The number will be saved to ...

Страница 30: ...e message using the keypad and press the Jog Dial to confirm 5 Select Send Save or Cancel and press the Jog Dial to confirm your selection Tip Press the Jog Dial in step 4 to access the Phonebook and retrieve a number instead of typing it in manually You can add a number from the Phonebook anywhere in a message Just press 1 and use the Jog Dial to scroll to the Phonebook icon on the preview bar Pr...

Страница 31: ...3 Press to shift to Abc 4 To type the word Sony press each of the following keys in order 5 At the end of the word check the preview bar for the possibilities found for the key combination you typed 6 Rotate the Jog Dial to select Sony If your desired word is first on the list just press the Jog Dial to select it Tip Press to shift among abc lower case letters permanently Abc an upper case letter ...

Страница 32: ...the Jog Dial to select a symbol 6 Press c to return to the previous screen or End to return to the text entry screen Tip For Smart Punctuation just press 1 where you would add a fullstop hyphen or apostrophe and T9 will automatically insert the most likely punctuation symbol You just keep on typing and T9 will punctuate for you c READ CREATE SERVICE CENTRE LOCAL AREA INFO SETTINGS ...

Страница 33: ... can edit the number if you want Settings Settings allows you to customize outgoing messages including the format confirmation report etc Some of these options may be network dependant Contact your Network Operator Service Provider for details 1 Select Settings from the Messaging menu 2 Select a Settings option 3 Press the Jog Dial to confirm your selection Memory Class You have the following opti...

Страница 34: ...Voice if available The default setting is SMS Local Area Info Local Area Info allows you to receive Cell Broadcast messages or general messages like weather reports traffic reports etc broadcast to a group of phones in a certain area Some of these options may be network dependant Contact your Network Operator Service Provider for details 1 Select Local Area Info from the Messaging menu 2 Select on...

Страница 35: ...using the Jog Dial to highlight the desired number or name from the list 3 If only a name is displayed press the Jog Dial to check the phone number as well as the date and time of the call Press the Jog Dial again to copy the number to the Notepad to save the number see also Basic Operation Notepad 4 Press and hold the Jog Dial if the number is correct to initiate the call Tip Outgoing call Incomi...

Страница 36: ...twork Operator Service Provider provides a PIN number with your SIM card The PIN Menu offers you the possibility to change your PIN code or to enable disable the PIN code prompt Important You have three attempts to enter the correct PIN code If the third try fails your PIN is blocked and you must enter your PUK Personal Unblocking Key also provided with your SIM card You have ten attempts to enter...

Страница 37: ...r PIN code can only be changed if the PIN Control is switched on 1 Select PIN in the Security Menu 2 Select On 3 Enter the old PIN code at the prompt and press the Jog Dial or to confirm your entry 4 Enter your new PIN code 4 8 digits and press the Jog Dial to confirm 5 Repeat the new PIN entry for verification and press the Jog Dial to confirm If successfully verified the new PIN is effective imm...

Страница 38: ...ork Password Some of the restrictions in the Security Menu are controlled in the network e g Call Barring Your Network Operator Service Provider provides a Network Password if you register for one or more of these network call restrictions Call Barring Changing the Network Password 1 Select Network PWD in the Security menu 2 Proceed as in Changing the PIN Code Note If the message Unsuccessful appe...

Страница 39: ...ricts all outgoing international calls except those to your home country To set a Limit Calls Out feature 1 Select Limit Calls Out from the Security menu 2 Select the restriction you want to set 3 Select Set using the Jog Dial 4 Enter your Network Password at the prompt 5 Confirm your selection 6 Wait for the network response to appear on the display Note In step 3 you also have the option to clea...

Страница 40: ...rator e g when abroad Note To set a Limit Calls In restriction proceed as in Security Limit Calls Out FDN Phonebook When you select FDN Phonebook and turn this feature on you only have access to numbers stored in the Fixed Dialling Numbers FDN section of your Phonebook see also Phonebook This feature can help you to control outgoing calls for example if you loan your phone to someone Your PIN2 cod...

Страница 41: ...ct an available network from the list 3 Press the Jog Dial to confirm your selection Auto Network Use this option to turn on or off the automatic network selection If you choose a network from the list in the menu Select Network you will automatically turn off the Auto Network feature Priority List Choose Priority List to edit the automatic network selection priority list This feature is helpful f...

Страница 42: ...ntact your Network Operator Service Provider for details To Set Call Waiting 1 Select Call Waiting from the Network Services menu 2 Select Set to activate Call Waiting 3 Wait for the network response to appear on the display Tip See also the chapter During a Call for options such as Call Hold for tips on how to handle two calls at the same time SECURITY NETWORK SERVICES TIME COST ...

Страница 43: ...ils Call Time To check the length of your last call and total calls incoming and outgoing 1 Select Call Time from the Time Cost menu 2 Select Check 3 Press the Jog Dial or or to exit Tip Select Reset in step 2 to reset the call time counters for last call and total calls Call Cost To check the cost of your last call total calls and remaining credit 1 Select Call Cost from the Time Cost menu 2 Sele...

Страница 44: ... enter a decimal point 6 Press the Jog Dial to confirm 7 Press the Jog Dial or or to exit Charge Limit Select Charge Limit to set a unit figure at which your phone will not allow any more phone calls to be made If you have selected Unit in the Charge Rate Menu see above enter the Unit value In case of Currency enter the Currency value To set the Charge Limit 1 Select Charge Limit from the Time Cos...

Страница 45: ...ault see page Caller ID default Caller ID 46 Select Line Line 1 Select Line 46 Language SIM Language 47 Ringer Volume Medium Ringer Volume 47 Ringer Tone Aizu Ringer Tone 48 Any Key Answer Off Any Key Answer 48 Key Click Sound KeyClick Key Click Sound 48 DTMF Tones On DTMF Tones 49 Illumination On Illumination 49 Auto Redial Off Auto Redial 49 Auto Answer Off Auto Answer 49 1 Minute Beep Off One M...

Страница 46: ...ven divert your business line to your Mailbox after business hours and only receive private calls This feature may not appear in some networks To make a line selection in standby mode press and hold and use the Jog Dial to make your selection 1 or 2 will appear in standby mode so that you always know which line is active Call on Line 1 Call on Line 2 Voice Message on Line 1 Voice Message on Line 2...

Страница 47: ...age by pressing 0000 Ringer Volume The Ringer Volume setting allows you to adjust the ringer volume level to off level 0 low medium high maximum and an incremental setting 1 Select Ringer Volume from the Preferences menu 2 Select the ringer volume by rotating the Jog Dial 3 Press the Jog Dial to confirm your selection Note appears in standby mode to remind you when you have turned the ringer off l...

Страница 48: ...s the Jog Dial to confirm your selection Any Key Answer Any Key Answer lets you answer a call by pressing any key 1 Select Any Key Answer from the Preferences menu 2 Select On or Off 3 Press the Jog Dial to confirm your selection Note You cannot use MENU or I to answer a call Key Click Sound You can adjust the key sounds to DTMF tones Key Click or Silent in the Key Click Sound settings 1 Select Ke...

Страница 49: ...r which is busy This feature may not appear in some networks Note An incoming call will interrupt the Auto Redial feature Auto Answer Auto Answer programs your phone to answer an incoming call Auto Answer only works together with the Handsfree Car Kit or the Headset accessory 1 Minute Beep You can turn on the 1 Minute Beep setting to be reminded beep in one minute intervals of the time you are on ...

Страница 50: ...you of an event e g a meeting etc 5 Use the Jog Dial and the Keypad to enter the time you want the alarm to ring 6 After entering the last digit press the Jog Dial to confirm the time On is highlighted 7 Press the Jog Dial to activate the Alarm function The alarm will ring at the specified time Notes The volume of the alarm is determined by the Ringer Volume setting When the alarm is on appears in...

Страница 51: ... On The alarm will not ring during a call rather on completion of the call Auto Sleep The auto sleep function turns your phone off at a specified time Activate auto sleep once and the phone will turn off at the same time every day 1 Select Clock from the Tools Menu 2 Press the Jog Dial 3 Rotate and then press the Jog Dial to select Auto Sleep 4 Select Set and use the Jog Dial and the Keypad to ent...

Страница 52: ... pressing Setting the Date and Time 1 Select Clock from the Tools Menu 2 Press the Jog Dial 3 Rotate and then press the Jog Dial to select Set 4 Use the Jog Dial and the Keypad to enter the day month and year DDMMYY To correct the date rotate the Jog Dial and press c 5 After entering the last digit press the Jog Dial to confirm 6 Enter the hour and minutes HHMM 7 Use the Jog Dial to select OK or t...

Страница 53: ...ative numbers Euro Currency Calculator You can also use the calculator as a currency calculator for an easy tool to convert prices from one currency to another 1 Proceed as in Calculator above 2 In step 3 enter the value you want to convert 3 Use the Jog Dial to select to enter the currency calculator 4 Use the Jog Dial to select to set the currency exchange rate 5 Enter the value you want to conv...

Страница 54: ...al EasyCom or PC Card accessory see also the operating instructions of the accessory for use with the CMD CD5 Selecting a Fax Data Setting Switch the Speech Then Fax setting to On to make a phone call and then send a fax When the phone is not connected to the EasyCom or PC Card accessory Off should be selected 1 Select Data Services from the Tools menu 2 Press the Jog Dial 3 Press the Jog Dial to ...

Страница 55: ... following settings 115 2 kbps 57 6 kbps 38 4 kbps 19 2 kbps 9 6 kbps 9 6 115 2 kbps Tip Select 9 6 115 2 kbps for automatic detection of the serial speed In order for the phone to detect the serial speed correctly enter an AT command whereafter the phone responds with OK For a list of AT commands please refer to the operating instructions supplied with the PC Card or EasyCom accessory CLOCK CALCU...

Страница 56: ...ght be dropped Troubleshooting Appendix Possible Remedies Charge the battery Replace the battery Note that after several years gradual decline is normal Move to an open space or nearer to a window Check Operator coverage map Call your service provider Try manual network search Use full national area code When abroad use also international access code to reach home country Check outgoing call barri...

Страница 57: ...IN code incorrectly three times the SIM card is blocked To enter the unblock code PUK to unblock the SIM proceed as follows 1 Enter the unblock code and press the Jog Dial or press 2 Enter the new PIN 4 8 digits and press the Jog Dial or press 3 Enter the new PIN code again and press the Jog Dial or press The SIM is unblocked Notes If you enter the wrong unblock code PUK 10 times your SIM is block...

Страница 58: ... SMS 16 All except SMS 19 Line 2 ALS 89 Call Waiting Activate call waiting 43 Deactivate call waiting 43 Call Hold Service The following procedures may be available during a call The availability of service depends on your network operator Reject 0 Drop 1 Release a specific call X 1X Swap 2 Place all active calls on hold except call X with 2X which communication shall be supported Place all active...

Страница 59: ...D 21 TS SEND 21 SEND Barring Outgoing Activate Cancel Check International Except Home 332 PW TS SEND 332 PW TS SEND 332 SEND International 331 PW TS SEND 331 PW TS SEND 331 SEND Always 33 PW TS SEND 33 PW TS SEND 33 SEND Network Password Change 03 330 Old PW New PW New PW SEND Presentation of IMEI 06 Note TS Teleservice DN Divert Number PW Password Barring Incoming Activate Cancel Check All Calls ...

Страница 60: ...ng Temperature 10 C 45 C Licensing Your CMD CD5 is authorised for use in GSM 900 1800 networks and complies with EU standards 89 336 EEC Electromagnetic Compatibility 98 13 EEC CTR 19 and CTR 20 95 54 EEC Car Automotive Directive Applies to accessories used in vehicles confirmed by the CE label Sony reserves the right to make changes or improvements to any of the products described in this guide w...

Страница 61: ... 9 C Calculator 53 Calendar 54 Call Barring 39 40 Limit Calls Out 39 Limit Calls In 40 Call Cost 43 Call Hold 15 16 58 Call Time 43 Call Waiting 16 42 58 Caller ID 46 Calls Answering 13 Making 12 Cell broadcast see Local Area Info 34 Changing network password 38 Character table 18 Charge Limit 44 Charge Rate 44 Low signal warning 56 Making Calls 12 Manner Key 2 5 Menu 24 Menu key 2 5 Menu Overview...

Страница 62: ...ting 22 25 Volume Speaker 14 Ringer 14 47 Welcome Message 49 Index continued Q R S Redial List 35 Ringer On Off 5 RingerID 21 Single Beep 5 Silent Mode 5 Tone 48 Volume 14 47 Roaming 11 Security 36 Select Line 46 Service Centre 33 Send key 2 Short messages 27 Calling back 29 Changing the settings 33 Creating 30 Deleting 29 Editing 28 Forwarding 28 Last Message 30 Memory class 33 Message format 34 ...

Страница 63: ...63GB Appendix Notes ...

Страница 64: ...64GB Notes ...

Страница 65: ...65GB Appendix Notes ...

Страница 66: ...66GB Notes ...

Страница 67: ...manufacturer or Network Operator Service Provider In case of loss or theft of your phone and or SIM Card call your Network Operator Service Provider immediately to prevent misuse My Mobile Phone Number Operator Customer Service Number My SIM Card Number Printed on your SIM Card My Phone s ID Number IMEI Printed on the label underneath the battery pack or select Phone Status in the Setup Menu to di...

Страница 68: ...gle Beep Vibra Alert Manner Key To adjust the ringer in standby mode or when your phone is ringing press the Manner key to scroll through the ringer options 1 MENU Function Scrolls through menu options Selects an option highlighted in the display Accepts an entry made by alphanumeric keys Dials the phone number selected Exits from one menu to the previous menu Vibra Ringer Vibra Single Beep Ringer...

Страница 69: ...Auto Redial Auto Answer Any Key Answer Welcome Message Factory Reset From Standby Mode 1 Dial the complete number of the party you want to call including the area code even when dialling locally 2 Press and hold the Jog Dial or to call the number displayed Or press the Jog Dial to save the number to the Phonebook From the Phonebook 1 Press the Jog Dial in standby mode to open the Phonebook 2 Rotat...

Страница 70: ...AND 1 Ear piece 2 Jog Dial 3 Display 4 Keypad alphanumeric keys 5 Clear Key 6 Microphone 7 Manner Key 8 On Off Key 9 Voice Mail Key º Exit Key Send Key Menu Key Antenna Battery Pack 5 External Connector Charging and Accessories c 1 MENU 1 2 3 9 4 5 6 º 8 7 5 ...

Страница 71: ...55GB Made from chlorine free recyclable paper Sony Corporation Printed in France ...

Отзывы: