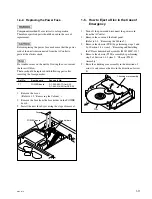
1-9
CDP-D12
7. LOAD SW board
1.
Remove the CD mechanism deck assembly.
(Refer to item 1 of Section 1-4-1.)
2.
Remove the chassis (T388) assembly.
(Refer to item 2 of Section 1-4-1.)
3.
Remove the screw and remove the arm roller assem-
bly. (Refer to item 6 of Section 1-4-1.)
4.
Remove soldering at the two positions of the LOAD
SW board.
5.
Remove the screw and remove the LOAD SW board.
6.
Install the new LOAD SW board by reversing the
steps of removal.
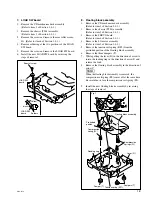
8. Floating block assembly
1.
Remove the CD mechanism deck assembly.
(Refer to item 1 of Section 1-4-1.)
2.
Remove the chassis (T388) assembly.
(Refer to item 2 of Section 1-4-1.)
3.
Remove the SERVO board.
(Refer to item 4 of Section 1-4-1.)
4.
Remove the LO motor assembly.
(Refer to item 5 of Section 1-4-1.)
5.
Remove the tension coil spring (KF1) from the
protruded portion of the floating block assembly.
6.
Remove the three dampers (T).
7.
While pulling the lever (D) in the direction of arrow A,
rotate the loading ring in the direction of arrow B and
release the lock.
8.
Remove the floating block assembly in the direction of
arrow C.
n
When the floating block assembly is removed, the
compression coil spring (FL) comes off at the same time.
Be careful not to lose the compression coil spring (FL).
9.
Install the new floating block assembly by reversing
the steps of removal.
Special screw
LOAD SW
board
LOAD SW
board
Yellow
black
Solders
B
A
C
Fig. 1
Lock
Floating block assembly
Protruded
portion
Compression
spring (FL)
Compression
springs (FL)
Lever (D)
Damper (T)
Dampers (T)
Tension spring (KF1)
Roading ring
Содержание CDP-D12
Страница 1: ...COMPACT DISC PLAYER CDP D12 SERVICE MANUAL 1st Edition ...
Страница 4: ......
Страница 34: ......
Страница 42: ......
Страница 48: ......
Страница 54: ...Printed in Japan Sony Corporation 2003 10 16 2003 CDP D12 UC CE CN E 9 976 920 01 ...


