1-6
CDP-D12
6.
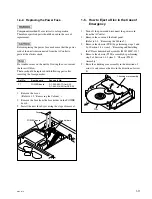
Remove the four screws and remove the bracket (CD).
7.
Install the CD mechanism deck assembly by reversing
steps 1 to 6 of removal.
2. Chassis (T388) assembly
1.
Remove the CD mechanism deck assembly.
(Refer to item 1 of Section 1-4-1.)
2.
Remove soldering at the three positions on the SERVO
board.
3.
Remove the four precision screws (P2
x
3) and
remove the chassis (T388) assembly in the direction of
the arrow in the way of disengaging the claws.
4.
Remove the SERVO board and the guide (DISC M).
(Refer to item 3 of Section 1-4-1.)
5.
Install the SERVO board and the guide (DISC M)
removing the step 3 in the new chassis (T388) assem-
bly. (Refer to item 3 of Section 1-4-1.)
6.
Install the chassis (T388) assembly by reversing steps
1 to 3 of removal.
PTT2.6
x
6
PTT2.6
x
6
CD mechanism deck
assembly
Bracket (CD)
SERVO board
Solders
Blue
Black
Red
Claw
Precision
P2
x
3
Precision
P2
x
3
Chassis (T388) assembly
Содержание CDP-D12
Страница 1: ...COMPACT DISC PLAYER CDP D12 SERVICE MANUAL 1st Edition ...
Страница 4: ......
Страница 34: ......
Страница 42: ......
Страница 48: ......
Страница 54: ...Printed in Japan Sony Corporation 2003 10 16 2003 CDP D12 UC CE CN E 9 976 920 01 ...


