background image

11

Figure 36

Figure 35

Figure 34

Figure 33

screw

heat sink

screw

processor card

clip

clip

processor 

card

screw

fan  

assembly

2-pin  

connector

processor 

card

Installation—QuickSilver 001 and 00 Models


2.

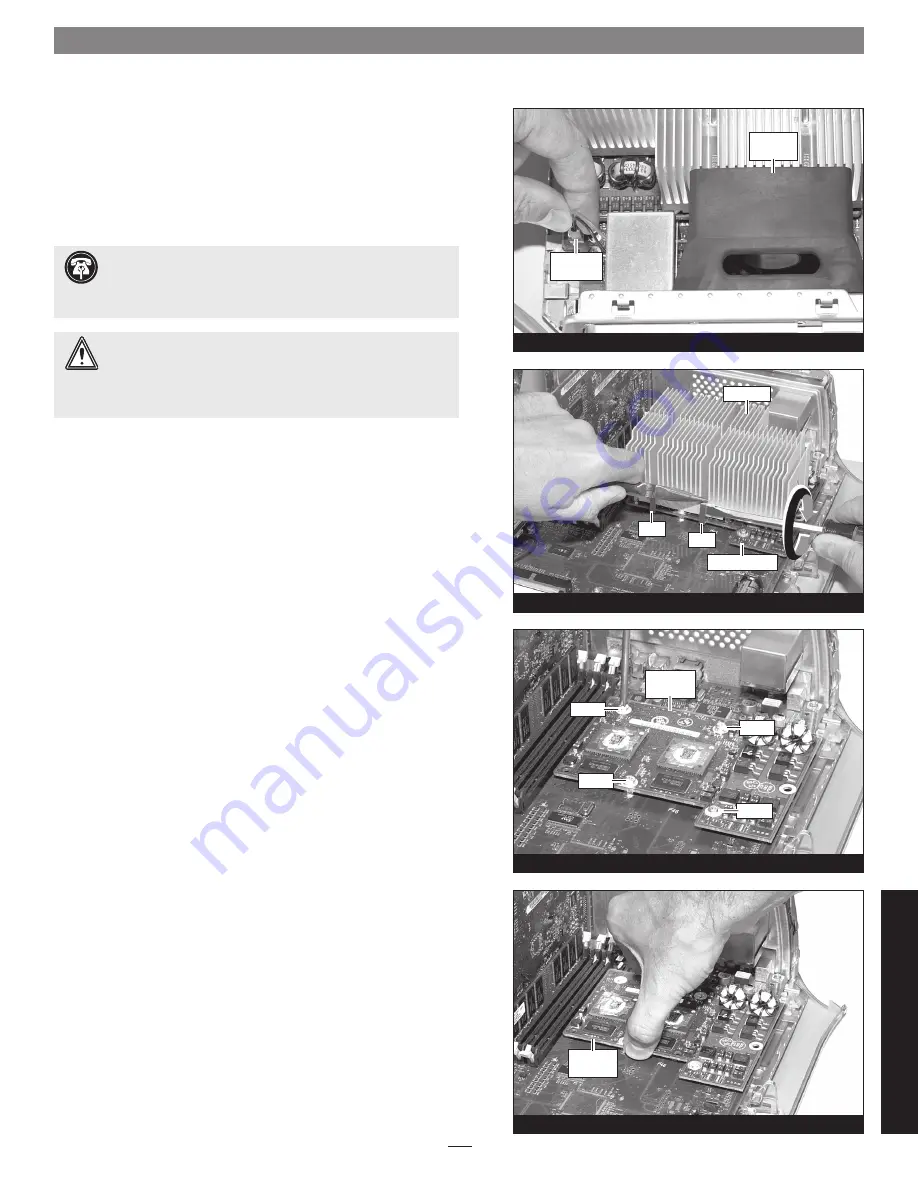
 Locate and carefully disconnect the 2-pin fan power connec-

tor from the logic board, and then lift out the fan assembly 

(Figure 33)

Remove Heat Sink

With the front of the computer facing you, locate the clips securing 
the heat sink to the processor card 

(Figure 34)

. Carefully insert a flat 

blade screwdriver between the right clip and the edge of the heat sink; 

do not touch the edge of the processor card

. Using extreme caution, 

press down on the edge of the clip with needle-nose pliers, and twist 
the screwdriver to unhook one side of the clip from the processor card 

(Figure 34)

. Repeat the procedure on the other side of the clip. Repeat 

these steps with the left clip. Once the clips have been unhooked, 
gently lift the heat sink and clips away from the processor card and 
set them aside, but not on the logic board. 

Remove Processor Card


1.

 Remove the four screws securing the processor card to the logic 

board 

(Figure 35)


2.

 Grasping its edges, gently lift one edge of the processor card to 

separate it from the logic board, and then carefully lift it straight 
up and away

 (Figure 36)


 Support Note:

 The following steps address the removal of 

your system’s processor card heat sink. Please note, the dual 

processor heat sink is pictured, but the procedure to remove the 
single processor heat sink is identical.


 WARNING:

 Verify that the power cord is disconnected from 

your Power Mac before you remove the heat sink and proces-

sor card. The original processor card is secured to the logic board 
with four screws, one of which c12V and could spark if it is 
grounded when the system is on. 

Qu

ic

kS

ilv

er


00

1/

0

0

screw

Содержание Encore ST G4

Страница 1: ...cessor installed If a computer experi ences sleep issues with the original processor installed installing this upgrade is unlikely to change that condition In the very rare instance where a computer begins to have sleep issues after a Duet upgrade is installed the problem is iso lated to that specific card and can be resolved by replacing it You Should Have The following items should be included i...

Страница 2: ...This page left intentionally blank ...

Страница 3: ...o section B below Otherwise go to step 2 2 Boot your system in Mac OS 9 2 x the firmware updater will not work in OS X Classic mode As of this writing Apple has not made this firmware updater available as an OS X application 3 Log on to the Internet and type the following in your browser window s address bar http docs info apple com article html artnum 120068 4 Click on the appropriate link to dow...

Страница 4: ...allation of software required to sup port this Encore ST G4 Duet in your computer under Mac OS 9 2 when it is a selectable OS in Startup Disk in System Preferences Please note if you ever start up your computer undr Mac OS 9 2 you MUST run the Crescendo Encore Installer before you install this upgrade card If you do not run the application your computer will not operate with the processor upgrade ...

Страница 5: ... Remove Heat Sink Locate the processor heat sink on the logic board Figure 7 your heat sink may appear different from what is pictured Using caution to avoid touching the processor card and the logic board grasp one of the clips securing the heat sink with needle nose pliers between the heat sink and processor card Pull down and away to unhook one side of the clip from the processor card Figure 7 ...

Страница 6: ...et card Figure 10 and then place the cap on the origi nal processor card s connector 3 Place the processor card you removed from the computer into the anti static package and then store it the original heat sink heat sink clips and the screws you removed in a safe place 4 Align the connector on the bottom of the Duet card with the connector on the logic board Figure 11 and then set the card down o...

Страница 7: ...the logic board do not overtighten the screws Figure 13 Close Computer 1 Raise the side panel back into place Figure 14 2 Return the computer to your computing area if necessary and reconnect the power cord and peripheral cables to the computer Turn On Computer Turn on your Power Mac your accelerated machine should boot normally side panel screw AGP Graphics Gigabit Ethernet WARNING When your comp...

Страница 8: ...omputer and an electrical outlet 3 Touch a port access cover on the back of the computer to dis charge any potential damaging static electricity Figure 15 4 Disconnect the power cord from the computer 5 If present remove the two indicated screws from the back plate of the computer Figure 16 Otherwise go to step 6 6 Locate the security lock at the back of the computer Figure 17 If it is not already...

Страница 9: ...securing the processor heat sink to the processor card Figure 21 your heat sink may appear different from what is pictured Using caution to avoid touching the processor card and the logic board grasp one of the clips securing the heat sink with needle nose pliers between the heat sink and processor card Pull down and away to unhook one side of the clip from the processor card Figure 21 Push the cl...

Страница 10: ...ink clips and the screws you removed in a safe place 4 Align the connector on the bottom of the Duet card with the connector on the logic board Figure 25 and then set the card down on top of the three threaded posts Make sure the connec tors are lined up then grasping the Duet card by its heat sink gently press it straight down until the connectors snap together Verify the connectors are completel...

Страница 11: ... Raise the side panel back into place Figure 28 2 Return the computer to your computing area if necessary and reconnect the power cord and peripheral cables to the computer Turn On Computer Turn on your Power Mac your accelerated machine should boot normally side panel Digital Audio Figure 27 screw screw screw WARNING When your computer is operating the Duet s heat sink will become VERY hot to the...

Страница 12: ...cal outlet 3 Touch a port access cover on the back of the computer to dis charge any potential damaging static electricity Figure 29 4 Disconnect the power cord from the computer 5 Locate the security lock at the back of the computer Figure 30 If it is not already pressed in press it in now 6 With the right side of the case facing you open your Power Mac by lifting the release latch and lowering t...

Страница 13: ... the other side of the clip Repeat these steps with the left clip Once the clips have been unhooked gently lift the heat sink and clips away from the processor card and set them aside but not on the logic board Remove Processor Card 1 Remove the four screws securing the processor card to the logic board Figure 35 2 Grasping its edges gently lift one edge of the processor card to separate it from t...

Страница 14: ...eat sink heat sink clips and all four screws you removed in a safe place 4 Align the connector on the bottom of the Duet card with the connector on the logic board Figure 39 and then set the card down on top of the three threaded posts Make sure the connec tors are lined up then grasping the Duet card by its heat sink gently press it straight down until the connectors snap together Verify the conn...

Страница 15: ...gic board 2 With the back of the computer facing you secure the fan assem bly to the back plate of the computer with the two screws you removed previously Figure 43 3 Raise the side panel back into place Figure 44 4 Return the computer to your computing area if necessary and reconnect the power cord and peripheral cables to the computer Turn On Computer Turn on your Power Mac your accelerated mach...

Отзывы: