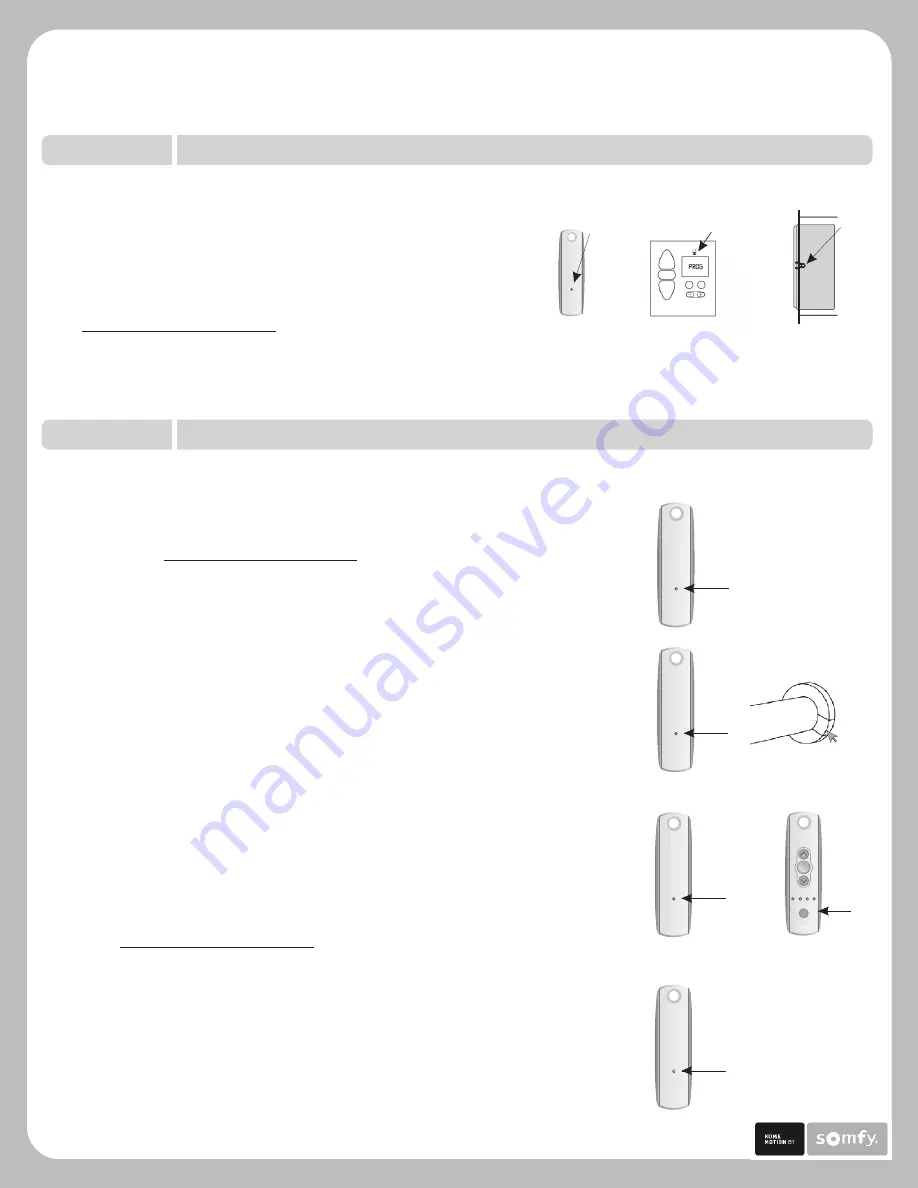
Adding Additional Transmitters (Single Channel)
With a Remote Control
1) Using a paperclip, press and hold the
PROGRAM
on the previously addressed transmitter until the shade jogs.
2) Using a paperclip, press and hold the
PROGRAM
on
the Additional (new) transmitter until the shade jogs. Additional
(new) transmitter is now added to shade memory and can be used
to operate shade.
With the Program Button on the Motor
1) Using a paperclip, press and hold the
PROGRAM
on the motor head, LED
will blink once then remain on, release button and motor will jog.
2) Using a paperclip, press and hold the
PROGRAM utton
on the Additional
(new) transmitter until the shade jogs. The Additional (new) transmitter is now added
to shade memory and can be used to operate shade.
button
button
button
b
Previous
transmitter
Program
Button
my
Channel
Selector
New
transmitter
Program
Button
Previous
transmitter
Program Button
New
transmitter
STEP SIX
Adding Additional Transmitters, Assigning or Deleting Channels
Assigning Specific Channels to Shade (Multi-channel transmitters only)
1) Using a paperclip, press and hold the
PROGRAM utton
on the
previously addressed transmitter until the shade jogs.
2) Select the desired channel (1-4 or all) by momentarily pressing the
Channel Selector utton
on the multi-channel transmitter.
3) Press and hold the
PROGRAM utton
on the multi-channel transmitter until
the shade jogs. Additional (new) channel is now added to shade memory and
can be used to operate shade.
Note: To prevent unwanted Channel/Transmitter assignments, it may be
necessary to unplug power from all previously programmed shades until
programming is complete.
b
b
b
Program
Button
STEP FIVE
Completing & Exiting Programming Mode
Using a paperclip, press and hold the
PROGRAM utton
on the back of the transmitter until the shade jogs.
TRANSMITTER IS NOW MEMORIZED AND PROGRAMMING IS COMPLETE.
Note: If power is disconnected from shade before Step 5 is completed,
TRANSMITTER WILL NOT BE MEMORIZED to the programmed shade however
limits (shade positions) will remain programmed. If this occurs, go
back and repeat step 2 (Initiate Programming). Then omit step 4 (Setting
Limits) and resume with step 5.
b
Program
Button
Program
Button
Chronis RTS Timer
with cover removed
Telis Transmitter
(back view)
Decora Wireless
Wall Switch, (side view)
P.4
Program
Button
LT-30RT Round Head
Roll Up WireFree RTS Programming & Operation Instructions
TM
If you cannot see LED light (because of certain mounting constraints)
press and hold
Programming utton
for 2 seconds then release, shade will then jog.
b


