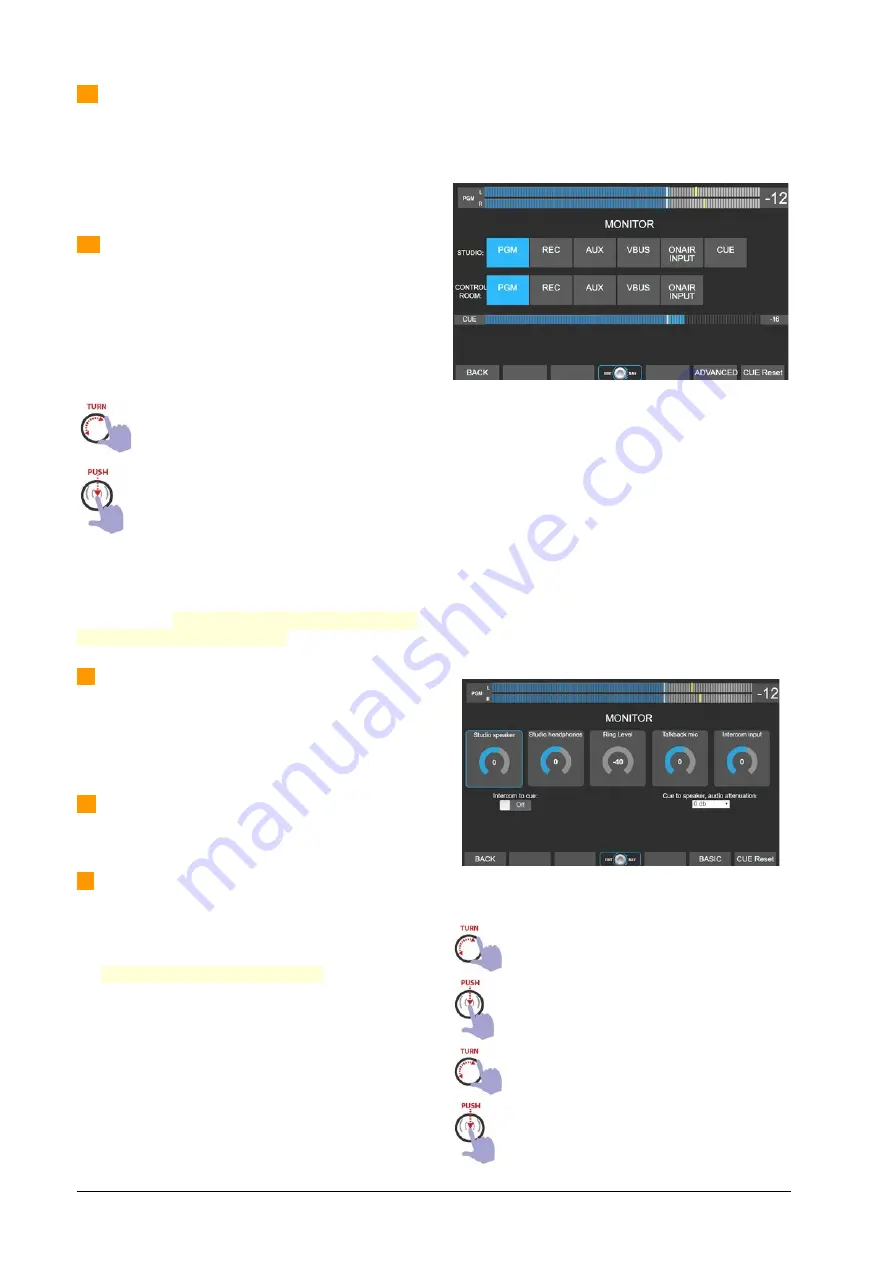
1 – STUDIO MONITOR:
Allows to select a signal
source for the Studio monitoring. The options are:
AIR-IN PGM REC AUX VBUS CUE
The send level for studio speakers and headphones
can be adjusted from the touch screen in the MONI-
TOR section (see below).
2 – CONTROL ROOM:
Allows to select a signal
source for the Studio monitoring. The options are:
AIR-IN PGM REC AUX VBUS
The selector knob is an encoder that changes the
options on the screen when it is rotated, and has a
push function to confirm an option. To choose a sig-
nal source proceed:
Turn the encoder. The options will be displayed
on the screen, and the text will remain flashing
until the operation is confirmed.
To confirm the selection, push the encoder. The
audio is switched when confirming the opera-
tion. If the knob is turned but not pressed to
confirm, after 10 seconds the action is canceled
and the screen returns to the current source.
If the encoder is pressed with one touch (without
turning it), it returns to the previous monitoring
source, indicated below in small letters. This feature
allows you to quickly switch the listening between
two sources with a simple touch.
3 – CONTROL ROOM MONITORING LEVEL:
It is a
rotary attenuator that handles the level of the con-
trol speakers. The output is line level, to connect ac-
tive or powered speakers. Note that the maximum
level reached will be affected by the speaker's own
level adjustment.
4 – CONTROL ROOM HEADPHONES LEVEL:
A ro-
tary knob that manages the level of the operator’s
headphones.
5 – CUE LEVEL:
It is a rotary knob that controls the
level of the CUE bus. The main screen shows a CUE
level meter, in dBfs. This indicator shows the level
after the CUE level control; therefore, there is no indi-
cation if the knob is zero.
The
SPEAKER and PHONES buttons
inject the CUE
signal into the speakers and/or headphones of Con-
trol Room. When these buttons are activated, the
CUE signal is added to the currently monitored sig-
nal (shown on the SOURCE screen). The monitored
signal reduces its level automatically when a CUE
signal is present. The degree of attenuation can be
defined in the MONITOR section.
The CUE bus can be assigned to any output, for con-
nection of auxiliary speakers. By default, it is as-
signed to UNBAL 8.
5.4.1 The screen MONITOR
By pressing the button
MONITOR
or this option at
the main screen, the user access to the MONITOR
screen.
This screen replicates the
signal assignment
for the
Studio and Control Room, but showing the options
in the
traditional way with a selector keypad
(now
they are touch buttons!). To change an assignment,
press the option on the screen.
There is a
CUE level meter
, in dBfs. The level shown
is after the CUE level control (post-fader). There will
be no level indication if the CUE knob is zero.
The
CUE Reset
option turns off all active CUE but-
tons, both physical buttons and virtual channel CUE
buttons.
The option
ADVANCED
opens a new screen, with
advanced monitoring settings:
Navigation
Turn the encoder to navigate the controls.
Push the encoder to select a control.
Turn the encoder to change the value of the se-
lected control.
Push the encoder to confirm the new value.
When do it, the encoder returns to the naviga-
tion mode.
Page 30
Solidyne UNIDEX UX24
Содержание UNIDEX UX24
Страница 1: ......
Страница 2: ...Page 2 Solidyne UNIDEX UX24 www SolidynePro com...
Страница 6: ...Page 6 Solidyne UNIDEX UX24 www SolidynePro com...
Страница 44: ...EMPTY PAGE Page 44 Solidyne UNIDEX UX24 www SolidynePro com...
Страница 46: ...EMPTY PAGE Page 46 Solidyne UNIDEX UX24 www SolidynePro com...


