11
•
Service and repairs must be carried out
by qualified personnel only. Only use manu-
facturer original spare parts for service re-
pair.
•
The manufacturer cannot be held re-
sponsible for any damage/injury caused to
persons, animals or property caused by mis-
use of the appliance, not in compliance with
manual instructions.
•
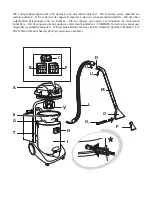
Before removing the motor unit A from
the filter canister I, remove the hoses (T
1
and
T
2
) and release the latches G.
•
Do not pull on the water hoses that lead
from the motor unit A to the tank T.
DRY SUCTION
• Insert the filter E in the tank I.
• Hook up the motor head A on the tank I and
lock it up with the two hooks G.
• Fix the flexible hose L into the suction inlet
H.
• Insert the extensions M into the end of the
flexible hose L and connect the most suitable
accessory.
• Plug the unit in.
• Turn on the illuminated ON-OFF switch C.
• Start the suction and choose 1 or 2 motors by
pressing the switches B.
WET SUCTION
• Remove the filter E from the tank I.
• Hook up the motor head A on the tank I and
lock it up with the two hooks G.
• Fix the flexible hose L into the suction inlet
H.
• Fix, at the end of the flexible hose L, the ex-
tensions M.
• Connect the accessories (O and O
1
).
• Plug the unit in.
• Turn on the illuminated ON-OFF switch C.
• Start the suction with 1 or 2 motors by press-
ing the switch B.
INJECTION-EXTRACTION WASHING SYSTEM
• Preparation:
- Remove the filter E from the tank I.
- Pour detergent into the tank T
1
.
- Hook up the motor head A on the tank I
and lock it up with the two hooks G.
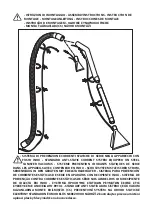
- Insert the water hoses (T
1
and T
2
) into the
tank T
- Fix the flexible hose L into the suction inlet
H.
- Attach the end of the water hose U to the
quick-release connector located on the
motor unit A .
- Fix, at the end of the flexible hose L, the
extensions M.
- Secure the hoses (U
1
and U
2
) with the clips
provided.
- Fix in the most suitable accessor.
• Operation:
- Plug the unit in.
- Turn on the illuminated ON-OFF switch C.
- Press the lever on the tap and both the
switches F to select operation of 1 or 2 mo-
tors.
- Release the lever on the tap (the pumps
will automatically shut down).
- Use the switches F.
- Use the switches B to turn on the 1 or 2
pumps.
- To start cleaning, place the accessory on
the surface, press the lever on the tap, and
pull it toward you.
- When you’ve finished, turn off the switches
F and B and the master switch C.
- Use the lever on the tap to drain the re-
sidual detergent.
•
If the detergent runs out, turn off the
switches F immediately to prevent dam-
age to the pumps.
Содержание Eris78
Страница 29: ...29 A B C D E F G H I L M O O1 P T U V 0 3 m Hepa IEC60335 2 769 2012 IEC60335 2 68 2012...
Страница 30: ...30 T1 T2 E 1 E 2...
Страница 32: ...32 12 2012 19 UE C F 1 2 F 1 2 B F B C F...
Страница 38: ...38 42 43 44 T1 T2 G G L L C ON Off 1 2 G L L 1 C ON Off 1 2 1 G 1 2 L...
Страница 39: ...39 U L U1 U2 C ON Off F 1 2 F 1 2 F B F LAVOR 12 WEEE 2002 96 27 01 2003 Lpa 74 db A...
Страница 43: ...43...
Страница 44: ...AR 44...
Страница 46: ...Cod 7 300 0380 7 300 0290 2 Page 12 Col G A I T D A T AR 46...
Страница 52: ...52...
Страница 53: ...53...
Страница 54: ......


