SECTION 3 - INSTALLATION
Page S3-2
INSTALLATION PROCESS
[BASIC]
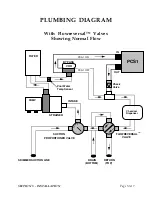
1. Retrofit support system with new valves
2. Install the PCS1
3. Automate the PCS1
The installation discussions that follow will amplify this basic installation
process and provide plumbing and electrical details.
NOTICE
: It may be necessary to
modify the diagrams supplied depending upon local installation requirements
including code restrictions. The installer is responsible for making these
determinations. The most difficult part of the installation is the first step --
retrofitting the poolÕs support system.
Содержание PCS1
Страница 7: ...SECTION 1 SYSTEM ARRIVAL Page S1 1 SECTION ONE SYSTEM ARRIVAL...
Страница 22: ...SECTION 2 HEATING DATA Page S2 1 SECTION TWO HEATING DATA...
Страница 28: ...BTUS Vs GPM BTUS Vs T SECTION 2 HEATING DATA Page S2 7...
Страница 34: ...SECTION 3 INSTALLATION Page S3 1 SECTION THREE INSTALLATION...
Страница 65: ...Attic Installation Photos SECTION 3 INSTALLATION Page S3 31...
Страница 66: ...Attic Installation Photos SECTION 3 INSTALLATION Page S3 32...
Страница 79: ...SECTION 3 INSTALLATION Page S3 45 STEP THREE AUTOMATING The PCS1 With Compool s LX220 Solar Controller...
Страница 88: ...SECTION 4 SERVICE Page S4 1 SECTION FOUR SERVICE...
Страница 99: ...Common Questions Page 1 of 10 COMMON QUESTIONS...
Страница 109: ...Dictionary of Terms Page 1 of 4 DICTIONARY OF TERMS...
Страница 113: ...Site Survey Page 1 of 4 SITE SURVEY...
Страница 116: ...Site Survey Page 4 of 4 Sketch Form...


