24
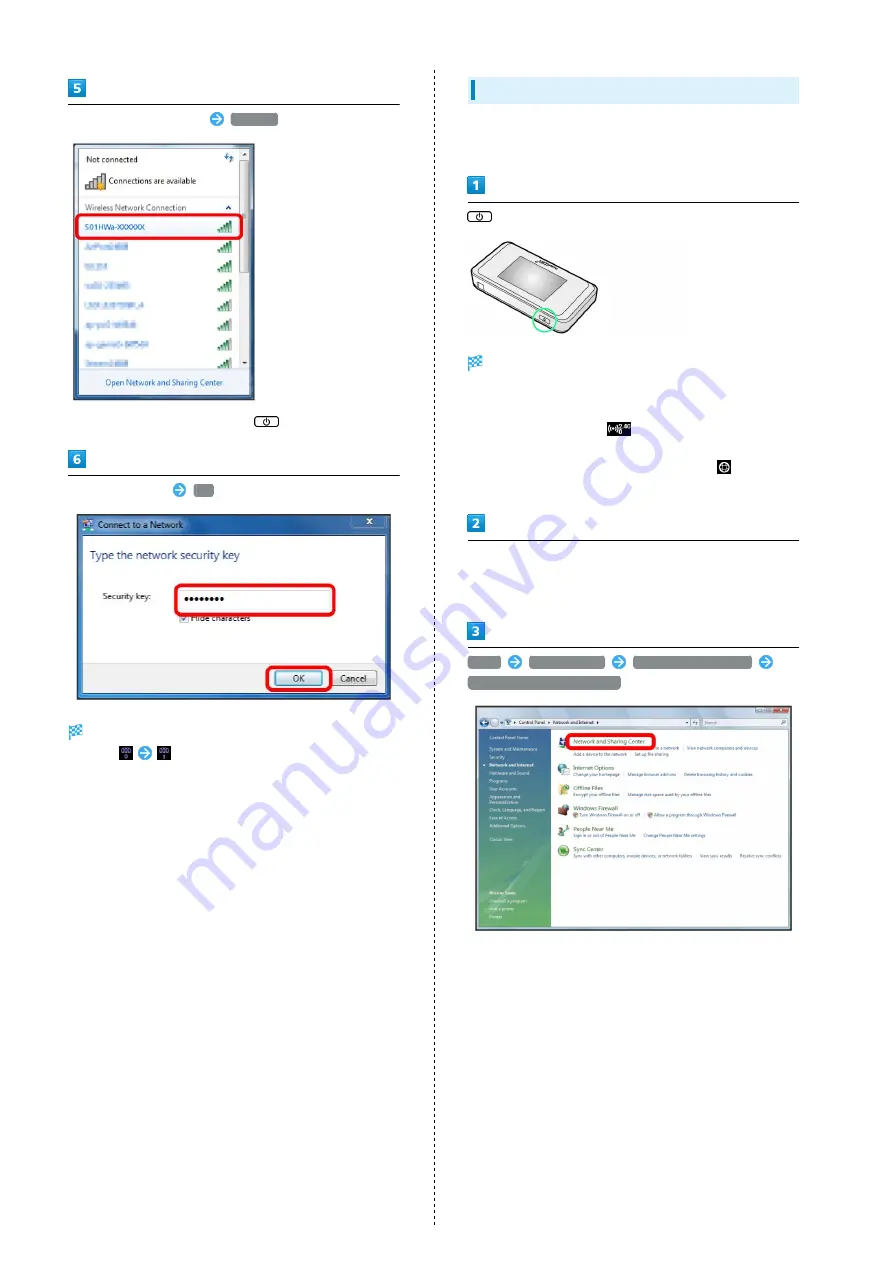
Select Wi-Fi router's SSID
Connect
・When "SSID" is not shown, Press
to exit Sleep mode.
Enter Security Key
OK
WLAN connection counter number on Display increases by
one (e.g.
).
Windows Vista
This section describes setup operations with screenshots and
steps for SSID A at WPA security setting on Windows Vista.
(Press & Hold)
Lock Screen appears when powered on and WLAN function
is enabled. Wi-Fi router automatically connects to the
Internet.
・When WLAN is enabled,
(Wi-Fi connection standard
(2.4G/5G) / number of connected devices) lights and
when Wi-Fi router connects to the Internet,
(Internet
connected) lights.
Activate PC WLAN function
・Method for enabling PC WLAN varies by model. Contact PC
manufacturer.
Start
Control Panel
Network and Internet
Network and Sharing Center
Содержание 501HW
Страница 1: ...501HW User Guide...
Страница 2: ......
Страница 19: ...17 Getting Started 501HW Power Off Press Hold Power is off...
Страница 20: ...18...
Страница 46: ...44...
Страница 62: ...60 Resetting Data Traffic Reset all data traffic volumes for 1 2 and 3 Data volume is reset...
Страница 92: ...90...
Страница 100: ...98 Next Confirm description for SSID and SSID Stealth in LAN Wi Fi setup Next...
Страница 103: ...101 Settings Using WEB UI 501HW Select the network OK Network search is set...
Страница 106: ...104 Set each item Save Created profile appears for profile name...
Страница 108: ...106 Enter each item Save Edited information appears...
Страница 119: ...117 Settings Using WEB UI 501HW Enter SoftBank Wi Fi spot password Save SoftBank Wi Fi Spot setup is complete...
Страница 122: ...120 Set each item Apply LAN Wi Fi basic settings for SSID A are made...
Страница 126: ...124 Set each item Apply LAN Wi Fi advanced settings are made...
Страница 128: ...126 OK MAC Address Filtering is set...
Страница 130: ...128 OK MAC Address Filtering is canceled...
Страница 132: ...130 OK Wi Fi router is rebooted and DHCP is set...
Страница 136: ...134 Canceling IP Address and Port Filtering In Menu List Router Setting IP Address Filtering Delete OK...
Страница 137: ...135 Settings Using WEB UI 501HW Apply OK IP address filtering settings are canceled...
Страница 140: ...138 Canceling Portmapping In Menu List Router Setting Portmapping Delete OK...
Страница 141: ...139 Settings Using WEB UI 501HW Apply OK Portmapping settings are canceled...
Страница 143: ...141 Settings Using WEB UI 501HW Enter each item OK Apply OK Special application settings are added...
Страница 144: ...142 Canceling Special Applications In Menu List Router Setting Special Applications Delete OK...
Страница 145: ...143 Settings Using WEB UI 501HW Apply OK Special application settings are canceled...
Страница 154: ...152 OK Wi Fi router reboots to its default settings...
Страница 155: ...153 Settings Using WEB UI 501HW Rebooting Wi Fi Router In Menu List System Reboot Reboot OK Wi Fi router is rebooted...
Страница 161: ...159 Settings Using WEB UI 501HW Resetting Data Traffic In Main Menu Data Traffic Reset Yes Data traffic volume is reset...
Страница 163: ...161 Settings Using WEB UI 501HW Deleting Viewed Information In Main Menu Information Select information...
Страница 164: ...162 Delete OK Information is deleted after pop up screen is shown...
Страница 166: ...164 Delete OK Information is deleted after pop up screen is shown...
Страница 178: ...176 Enter Login password Login Settings open LAN Wi Fi...
Страница 179: ...177 Settings Using WEB UI 501HW Set each item Apply LAN Wi Fi basic settings for SSID A are made...
Страница 181: ...179 Settings Using WEB UI 501HW Enter Login password Login Settings open LAN Wi Fi...
Страница 185: ...183 Settings Using WEB UI 501HW Notes for Overseas Use When coming to Japan from overseas turn the power off and back on...
Страница 189: ...187 Settings Using WEB UI 501HW Data Usage...
Страница 192: ...190 Data Usage...
Страница 195: ...193 Settings Using WEB UI 501HW Data Usage Reset...
Страница 196: ...194 Yes Data volume is reset...
Страница 198: ...196 Information Information is shown...
Страница 199: ...197 Settings Using WEB UI 501HW Select information to confirm Information is shown...
Страница 201: ...199 Settings Using WEB UI 501HW Information Checkmark information to delete Checkmark Select All to select all...
Страница 202: ...200 Delete YES Information is deleted after pop up screen is shown...
Страница 204: ...202 Enter Login password Login Settings open Device Information Information is shown...
Страница 221: ...Appendix Troubleshooting 220 Specifications 223 Warranty Service 225 Customer Service 225...
Страница 228: ...226...
Страница 243: ......


