


8
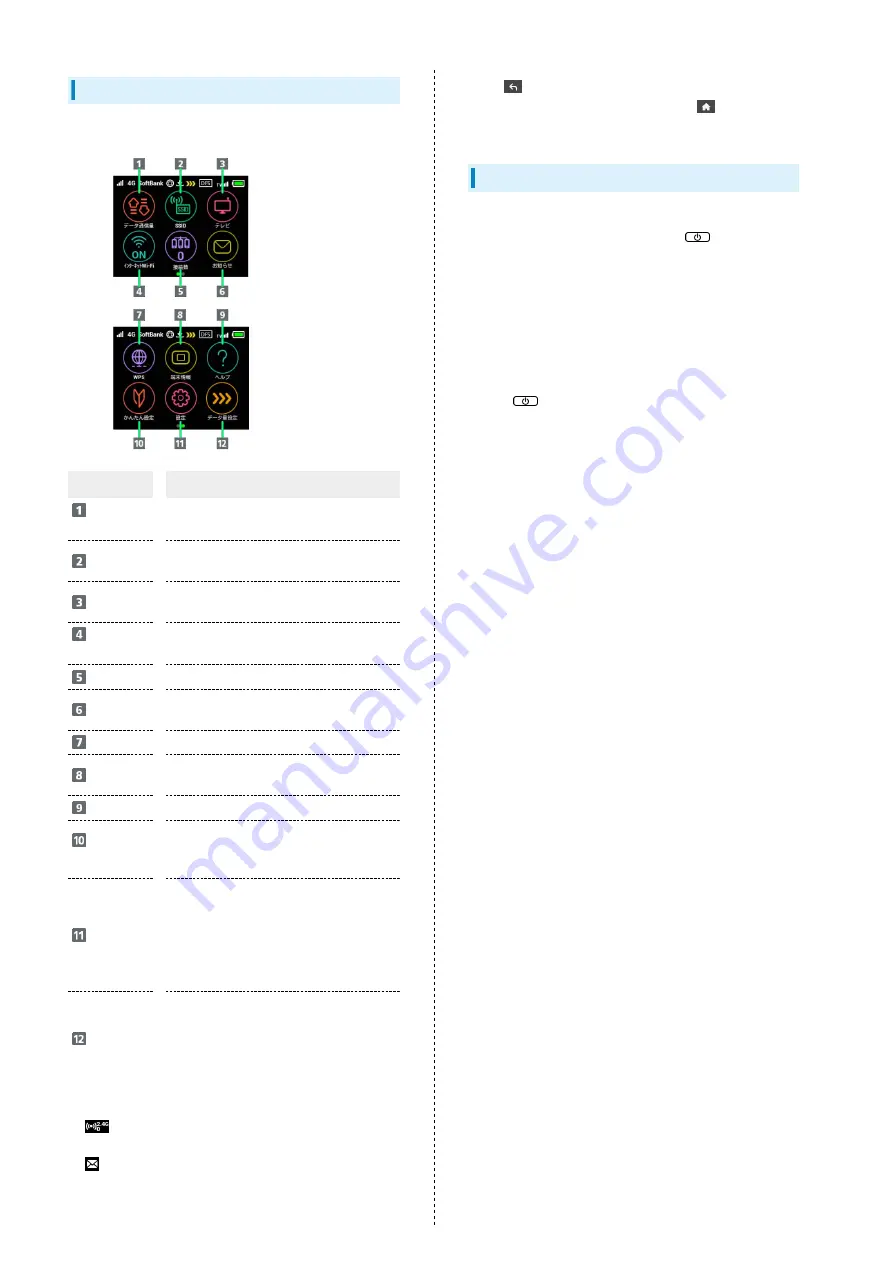
Touch Menu Icons
Tap Touch Menu Icon for settings and notifications.
Item
Description
データ通信
量
Show mobile network data usage, maximum
traffic, Auto Reset Date, etc.
SSID
Show and set SSID and Security Key for
Wi-Fi router
テレビ
Configure a device connected to Wi-Fi
router via WLAN to watch TV
インター
ネットWi-Fi
Connect to Internet Wi-Fi and SoftBank
Wi-Fi spots and make the settings
接続数
1
Show number of connected devices
お知らせ
Check and deleted received notifications;
number of unread notifications is shown
2
WPS
Set a WPS connection
端末情報
Show URL for WEB UI, Wi-Fi router’s
phone number, software version, etc.
ヘルプ
Show Help for Icons on Display
かんたん設
定
Check Wi-Fi router’s SSID and Security
Key, set the Pass Code for unlocking the
screen, and check how to operate the TV
設定
Make settings for replacing Touch Menu
Icons in Home Screen, roaming, Pass Code
for Screen Lock, Display brightness, Sleep
mode, Wi-Fi communication standard,
software update, deleting notification
icons, etc.
データ量設
定
Appears when data traffic approaches
the value at which communication speed
reduction starts, or once a communication
speed reduction has started. You can
apply to return normal speed, apply ahead
to keep normal speed or cancel application
1
(Wi-Fi communication standard (2.4G/5G) / number of
connected devices) appears at the top of Lock Screen
2
(Unread notification) appears at the top of Lock Screen
・Tap
on the settings window or notification window to
go back to the previous window and Tap
to go back to
Home Screen.
Display Off/Sleep Mode
・If Wi-Fi router is not used for a certain period of time,
Display turns off automatically. Press
to illuminate
Display.
・If Wi-Fi router is not connected to a WLAN terminal, and
there has been no operation of Wi-Fi router for a certain
period of time, or if Battery has not been charged, Display
turns off and Wi-Fi router enters Sleep mode to save power
(time until entering Sleep mode is set to 5 minutes by
default).
・In Sleep mode, WLAN is disabled.
・Press
to turn Display on and release Sleep mode.
After Sleep mode released, WLAN function is enabled and
Wi-Fi router can reconnect to WLAN devices.
・Some WLAN devices will disconnect a WLAN connection if
there is no transmission for a certain period of time after
connecting. If such a device is connected to Wi-Fi router,
the device may disconnect and Wi-Fi router may enter Sleep
mode.
・To change the time until Wi-Fi router enters Sleep mode or
the on/off setting, use the Touch Menu on Wi-Fi router or
the WEB UI. For details, see "
."
Содержание 501HW
Страница 1: ...501HW User Guide...
Страница 2: ......
Страница 19: ...17 Getting Started 501HW Power Off Press Hold Power is off...
Страница 20: ...18...
Страница 46: ...44...
Страница 62: ...60 Resetting Data Traffic Reset all data traffic volumes for 1 2 and 3 Data volume is reset...
Страница 92: ...90...
Страница 100: ...98 Next Confirm description for SSID and SSID Stealth in LAN Wi Fi setup Next...
Страница 103: ...101 Settings Using WEB UI 501HW Select the network OK Network search is set...
Страница 106: ...104 Set each item Save Created profile appears for profile name...
Страница 108: ...106 Enter each item Save Edited information appears...
Страница 119: ...117 Settings Using WEB UI 501HW Enter SoftBank Wi Fi spot password Save SoftBank Wi Fi Spot setup is complete...
Страница 122: ...120 Set each item Apply LAN Wi Fi basic settings for SSID A are made...
Страница 126: ...124 Set each item Apply LAN Wi Fi advanced settings are made...
Страница 128: ...126 OK MAC Address Filtering is set...
Страница 130: ...128 OK MAC Address Filtering is canceled...
Страница 132: ...130 OK Wi Fi router is rebooted and DHCP is set...
Страница 136: ...134 Canceling IP Address and Port Filtering In Menu List Router Setting IP Address Filtering Delete OK...
Страница 137: ...135 Settings Using WEB UI 501HW Apply OK IP address filtering settings are canceled...
Страница 140: ...138 Canceling Portmapping In Menu List Router Setting Portmapping Delete OK...
Страница 141: ...139 Settings Using WEB UI 501HW Apply OK Portmapping settings are canceled...
Страница 143: ...141 Settings Using WEB UI 501HW Enter each item OK Apply OK Special application settings are added...
Страница 144: ...142 Canceling Special Applications In Menu List Router Setting Special Applications Delete OK...
Страница 145: ...143 Settings Using WEB UI 501HW Apply OK Special application settings are canceled...
Страница 154: ...152 OK Wi Fi router reboots to its default settings...
Страница 155: ...153 Settings Using WEB UI 501HW Rebooting Wi Fi Router In Menu List System Reboot Reboot OK Wi Fi router is rebooted...
Страница 161: ...159 Settings Using WEB UI 501HW Resetting Data Traffic In Main Menu Data Traffic Reset Yes Data traffic volume is reset...
Страница 163: ...161 Settings Using WEB UI 501HW Deleting Viewed Information In Main Menu Information Select information...
Страница 164: ...162 Delete OK Information is deleted after pop up screen is shown...
Страница 166: ...164 Delete OK Information is deleted after pop up screen is shown...
Страница 178: ...176 Enter Login password Login Settings open LAN Wi Fi...
Страница 179: ...177 Settings Using WEB UI 501HW Set each item Apply LAN Wi Fi basic settings for SSID A are made...
Страница 181: ...179 Settings Using WEB UI 501HW Enter Login password Login Settings open LAN Wi Fi...
Страница 185: ...183 Settings Using WEB UI 501HW Notes for Overseas Use When coming to Japan from overseas turn the power off and back on...
Страница 189: ...187 Settings Using WEB UI 501HW Data Usage...
Страница 192: ...190 Data Usage...
Страница 195: ...193 Settings Using WEB UI 501HW Data Usage Reset...
Страница 196: ...194 Yes Data volume is reset...
Страница 198: ...196 Information Information is shown...
Страница 199: ...197 Settings Using WEB UI 501HW Select information to confirm Information is shown...
Страница 201: ...199 Settings Using WEB UI 501HW Information Checkmark information to delete Checkmark Select All to select all...
Страница 202: ...200 Delete YES Information is deleted after pop up screen is shown...
Страница 204: ...202 Enter Login password Login Settings open Device Information Information is shown...
Страница 221: ...Appendix Troubleshooting 220 Specifications 223 Warranty Service 225 Customer Service 225...
Страница 228: ...226...
Страница 243: ......


