


on the tracing grid.
Note: It is not possible to display length and
width following the addition or subtraction of
wound areas or further tracing grids. If the
length or width symbol is touched at this point
the display will show:
Calculating Area for Larger Wounds (more
than one tracing grid)
Note: Calculating the area of a larger wound
using more than one tracing grid must be
performed prior to the calculation of the %
non-viable or viable tissue.
14. After the wound area from one tracing grid
has been calculated, touch the ‘
+’ button on
the keypad with the stylus.
15. Repeat steps 9 and 10 for the second
tracing grid.
When processing is complete, the unit will
BEEP and display the accumulated area in
cm
2
, for example, assuming that the second
area was 70cm
2
, the display will change to:
When multiple tracing grids have been added
together, only the wound area can be
measured so the length and width parameters
cannot be displayed.
Note: The same process should be followed
in order to subtract or add further areas.
Touching ‘
C’ at this point will return the display
to the previous area measurement, which will
flash until the next command is entered. To
continue touch the ‘
+’ or ‘–‘ button and repeat
steps
9 and 10.
Calculating the Change in Wound Area
16. After the wound area has been calculated,
use the stylus to select the box under the area
change symbol. The display will change to:
17. Use the keypad on the tracing grid to enter
the previous area.
Touch each number in turn with the stylus,
e.g. if the previous area was 127cm
2
, then
enter ‘
1’, ‘2’, ’ 7’, ‘0’. If an error is made, touch
the ‘
C’ button momentarily for each incorrect
digit. Re-enter the correct digits.
18. When the area entered is correct, touch
‘
OK’.
19. Assuming the new area is 88.9cm
2
the unit
will then display the % change in area. This
- - - -
+
cm
2
i58
.
9
cm
2
88
.
9
cm
2
0
.
0
cm
2
I27
.
0
–
%
30
.
0
cm
2
0
.
0
cm
2
8
.
0
+
cm
2
8
.
0
cm
2
Io
.
7
I2
.
o
%
equates to a 30% reduction in wound area.
Calculating the % Non-Viable or % Viable
Tissue
Note: Calculating the % viable tissue can be
done in exactly the same way as calculating
the % non-viable tissue, by following the steps
below.
20. After the wound area has been calculated,
touch the box underneath the ‘non-viable
tissue’ symbol with the stylus.
21. Repeat steps 9 and 10 for the first area of
non-viable tissue. When processing is
complete the unit will BEEP and display the
non-viable tissue area in cm
2
.
22. If there are additional areas of non-viable
tissue, touch the ‘
+’ button and repeat steps
9 and 10 for each subsequent area of non-
viable tissue.
As processing is completed for each
additional area the unit will BEEP and display
the accumulated area of non-viable tissue in
cm
2
, for example, assuming that the second
area was 2.7cm
2
, the display will show:
23. Once all areas have been added, touch
the ‘
OK’ button with the stylus. The device will
then display the non-viable tissue as a
percentage of the complete wound, e.g:
10.7cm
2
of 88.9cm
2
= 12%. Touching ‘
C’ at any
point will return the display to the start of the
non-viable tissue procedure (
step 20).
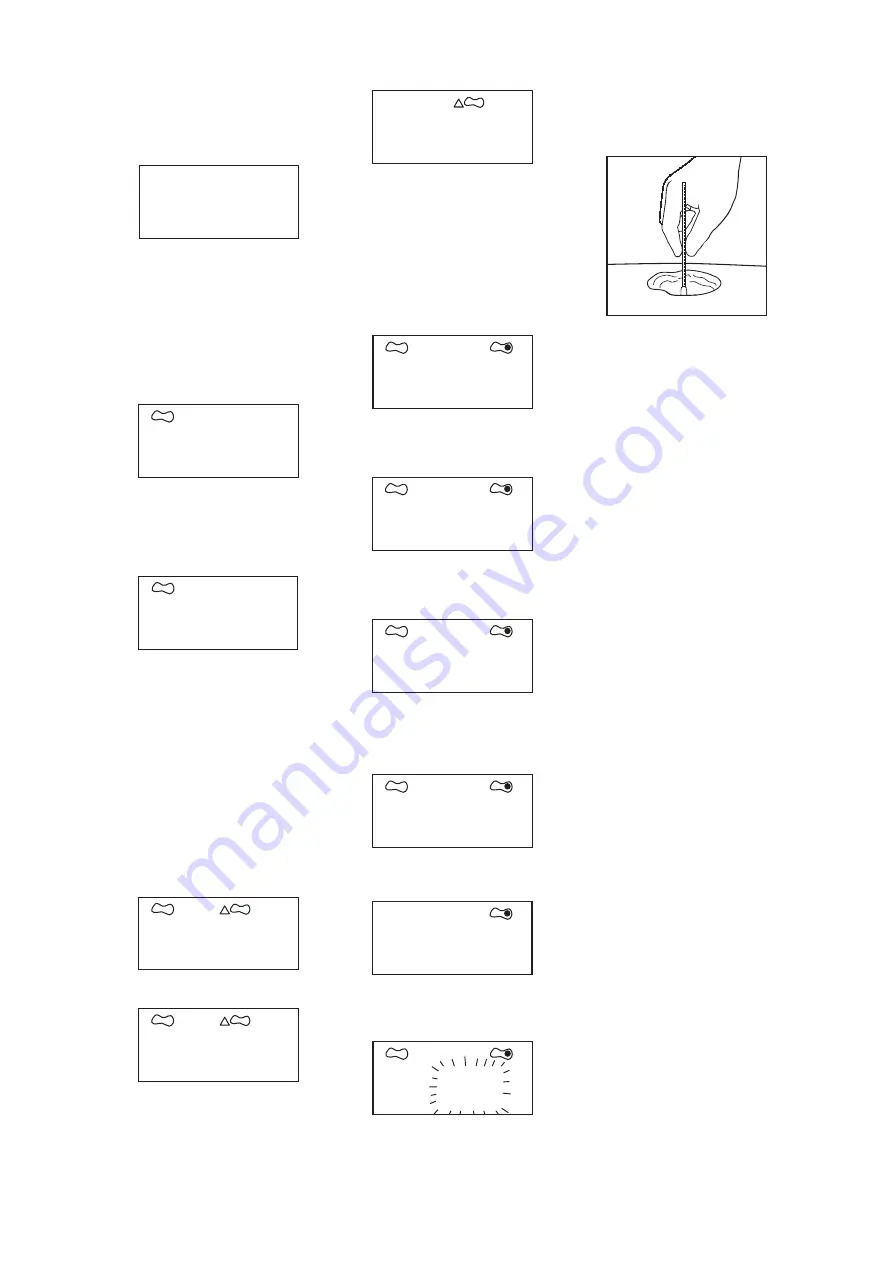
VISITRAK Depth
24. Place VISITRAK Depth into the deepest
part of the wound using minimal pressure and
at right angles to the wound bed and
surrounding skin (
Diagram H).
25. Using your thumb, mark where you would
expect the skin surface to be and assess the
depth using the scale on the depth indicator.
26. Record the wound depth in the box under
the wound depth symbol.
27. Dispose of VISITRAK Depth as clinical
waste.
cm
2
0
.
0
H
08
Содержание VISITRAK Depth
Страница 1: ...smith nephew VISITRAK Digital...


