background image


BACnet IoT Gateway Start-up Guide 

Page 43 of 60 

8.2  Registration Process  

Once SMC Cloud user credentials have been generated, the BACnet IoT Gateway can be registered onto 
the SMC Cloud server. 


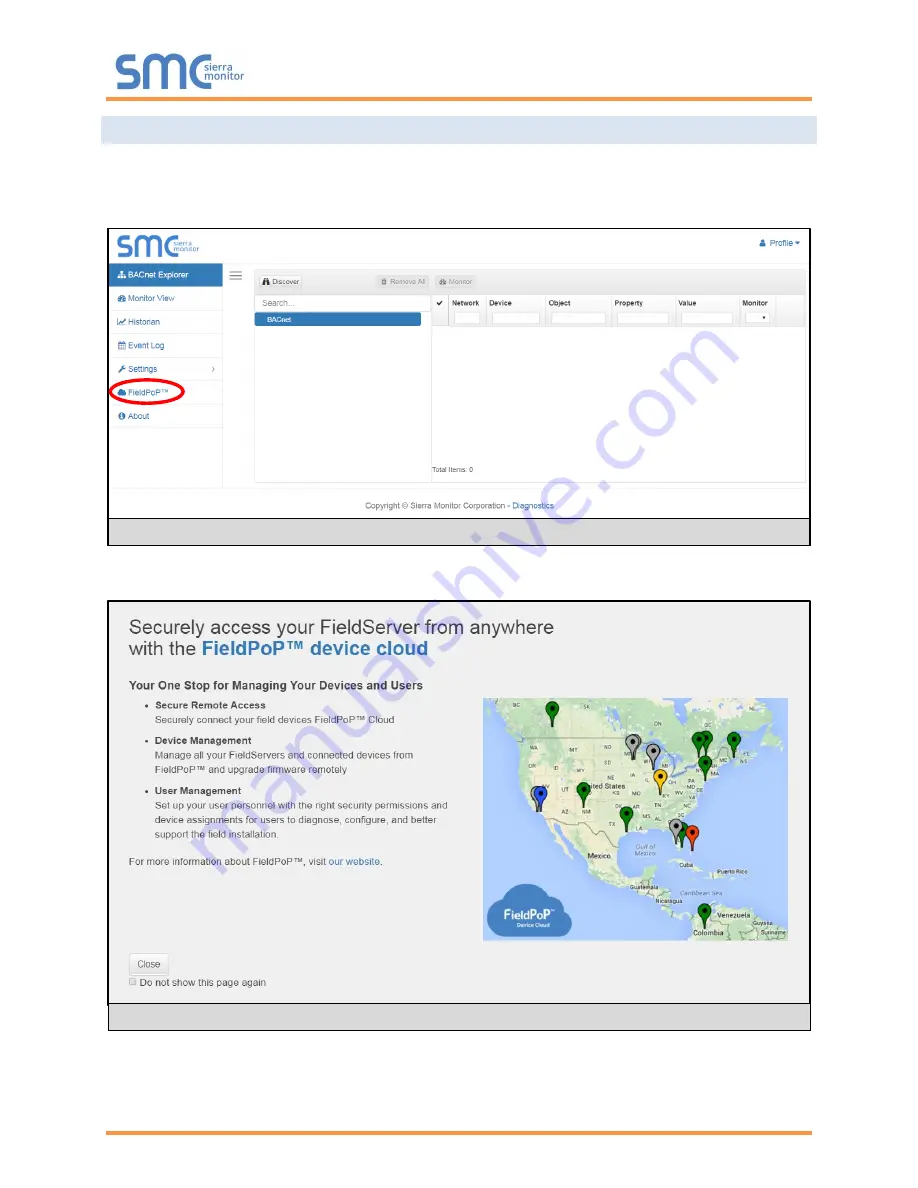
Click on the FieldPoP

 tab on the left-hand side of the screen. 


The following informational splash page will appear, click Close to view the registration page. 


Figure 54: BACnet IoT Gateway Landing Page 

– FieldPoP Tab 

Figure 55: Registration Information Page 

Содержание FS-IOT-BACX

Страница 1: ...Document Revision 1 C T18045 BACnet IoT Gateway FS IOT BACX Start up Guide APPLICABILITY EFFECTIVITY Effective for all systems manufactured after May 2018...

Страница 2: ...ation Please call us for any technical support needs related to the FieldServer product Sierra Monitor Corporation 1991 Tarob Court Milpitas CA 95035 Website www sierramonitor com U S Support Informat...

Страница 3: ...6 Configuring the BACnet IoT Gateway 20 6 1 Settings 20 6 1 1 Network Settings 20 6 1 2 Local Settings BACnet 22 6 1 3 Remote Settings Foreign Device Registration for BBMD Support 23 7 Using the BACne...

Страница 4: ...53 Appendix C 4 Checking Wiring and Settings 53 Appendix C 5 LED Diagnostics for Communications Between BACnet IoT Gateway and Devices 54 Appendix C 6 Before Contacting Technical Support Take a Diagno...

Страница 5: ...y Window 25 Figure 25 Device List 25 Figure 26 Device Sub items 26 Figure 27 Full Device Sub items 26 Figure 28 Simplified Device Details 27 Figure 29 Additional Device Details 27 Figure 30 Highlighte...

Страница 6: ...Landing Page 47 Figure 61 Specifications 48 Figure 62 BBMD Scenario 1 Interconnected IP Network 49 Figure 63 BBMD Scenario 2 NAT Routing 50 Figure 64 Ethernet Port Location 52 Figure 65 Error Messages...

Страница 7: ...well as all ports and support offered by the FS IOT BACW model Additionally the Gateway acts as a Wi Fi access point for modern web based configuration and remote access from any mobile device withou...

Страница 8: ...IoT Gateway Start up Guide Page 8 of 60 2 EQUIPMENT SETUP 2 1 Physical Dimensions 2 1 1 FS IOT BACW Drawing Figure 1 BACnet IoT Gateway FS IOT BACW Dimensions P1 Serial Port Power Port Wi Fi Antenna...

Страница 9: ...BACnet IoT Gateway Start up Guide Page 9 of 60 2 1 2 FS IOT BACC Drawing Figure 2 BACnet IoT Gateway FS IOT BACC Dimensions P1 Serial Port Power Port Cellular Antenna Wi Fi Antenna Socket...

Страница 10: ...e unit 2 3 Attaching the Antenna s Wi Fi Antenna If using the FS IOT BACW Wi Fi or FS IOT BACC Cellular Wi Fi models screw in the Wi Fi antenna to the front of the unit as shown in Figure 1 Cellular A...

Страница 11: ...n Insert the SIM card into the Micro SIM card slot with the chip on the SIM card facing away from the cellular antenna as shown below See Section 6 to complete cellular setting configuration SIM Card...

Страница 12: ...he number 4 DIP Switch is set to the left side Connect to the 3 pin connector as shown below The following Baud Rates are supported on the P1 Port 9600 19200 38400 57600 76800 3 1 1 1 Wiring RS 485 BM...

Страница 13: ...ring the BACnet IoT Gateway via the Web App To connect the BACnet IoT Gateway either connect the PC to the Gateway s Ethernet port or connect the Gateway and PC to an Ethernet switch Use CAT5 cables f...

Страница 14: ...d by 12 24V DC Power Requirement for BACnet IoT Gateway External Gateway Current Draw Type BACnet IoT Gateway Family 12V DC 24V DC FS IOT BACW Typical 170mA 100mA FS IOT BACW Maximum 240mA 140mA FS IO...

Страница 15: ...t to the BACnet IoT Gateway using the Toolbox click on the plus icon and enter the IP Address or enter the Internet IP Address into a web browser 5 1 Using the FieldServer Toolbox Install the Toolbox...

Страница 16: ...nput the BACnet IoT Gateway s IP Address The Default IP Address of the BACnet IoT Gateway is 192 168 1 24 Subnet Mask is 255 255 255 0 If the PC and the BACnet IoT Gateway are on different IP Networks...

Страница 17: ...enter user name and password informaiton into the Login Window NOTE The default user name is admin and default password is admin The BACnet IoT Gateway landing page will open once valid user informati...

Страница 18: ...ight corner of the window to exit the Profile Settings window 5 4 Add Additional Users Once in the Profile Settings window fill in the username the two password and role fields NOTE An administrator r...

Страница 19: ...iple fields that allow editing of user information Select the action to perform o Reset user password Fill in the two password fields and click the Reset Password button o Change user role Select the...

Страница 20: ...tings Saving will require the device to be restarted Refresh Click to clear the current settings before saving if settings have been saved the Refresh button is unavailable Defaults Click to change se...

Страница 21: ...age 21 of 60 Scroll down to view and edit the Wi Fi Client Wi Fi Access Point and Cellular Settings NOTE Cellular Settings are only available on FS IOT BACC models Figure 18 Network Settings Wi Fi Cli...

Страница 22: ...ss Legal values are 0 127 must be unique on the physical network Max Master The highest MAC address to scan for other MS TP master devices The default of 127 is guaranteed to discover all other MS TP...

Страница 23: ...Enabled checkbox under the Foreign Device Registration section of the BACnet Settings Enter the Remote BACnet Router s externally mapped IP Address and BACnet IP Port to the appropriate Foreign Device...

Страница 24: ...epresent each of the first four tabs that appear across the left side of the page once logged into the BACnet IoT Gateway and describe their functions 7 1 BACnet Explorer Click on the BACnet Explorer...

Страница 25: ...ery settings and click Discover to start the search NOTE The Discover All Devices or Discover All Networks checkboxes must be unchecked to search for a specific device range or network NOTE Allow the...

Страница 26: ...perties for the selected aspect of a device To view the full details of a device highlight the device directly in Figure 27 1991 WeatherLink_1 and click the Explore button that appears to the right of...

Страница 27: ...t side window If changes are expected since the last explore simply press the Refresh button that appears to right of individual properties to refresh the value NOTE The Gateway Search Bar will find d...

Страница 28: ...ear to the right of the highlighted device to open a dropdown menu Click Deep Explore to open the Deep Explore window Select which property types to find in the search NOTE The all selection must be u...

Страница 29: ...ce Info To check a device s properties information click the desired device to highlight it Then click the three white dots that appear to the right of the highlighted device to open a dropdown menu C...

Страница 30: ...properties are editable such as object name object description etc however this is not recommended because the BACnet IoT Gateway is not a Building Management System BMS To edit the present value sel...

Страница 31: ...art up Guide Page 31 of 60 Enter the appropriate change and click the Write button The window will close When the BACnet Explorer page appears the present value will be changed as specified Figure 32...

Страница 32: ...the expanded device properties on the BACnet Explorer page click the checkbox to the left of any property to track Once all properties are selected for that data type click the monitor button to set t...

Страница 33: ...ht of the listed data elements to open the Data Logging window Select the type of logging for the data point and set the logging interval COV threshold value or COV max scan time as they apply then cl...

Страница 34: ...o open the Settings window Click the Edit icon to open the Edit Poll Interval window Make desired changes and click Save NOTE Up to 30 days of data can be recorded and stored NOTE Click the Trash icon...

Страница 35: ...the page 7 3 1 Graph Data Logging Information Click on the Settings button to select data to graph Click the checkbox next to the data element to graph o Any combination of elements can be selected N...

Страница 36: ...tates each exact point and the location of that point on the graph via a blue dot To view a graph of only select dates time frames move the cursor towards the miniature version of the graph that is sh...

Страница 37: ...and dragging the wedge markers on either side of the highlighted portion of the miniature graph To go back to the full graph click on any faded portion of the miniature graph NOTE The data selected in...

Страница 38: ...View tab to go to the Monitor View page Click the bell icon to the right of the property to log and the Event Settings window will open Click on the Add Event button to change the event settings Set t...

Страница 39: ...rash icon to the right of any event to remove it Click the x in the top right corner of the Event Settings window to close it o The Monitor View page will now update the status column as events take p...

Страница 40: ...7 4 Event Log Click the Event Log tab on the left side of the page to open the Event Logger and view the events that have been set to track in Section 7 3 2 by time and type with a descriptive messag...

Страница 41: ...er s support team and follow the instructions below to set up login details The Welcome to FieldPoP email will appear as shown below NOTE If no SMC Cloud email was received check the spam junk folder...

Страница 42: ...lick the Complete Registration button and fill in user details accordingly Fill in the name phone number and password fields Click Save to save the user details Record the email account used and passw...

Страница 43: ...ted the BACnet IoT Gateway can be registered onto the SMC Cloud server Click on the FieldPoP tab on the left hand side of the screen The following informational splash page will appear click Close to...

Страница 44: ...appear o Follow the directions presented in the warning message and check that the DNS settings are set up with the following Domain Name Server DNS settings DNS1 8 8 8 8 DNS2 8 8 4 4 o Ensure that th...

Страница 45: ...one of the following o Enter the address in the address field o Click the Get Current Location button to auto populate NOTE This button will only work if location services have been enabled on the lo...

Страница 46: ...Page 46 of 60 Once the device has successfully been registered the following screen will appear listing the device details and additional information auto populated by the BACnet IoT Gateway Figure 5...

Страница 47: ...ww fieldpop io and type in the appropriate login information as per registration credentials If the login password is lost see the SMC Cloud Start up Guide for recovery instructions NOTE For additiona...

Страница 48: ...Rules Operation is subject to the following two conditions This device may not cause harmful interference This device must accept any interference received including interference that may cause undesi...

Страница 49: ...esigned to work together Forcing this situation would create extremely difficult to diagnose problems Appendix B 2 Understanding BACnet BBMD and NAT Routing The BACnet IoT Gateway does not support NAT...

Страница 50: ...they know them The only reachable address is the BBMD itself so this must also act as a BACnet IoT Gateway to forward traffic to the intended device When this is done the destination device s IP Addre...

Страница 51: ...PC s Device Manager List and that it is configured to run the TCP IP protocol Check that the IP netmask of the PC matches the BACnet IoT Gateway The Default IP Address of the BACnet IoT Gateway is 192...

Страница 52: ...and complete the installation Connect a standard CAT5 Ethernet cable between the user s PC and BACnet IoT Gateway Double click on the FS Toolbox Utility and click Discover Now on the splash page Chec...

Страница 53: ...the Serial side If the Tx Rx LEDs are not flashing rapidly then there is a COM issue To fix this problem check the following Visual observations of LEDs on the BACnet IoT Gateway Appendix C 5 Check ba...

Страница 54: ...tem error on unit If this occurs immediately report the related system error shown on the error screen of the FS GUI to support for evaluation PWR This is the power light and should show steady green...

Страница 55: ...m for evaluation The Diagnostic Capture will allow us to rapidly diagnose the problem Open the FieldServer FS GUI page Click on Diagnostics in the Navigation panel Go to Full Diagnostic and select the...

Страница 56: ...efault IP Address is 192 168 1 24 NOTE Use the FS Toolbox utility if the IP Address is unknown Appendix C 2 3 Click on the Diagnostics Debugging button 4 In the Navigation Tree on the left hand side d...

Страница 57: ...ricted access to the BACnet IoT Gateway The User account can view any BACnet IoT Gateway information but cannot make any changes or restart the BACnet IoT Gateway The password needs to be a minimum of...

Страница 58: ...eds to be modified to allow the PC to register bridges on SMC Cloud NOTE This problem is specific to KES10 Kaspersky 2017 does not have this problem To fix the problem the BACnet IoT Gateway http 192...

Страница 59: ...60dBm Excellent 60dBm Excellent 70dBm Very good 70dBm Very good 80dBm Good 80dBm Good 80dBm Weak 90dBm Weak 90dBm Spotty not good for data Figure 71 Wi Fi Cellular Signal Strength Listing NOTE If the...

Страница 60: ...ion or on which original identification marks have been removed or altered This Limited Warranty also will not apply to interconnecting cables or wires consumables or to any damage resulting from batt...

Отзывы: