background image

Setting Up Your 2000i

19

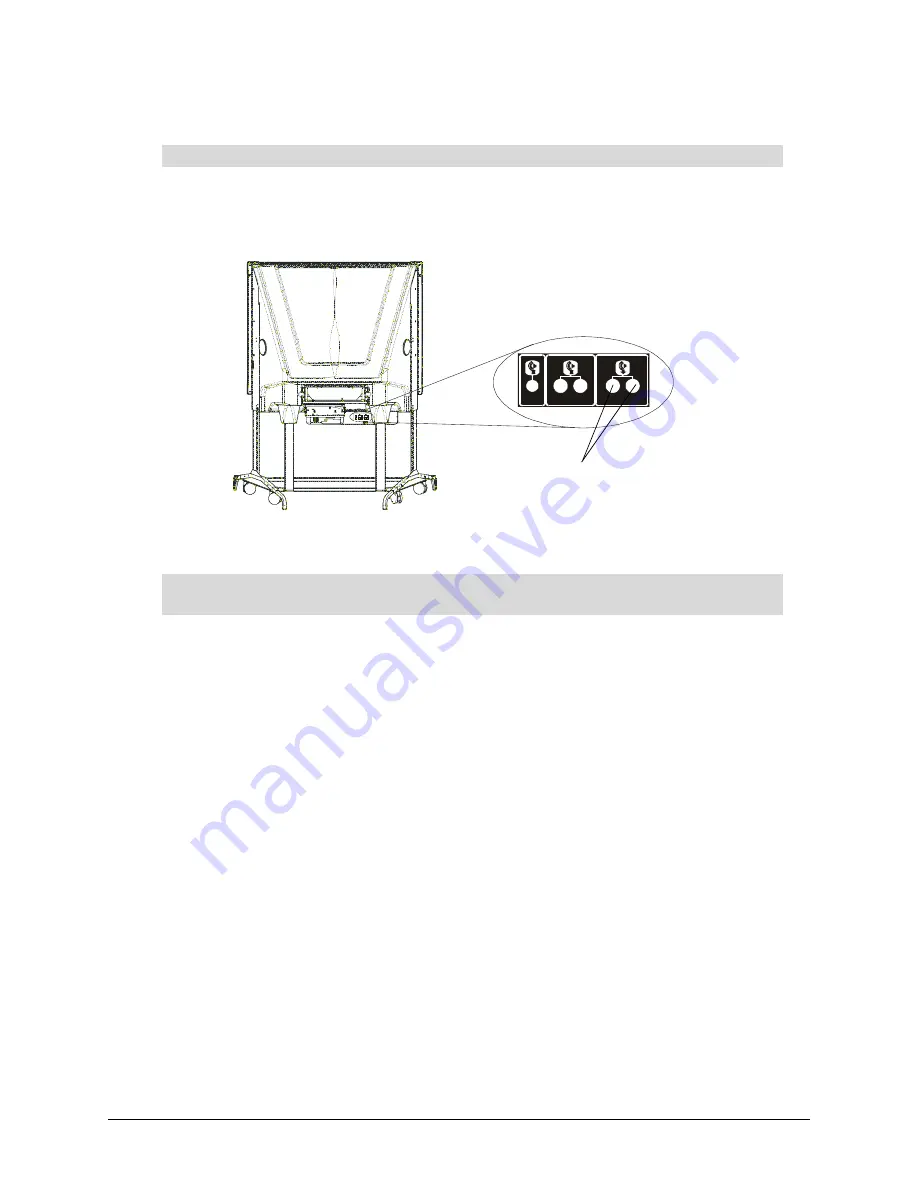
Connecting an External Sound System

Connect standard red and white RCA audio cables (not provided) from the 

RCA Audio

 inputs on 

the external sound system to the two 

Audio OUT

 jacks on the rear of the 2000i. Keep your right 

and left channel connections correct for stereo sound.

Connecting an External Monitor or Projector

Connect an HD DB15 video cable (not provided) from the external projector or monitor to the 

Monitor OUT

 port on the back of the projector. This connection is for RGB output only.

To deliver preamplified (or line level) sound to an external room sound system

To direct the RGB output from the host computer or guest laptop to an external 
projector or monitor

Computer 2

Audio

Auxiliary

Audio In

Audio

Out

Com

pu

t e

r  

2

Aud

i o

Aux

i l

i

ar y

Aud

i o

  I

n

Aud

i o

O

ut

Connect RCA audio cables from the 
external sound system here

Содержание SMART Board 2000i-DVS

Страница 1: ...Interactive Whiteboard Guide Installation SMART Board 2000i TM 2000i DVX 2000i DVS...

Страница 2: ...the user will be required to correct the interference at his own expense SMART Board Notebook DViT LinQ X Port and the SMART logo are trademarks of SMART Technologies Inc Windows is either a registere...

Страница 3: ...ctor que se encuentra en el interior de la cabina es una fuente de luz de alta luminosidad No mire fija ni directamente al haz de luz Evite que los ni os fijen la vista en el haz de luz Der Projektor...

Страница 4: ...uld be used only with European TN and TT power distribution systems The 2000i is not suitable for older IT type power distribution systems found in some European countries This system IT type is widel...

Страница 5: ...sistema el ctrico que posee p ngase en contacto con personal cualificado a la hora de instalar su modelo 2000i WARNUNG F R EUROP ISCHE KUNDEN Das 2000i darf nur mit europ ischen TN und TT Netzverteil...

Страница 6: ...dge the rear surface of the screen dab it carefully with a soft cloth and alcohol free glass cleaner Do not spray glass cleaner directly on the back of the screen spray it lightly on the cloth and the...

Страница 7: ...sert the plug into a dusty outlet Unplug the cabinet before you install or service any components This product has a three wire grounding type plug which will only fit into an AC grounding type power...

Страница 8: ...vi Important Information...

Страница 9: ...or Projector 19 Finalizing the Installation 21 Adjusting the Projected Image 21 Configuring the Computer Settings 27 Installing SMART Board Software 29 Configuring the Interactive Whiteboard 29 Orien...

Страница 10: ...oubleshooting 47 Calibrating the Cameras 49 Customer Support 51 Contacting SMART Technical Support 51 General Inquiries 51 Returning Defective Merchandise 51 Registration 52 Sending Feedback 52 Obtain...

Страница 11: ...uter which translates it to mouse clicks or digital ink Features A touch sensitive rear projection interactive whiteboard that enables you to do everything you can do at a computer workstation open fi...

Страница 12: ...2000i Getting to Know Your 2000i Removable View Port Projector Lockable Casters 4 Storage Tray Your Computer Extendable Anti Tip Feet 4 SMART Pen Tray Laptop Shelf Height Adjustment Handle Projector C...

Страница 13: ...y detect dark objects If you need to use a different pen choose one with a dark tip Press the top pen tray button to make the SMART Keyboard appear for on screen typing and handwriting recognition Pre...

Страница 14: ...570 670 User s Manual The Zoom lever does not change the size of the projected image Instead it adjusts image focus The ring no longer adjusts focus and you should not move it under any circumstances...

Страница 15: ...y determine the best resolution for the current RGB input signal compensating for resolution differences among various input devices such as guest laptops 6 Click OK NOTE All other settings are the NE...

Страница 16: ...jector itself remains on To put the projector into standby mode press the Lamp Off button on the control panel For the next three minutes the lamp is in a reversible standby mode The screen appears bl...

Страница 17: ...press the Lamp Off button in the control panel at the end of the day and your projector will remain in standby mode until you press the Lamp On button the next day NOTE You can also configure the comp...

Страница 18: ...the two display sources Note there is a three second delay before the alternate display source appears If you switch to another source such as the internal computer and then press this button the las...

Страница 19: ...unit from its shipping carton To do this follow the Unpacking Instructions 2 Unpack the remaining contents of the shipping carton and wheel the unit to a location that s within reach of a power source...

Страница 20: ...oom to room NOTE These straps won t secure the computer during cabinet shipment so if you need to transport the 2000i remove the computer before you ship it WARNING Lock the casters and extend the ant...

Страница 21: ...ble to the computer s Audio Line OUT connector 5 Connect the Computer 1 Serial cable to an available serial port on the computer NOTE If your computer has no available serial port connect the SMART US...

Страница 22: ...steadily illuminated when the projector lamp has powered up When an image displays adjust the computer power settings and the image alignment on the interactive screen Then install SMART Board softwa...

Страница 23: ...e the height adjustment handle for laptop use or higher up on the frame for use with a videoconferencing camera You can install the shelf on either side of the unit 1 Remove the plastic hole covers at...

Страница 24: ...ADP cable from SMART Technologies to convert USB to serial Complete instructions for installing the X Port 20 switch and connecting a guest laptop are in the X Port 20 Switch Installation Guide that...

Страница 25: ...nnect the yellow RCA video connector on an RCA composite video cable not provided to the Video Output jack on the VCR DVD player This jack may be labeled To Monitor 3 Plug the other end of the cable i...

Страница 26: ...ime However you can link the DVD player and VCR audio connections as described on page 18 5 Connect the power cable to an available outlet or power bar not supplied 6 Turn on the projector 7 Press the...

Страница 27: ...s from both the VCR and a DVD player to the Connection Panel The panel can accommodate only one external audio source at a time However you can link the audio connections of the DVD player and VCR as...

Страница 28: ...d white RCA stereo audio cables not provided from the RCA Audio or Audio OUT outputs on the VCR to the two Auxiliary Audio IN jacks on the rear of the 2000i Keep your right and left channel connection...

Страница 29: ...ctor Connect an HD DB15 video cable not provided from the external projector or monitor to the Monitor OUT port on the back of the projector This connection is for RGB output only To deliver preamplif...

Страница 30: ...20 Setting Up Your 2000i...

Страница 31: ...ally and adjusting the image size you must watch the image on the back of the screen while making adjustments You ll also need to remove the view port cover attached with hook and loop fastener strips...

Страница 32: ...pull it away from the unit You can now access the projector to perform the following image adjustment procedures 1 Crouch behind the projector and look at the projected image through the view port To...

Страница 33: ...ide use the supplied 7 16 nut driver to loosen or tighten the nut that s located on the right side of the projector plate as required see the following figure 1 Crouch behind the projector and look at...

Страница 34: ...rough the view port 2 Using the security key TR20 TORX tamper recess key from the accessory kit loosen the three TORX M4 security screws that secure the projector to the projector plate To change the...

Страница 35: ...rity key through the two access holes in the projector cover see the following figure NOTE As you maneuver the security key through these two access holes watch it from the back to see when it engages...

Страница 36: ...ning at the top of the cap and carefully pry the cap off 4 Loosen and tighten the nut inside the access hole with the supplied 7 16 nut driver to adjust the image vertically 5 Replace the plastic cap...

Страница 37: ...ettings For optimal configuration use these recommended settings for the computer inside the 2000i With these settings you can balance ease of use while conserving energy and preserving the projector...

Страница 38: ...on Windows NT 4 0 systems so you must leave the computer on with full power or shut it down at the end of the day and start it up again It s very important that the computer and projector resolutions...

Страница 39: ...puters click the SMART Installer icon to open your CD drive and double click the software application file Configuring the Interactive Whiteboard Normally the internal computer s serial or USB port is...

Страница 40: ...er when you touch the interactive whiteboard You can also increase the orientation level for even greater touch precision 1 Press the SMART Board icon in the system tray Windows computers or in the Do...

Страница 41: ...3 Select Alignment Orientation Precision from the list 4 Press Quick 4 points or Fine 20 points 5 Press OK 6 Perform the 4 point or 20 point orientation NOTE This setting will remain in effect for all...

Страница 42: ...32 Finalizing the Installation...

Страница 43: ...d then entering your user name and password at the logon screen NOTE To preserve the computer s hard drive s and the projector lamp you may want to put the computer hard drive and the monitor interact...

Страница 44: ...ce If the blue No Input screen remains turn the computer on or press the computer s reset button and log on as usual using the connected keyboard Screen is black On LED is blinking slowly No action is...

Страница 45: ...then turns off To skip the three minute reversible standby period press and hold the Lamp Off button for three seconds Release the button The lamp cools down for 60 seconds and then turns off CAUTION...

Страница 46: ...nd enters a 60 second cool down period 3 When the cooling fan stops flip the power switch on the back of the projector 4 Disconnect the 2000i power cable from the wall power outlet Adjusting the Heigh...

Страница 47: ...00i retains settings you made for the first input source for when you switch back 1 Press and hold the Volume Up button on the control panel to increase the volume for the current source 2 Press and h...

Страница 48: ...s and all the buttons on the control panel are disabled during that time Press the VCR DVD Player button on the control panel If both a VCR composite RCA connection and a DVD player S video connection...

Страница 49: ...hen SMART Board software is installed and running on the internal computer see page 29 The internal computer source must also be the current active source For more information on using the Floating To...

Страница 50: ...ct Screen Capture Toolbar from Notebook software s View menu and then minimize the Notebook software window A three button Screen Capture toolbar will float on top of all your applications Now after w...

Страница 51: ...liarize yourself with a different computer And because you can take advantage of the 2000i s interactive tools you can deliver a dynamic interactive presentation To establish a communication link betw...

Страница 52: ...42 Basic Operations...

Страница 53: ...een is well protected from handling by its location on the inside of the unit However if it must be dusted or if a mark has been made on its surface dab it gently with a soft cloth that s sprayed with...

Страница 54: ...Please replace the lamp To find out how many hours of lamp use remain press the Menu button on the remote control or projector and select Information Page 1 Remaining Lamp Time To replace the lamp an...

Страница 55: ...ables you can return each cable to its correct port as indicated by its label However your configuration will be different if you have installed other equipment WARNING After you turn off the projecto...

Страница 56: ...each short edge and pull it away from the unit 7 Using a pencil mark the projector plate with the current position of the three screws that attach the projector to the plate 8 Loosen but do not remove...

Страница 57: ...eplace the projector lamp as described on page 53 of the NEC VT470 570 670 User s Manual 13 Replace the projector by reversing steps 1 through 10 Troubleshooting Many problems result from incorrect ca...

Страница 58: ...blem Cause Possible Resolution There s no touch control on the interactive screen Software problem Make sure SMART Board software is running Is there a SMART Board icon in the system tray Windows comp...

Страница 59: ...gles will intersect If the cameras lose their alignment for any reason those angles no longer intersect at all points targets aren t detected and you may experience broken ink gaps in your writing or...

Страница 60: ...50 Maintenance and Troubleshooting...

Страница 61: ...tem if applicable General Inquiries Main Switchboard 1 888 42 SMART toll free in Canada U S or 1 403 245 0333 all other countries Fax 1 403 228 2500 E mail info smarttech com Address SMART Technologie...

Страница 62: ...ter online at www smarttech com registration Sending Feedback You can help us improve our technical documentation by e mailing your comments to TechnicalDocumentation smarttech com Obtaining More Info...

Страница 63: ...Whiteboard 43 Other Components 43 Projector 43 Computer Settings Configuring 27 Recommended Settings 28 Configuring Computer Settings 27 Interactive Whiteboard 29 Connecting Computer 11 DVD Player 14...

Страница 64: ...ools 39 Orienting the Interactive Whiteboard 30 P Pen Tray Buttons 3 Pen Tray Features 3 Pen Tray Pen 3 Port Selecting 30 Positioning the 2000i 9 Projector Adjusting the Focus 5 Changing the Display S...

Страница 65: ...Standby 35 Starting Up the 2000i 33 Startup Scenarios 34 Switching to DVD Player 38 Guest Laptop 39 Notebook Software 39 VCR 38 T Tools Floating Tools 40 41 Opening Floating Tools 39 SMART Board Tool...

Страница 66: ...56 Index...

Страница 67: ...REV A0 SMART Technologies Inc 1207 11 Avenue SW Suite 300 Calgary AB T3C 0M5 CANADA Support 1 403 228 5940 or Toll Free 1 866 518 6791 Canada U S Support Fax 1 403 806 1256 support smarttech com www s...

Отзывы: