22
20
3.
4.
Do not use RS-232 cable other than the one provided to connect
between the hand control and your computer. It may damage your
computer or the hand control. If you are making your own cable based
on the information provided in Appendix B, make sure that only pin 2, 3
and 5 connect to the com connector on your computer.
Do not disengage the SynScan AZ unit before you disengage the program. Doing so may cause
some programs to freeze.
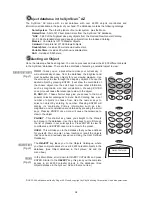
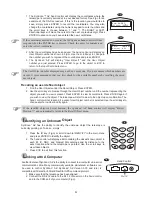
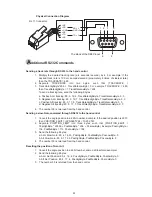
1= EXPD+
2= TD
3= GND
4= EXPD-
5= RD
6= +12V
RJ-11 Pin-outs
6 5 4 3 2 1
In the planetarium software of your choice, choose "Sky-Watcher
Mount, Celestron NexStar 5i/8i" or "Celestron NexStar 8/9/11" in
the driver setup menu and follow the instructions provided by
your program to establish the connection to the telescope. The
SynScan
TM
AZ should be under the full control of your computer
once the connection is successfully established.
When you are finished, follow the instructions provided by your
software to close the connection to the telescope.
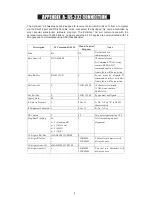
See Appendix C for
more information on
RS-232 connection.
U
pdating the SynScan
TM
Firmware
From version 3.0 onward, the SynScan
TM
AZ firmware is user upgradable. Users can download the latest
version of the SynScan
TM
AZ firmware from the Sky-Watcher web site and easily update their hand controls.
System requirements
SynScan
TM
AZ Hand Control of version 3.0.or later.
Windows95 or later
An available RS-232C communication port on the PC.
PC link cable that comes with the SynScan
TM
AZ hand control.
DC power supply with 7.5~15V/100mA (min.) output. Power plug should be 2.1mm diameter, tip
positive.
Create a folder for all SynScan
TM
AZ related files on your computer and name it SynScan.
Visit the Firmware Download Support Page of the Sky-Watcher website at:
http://www.SkywatcherTelescope.net.
Download and save the SynScan
TM
Firmware Loader to the SynScan folder on your computer. You
may create a shortcut on the desktop for quick access in the future. You will only need to download
this software once. Once it is saved on your computer, only the firmware data file is needed for
future updates.
Download and save the firmware data file named SynScanVXXXXAZ.ssf to the SynScan folder.
(The XXXX indicates the version number of the firmware.)
1.
2.
3.
4.
Preparing your PC for the update
Visit the Sky-Watcher website frequently to check for the latest firmware.
Plug the RJ-11 end of the PC link cable into the jack in the middle socket on
the hand control (Fig.e). Push the connector into the hand control until it clicks
into place. Plug the other end of the cable, the DB9 connector, to the RS-232
port on your PC.
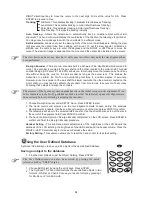
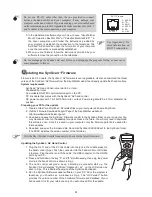
Press and hold down the key "0" and "8" simultaneously, then plug the power
cord into the hand control, as shown in Fig.p.
The hand control will give a beep, indicating a successful start up. The
SynScan
TM
AZ will display: "SynScan
TM
Update Ver. x.x" on the LCD screen, as
seen in Fig.q. This indicates the version of the SynScan Bootloader.
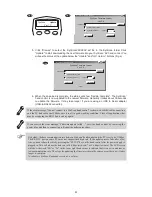
Run the SynScanFirmwareLoader software on your PC. Once the program is
launched, you should see a window as Fig.p. The "HC.Version" button
provides the version number of the hardware, firmware and database of your
hand control. It is for your reference only. You will not need it for the update.
1.
2.
3.
4.
Updating the SynScan
TM
AZ Hand Control
Fig.p
ESC
SETUP
ENTER
1
2
3
4
5
6
7
8
9
0
TOUR
UTILITY
RATE
M
IC
NGC
PLANET
USER
OBJECT
ID
Содержание DOBSONIAN SYNSCAN
Страница 28: ...28 III...


