background image

21

19

The SynScan™ AZ hand control will display the coordinates where the 

telescope is currently pointed at in your desired format. See Fig.l for an 

example of the RA-Dec readout. If this is the location you would like to 

save,  simply  press 

ENTER

  to  record  the  coordinates.  You  may  also 

change the coordinates using the numeric keypad to enter numbers and 

the  scroll  keys  to  choose  between  “+”  and  “-”.  The  RIGHT  or  LEFT 

directional keys will move the cursor to the next or previous digit. Press 

ENTER

 to save once you have entered the new coordinates.

1.

After the coordinates have been saved, the hand control will display an 

User Object number as shown in Fig.m. Use the scroll keys to change to 

the number you wish to represent the coordinates and press 

ENTER

The  SynScan

TM

  AZ  will  display  "View  Object?"  and  the  User  Object 

number  you  just  entered.  Press 

ENTER

  to  go  to  the  object  or 

ESC

  to 

return to the Input Coordinate menu.

2.

3.

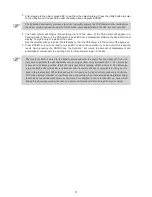
Fig.l

Enter RA-DEC:

22h46.1m  +90 00

If the coordinates entered do not exist, the AZ SynScan hand control will not 

respond when the ENTER key is pressed. Check the entry for mistake and 

enter the correct coordinates.  

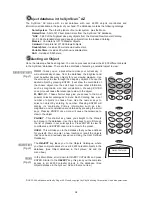
Fig.m 

Save?      <ENTER>

User obj.   # 03

The User Object number displayed may not be a vacant one. If you are unsure which numbers are 

vacant, it is recommended that you first check for the available numbers by recalling the saved 

user objects. 

Find the User Objects under the Recall Object. Press 

ENTER

Use the scroll keys to browse through the User Object number until the number representing the 

object you wish to view is present. Press 

ENTER

 to view its coordinate. Press 

ENTER

 again if 

you wish to view the object. The telescope will start to slew to the object upon confirmation. The 

hand control will not respond if a vacant User Object number is selected. Use the scroll keys to 

choose another number and try again.

1.

2.

Recalling an user defined object 

If  the  recalled  object  is  below  horizon,  the  SynScan

TM

 AZ  hand  control  will  display  "Below 

Horizon !!" and automatically return to the Recall Object menu.

I

dentifying an Unknown Object

SynScan

TM

 AZ  has  the  ability  to  identify  the  unknown  object  the  telescope  is 

currently pointing at. To do so, simply: 

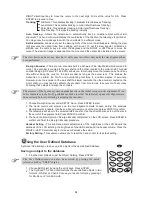
Press the 

ID

 key (Fig.n) or scroll down to 

IDENTIFY

 in the main menu 

and press 

ENTER 

to identify the object.

The hand control will display a list containing the closest known object in 

each  M,  IC,  NGC,  and  Named  Star  catalogs  and  its  distance  to  the 

exact  location  where  the  telescope  is  pointed.  Use  the  scroll  keys  to 

view these objects.

Press 

ESC

 to exit from this function.

1.

2.

3.

Fig.n

L

inking with A Computer

Another feature of SynScan

TM

 AZ is the ability to connect to a computer via a serial 

communication  cable.  Many  commercially  available  planetarium  softwares  can 

be  used  to  control  SynScan

TM

  AZ.  SynScan

TM

  AZ  Version  3.00  and  later  is 

compatible with Celestron 5i/8i and NexStar GPS command protocol. 

Make sure that the telescope has been aligned.

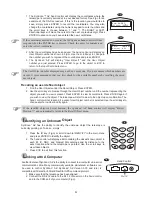
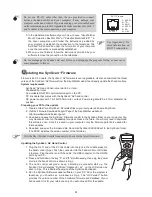
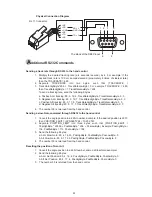
Connect the RS-232 cable to the RJ-12 connector on the hand control 

and to the COM-port of your computer (Fig.o).

1.

2.

Fig.o

RJ- 12

Hand Control

Содержание DOBSONIAN SYNSCAN

Страница 1: ...INSTRUCTION MANUAL DOBSONIAN SYNSCAN 8 10 12 14 16 180610V6 3 08 ESC SETUP ENTER 1 2 3 4 5 6 7 8 9 0 TO UR UTILITY RATE M IC NGC PLA NET USER OBJECT ID 240412V1...

Страница 2: ...ork to allow room for all parts to be unpacked While every effort has been made to ensure that the information contained in this instruction manual is accurate and complete no liability can be accepte...

Страница 3: ...ew M5x60 Large washer for M5 screw Hex socket flat head screw 7x50 Hex socket head cap screw M8x25 Optical tube locking screw Allen Wrenches 2mm 4mm 6mm Phillips screw driver Fastening bolts and washe...

Страница 4: ...ide panel Reinforce board Hex socket flat head screw 7x50 Round base assembly the bottom side Foot 12 Locate the hand control holder Using the two screws provided attach the holder to the latitude mot...

Страница 5: ...x60 Large washer for M5 screw Hex socket head cap screw M5x60 Large washer for M5 screw Left side panel assembly Hex socket head cap screw M5x60 Large washer for M5 screw Left side panel assembly Hex...

Страница 6: ...screw 7X50 Reinforce board Left side panel assembly When using GoTo and tracking function please tighten the handwheel Front panel L eft side panel Mount setup Locate the hand control holder Using the...

Страница 7: ...rear end ring attached to the lower section of the optical tube Simply unthread and remove the eight Phillips head screws that connect the end ring to the tube Figure 1 and then pull the end ring off...

Страница 8: ...threaded holes in the edge of the end ring with the holes in the end of the tube Then lower the entire assembly onto the tube Be careful to avoid finger pinching during this step There may be a bulge...

Страница 9: ...s of the tube to the mounting platforms on the inner side of the side boards Lower the telescope tube and carefully place it on the base Tighten the locking screw to secure the tube in place Loosen th...

Страница 10: ...er can now be turned in and out to focus When focus is reached lock it in position with the locking ring Fig b Choose a distant object that is at least 500 yards away and point the main telescope at i...

Страница 11: ...object or even tour the skies at the touch of a button The user friendly menu system allows automatic slewing to over 42 900 objects Even an inexperienced astronomer can master its variety of feature...

Страница 12: ...eft and right directional keys can also be used to move the text cursor when entering data to the hand control Dual Purpose keys Scroll Keys Fig g 1 These keys range from the middle to the bottom of t...

Страница 13: ...R again to confirm After entering the current time the SynScanTM AZ will prompt DAYLIGHT SAVING Use the scroll keys to make the selection and press ENTER to confirm After setting the daylight saving S...

Страница 14: ...m Enter your current local time using the 24 hr time mode e g 2 00PM 14 00 Press ENTER to view the time you just entered If it is incorrect press ESC to go back to the previous screen If correct press...

Страница 15: ...al divisions in azimuth angle from the north northeast east southeast to northwest etc Select the region where the chosen star is located and press ENTER Each division covers 90 degree span in azimuth...

Страница 16: ...r the object in the field of the eyepiece and press ENTER to confirm If both alignment stars are properly aligned Alignment Successful will display on the LCD Otherwise the warning Alignment Failed wi...

Страница 17: ...ar region in the sky The SynScan hand control provides a short cut to quickly activate the PAE function After exiting from the object catalog instead of using the Utility menu press and hold down the...

Страница 18: ...g has a set number of objects to choose from Use the numeric keys to select an object by entering its number Pressing ENTER will display its coordinate Primary information such as size magnitude and c...

Страница 19: ...n the hand control in both Celsius and Fahrenheit Power Voltage This displays the power voltage detected from hand control in Volts HOME position This is the position where both Ax1 and Ax2 reads 0 If...

Страница 20: ...next digit First set the value for R A Press ENTER to proceed to Dec Tracking Handset Setting This submenu allows adjustments of the brightness of the LCD backlit the darkness of the LCD lettering th...

Страница 21: ...croll keys to browse through the User Object number until the number representing the object you wish to view is present Press ENTER to view its coordinate Press ENTER again if you wish to view the ob...

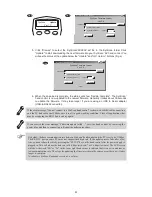
Страница 22: ...ve Create a folder for all SynScanTM AZ related files on your computer and name it SynScan Visit the Firmware Download Support Page of the Sky Watcher website at http www SkywatcherTelescope net Downl...

Страница 23: ...he hand control by removing the power plug and then re connecting it Repeat the update procedure By default the data communication rate between SynScanTM hand control and the PC is set to be 115kbps T...

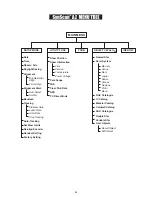
Страница 24: ...ow Information Park Scope PAE Clear PAE Data GPS PC Direct Mode Sidereal Rate Lunar Rate Solar Rate Stop Tracking Auto Select Sort By Time Version Temperature Power Voltage UTILITY FUNC IDENTIFY Named...

Страница 25: ...e 7 600X Rate 8 800X Rate 9 1000X Sidereal Lunar Solar Dual Axes Tracking Brightest Star Alignment Two Star Alignment 25 user defined objects Complete M NGC and IC catalog partial SAO catalogues total...

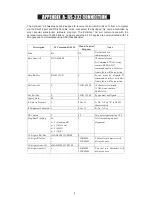
Страница 26: ...mmand conflicts with slew limits there will be no action Goto Ra Dec R34B 12CE Scope must be aligned If command conflicts with slew limits there will be no action Get Azm Alt Z 12AB 4000 10 characters...

Страница 27: ...yte TrackRateLowByte 0 0 d Negative Alt tracking 80 3 17 7 TrackRateHighByte TrackRateLowByte 0 0 The number 35 is returned from the hand control 4 Sending a slow Goto command through RS232 to the han...

Страница 28: ...28 III...
Страница 29: ...FILTER FOR VIEWING THE SUN WHEN OBSERVING THE SUN PLACE A DUST CAP OVER YOUR FINDERSCOPE TO PROTECT IT FROM EXPOSURE NEVER USE AN EYEPIECE TYPE SOLAR FILTER AND NEVER USE YOUR TELESCOPE TO PROJECT SUN...

Отзывы: