background image

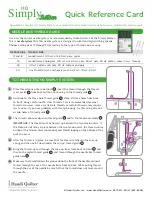
BOBBIN WINDING

WINDING THE BOBBIN

Pivot spool pin into highest position.

2.Pass thread from spool through thread guides as shown.

3.Pull end of thread through hole in bobbin as shown.

4.Move bobbin winder shaft to the left. Place bobbin onto shaft till it clicks into position
   with the end of thread coming from top of bobbin. Push bobbin winder
   shaft to right until it clicks. Hold onto end of thread.

5.Start machine to wind the bobbin. Stop machine after a few turns to trim the
   thread tail with scissors. Bobbin will stop turning when completely filled.
   Cut the thread and push shaft to the left to remove bobbin.
 

4

5

3

2

1

REMOVING THE BOBBIN

1.Remove the bobbin cover by sliding the
   release lever to right and push down
   the left corner of bobbin cover at the 
   same time. 

2.Remove  the bobbin from the machine.

Place a spool of thread on the spool pin.

Secure it with the spool cap to ensure smooth flow of thread.
Use a spool cap closest in size to the spool of thread being used.

1.Raise presser foot lever.

-11-

2

1

Содержание HSM-2517

Страница 1: ......

Страница 2: ......

Страница 3: ......

Страница 4: ...ight switch 15 Plug socket 16 Presser foot lever 17 Thread cutter 18 Automatic needle threader 19 Needle 20 Presser foot screw 21 Thread guide 22 Needle clamp screw 23 Foot release lever 24 Presser fo...

Страница 5: ...ge 7 Buttonhole opener with brush 8 Oiler 9 Buttonhole Foot 10 Overcasting Foot 11 Zipper Foot 12 Straight stitch foot 1 2 3 4 OPENING THE ACCESSORY CASE To open the accessory case lift up on the top...

Страница 6: ...the left To attach insert to the right b OPENING THE ACCESSORY CASE Hook your finger to the left side of accessory case and pull toward you DUST COVER OPTIONAL Cover the machine with dust cover when i...

Страница 7: ...weight cotton 2 Needle illustration 1 Flat side 3 Stop 6 Tighten the needle clamp screw firmly with the screw driver 5 Push the needle up as far as itcan go 4 Insert the new needle into the needle cl...

Страница 8: ...nect the plug of the foot control into the machine socket and your wall outlet as illustrated 1 2 OFF ON Power light switch POWER LIGHT SWITCH Your machine will not operate until the power light switc...

Страница 9: ...ERTING ZIPPERS DOUBLE OVERLOCK ELASTIC OVERLOCK STRETCH OVERLOCK FEATHER BUTTONHOLE FEATHER OVERLOCK G 1 H 2 4 F E D C 1 4 3 3 5 M S 1 5 D C B B B C INDICATOR TRIPLE STRAIGHT RICK RACK SHELL BLIND ZIG...

Страница 10: ...foot and lower the presser foot lever you until the needle enters the fabric presser foot toward the back of the machine Needle position for straight stitching 5 L 4 3 1 1 2 2 1 4 3 M 3 R 2 Straight s...

Страница 11: ...ELECTOR AND INDICATOR 5 4 panel 6 3 STITCH WIDTH NEEDLE POSITION DIAL shows the center position with the same control dial The triangle marking between 2 and 3 The width of all the stitches produced o...

Страница 12: ...rt machine to wind the bobbin Stop machine after a few turns to trim the thread tail with scissors Bobbin will stop turning when completely filled Cut the thread and push shaft to the left to remove b...

Страница 13: ...aw thread into notch A 3 Pull thread toward the left and along the inside of spring B until it slips into notch C being sure that thread does not slip out of notch A C B A 12 4 Pull thread out about 1...

Страница 14: ...Pull loop of thread to back of machine 3 Release the lever and needle will be 2 Guide thread into hooked end and pull push lever until the hooked end passes 1 Pull down lever and hook thread to Raise...

Страница 15: ...ng Reverse the machine at the end your seams to go forward This is called back tacking stitches in reverse Then allow the machine Secure your seams by taking the first few INSERTING ZIPPERS the left s...

Страница 16: ...ADJUSTING THE THREAD TENSIONS 3 4 2 3 4 2 3 4 2 3 4 2 3 4 2...

Страница 17: ...ches and Fig 3 4 Press both sides of the finished hem The right side should barely show the stitches titch just catches the fold turn the screw on the foot to adjust the guide so the s Fig 4 of the he...

Страница 18: ...ft fabrics in one operation It also produces a delicate shell hem on lingerie SEAM AND OVERCAST IN ONE SHELL TUCKS raw edge and other fine garments D Stitch Width 1 5 Stitch Length 1 4 Stitch Selector...

Страница 19: ...decorative stitch used in sleeves or fronts of together leave a little space in between To prepare the fabric blouses and dresses To attach two separate pieces of fabric and stadilizer then press on a...

Страница 20: ...g upon the type of fabric used you may need to adjust this dial to match forward stitches of stretch sewing with reverse motion stitches If the stitches are too open turn the dial to position if the s...

Страница 21: ...It is ideal for overcaseing a single layer of fabric or attaching flat elastic when making or repairing lingerie Double overlock has a unmber of uses It is perfect for work H G Stitch Length S Use thi...

Страница 22: ...uttonhole marked under the buttonhole foot Slide the foot forward so that the needle pierces the fabric at the beginning of the buttonhole ADJUSTING STITCH LENGTH DENSITY AND WIDTH You can also change...

Страница 23: ...Remove the needle plate 1 3 Remove the bobbin case 2 4 Clean the feed dogs and hook area with the lint brush NOTE Put drop of sewing machine oil on the hook race as indicated by the arrows A 5 Replace...

Страница 24: ......

Отзывы: