AAASewing.com
Janome 900CPX
Instruction Manual
Janome 900CPX Instruction Manual
www.aaasewing.com
900cpx Owners Manual/ User Guide
Страница 1: ...A A A S e w i n g c o m Janome 900CPX Instruction Manual Janome 900CPX Instruction Manual www aaasewing com 900cpx Owners Manual User Guide...
Страница 2: ...adjustment 4 Never operate the appliance with any air opening blocked Keep ventilation openings of this sewing machine and foot controller free from accumulation of lint dust and loose cloth 5 Never...
Страница 3: ...A A A S e w i n g c o m Janome 900CPX Instruction Manual www aaasewing com 900cpx Owners Manual User Guide...
Страница 4: ...A A A S e w i n g c o m 795 800 003 E Printed in Taiwan Janome 900CPX Instruction Manual www aaasewing com 900cpx Owners Manual User Guide...
Страница 5: ...eedle threader holder 8 Setting the Thread Guide Bar 9 Setting the Spool Cones 9 Threading the Machine 10 Threading the needles 11 How to use the threader 12 Threading the looper 13 STITCH TYPES Cover...
Страница 6: ...al 3 Pressure adjusting screw 4 Left needle thread tension dial 5 Looper 65 Looper release knob 7 Looper thread take up lever 8 Looper cover 98 Power switch 0 Machine socket 1 Presser foot lifter 2 Pr...
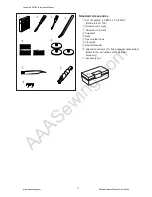
Страница 7: ...arge e Screwdriver Small r Tweezers t Nets y Spool holder caps u Lint brush i Needle threader o Attachment screws for fixing optional accessories Refer to the instructions of the optional accessory 0...
Страница 8: ...r supply when leaving the machine unattended when attaching or removing parts when threading or cleaning the machine Do not place anything on the foot control except when the machine is in use q Power...
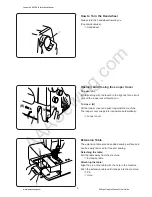
Страница 9: ...the machine The looper cover snaps into its position automatically q Looper cover Extension Table The extension table provides added sewing surface and can be easily removed for free arm sewing Detac...
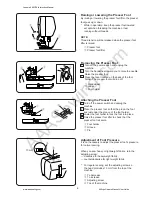
Страница 10: ...hing the Presser Foot 1 Turn off the power switch and unplug the machine 2 Place the presser foot so that the pin on the foot lies just under the groove of the foot holder 3 Lower the foot holder to l...
Страница 11: ...ed Ratio The differential feed ratio can be altered by turning the dial The number on the dial indicates the ratio between the main and the sub feed motion Set the dial at 1 0 for regular sewing Set t...
Страница 12: ...easily use the end of the needle threader to hold the needle Insert a needle into the needle threader holder with the flat side facing back as shown Hold the stem and insert the needle into the needl...
Страница 13: ...osition Setting the Spool Cones Place the spool cones on the spool holders If the thread slips down from a spool cone during threading and or sewing put a net over the spool cone as illustrated to pre...
Страница 14: ...foot lifter q Presser foot lifter NOTE Always thread the machine with the presser foot raised Turn the handwheel toward you to bring the needles to their highest position w Handwheel WARNING Turn the...
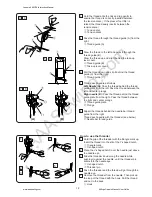
Страница 15: ...n A NOTE If the thread is coming out from the thread guide notch pass the thread through the thread guide hole again as shown B q Thread guide bar 2 Pass the thread through the holes on the right side...
Страница 16: ...he thread guide plate from the right Pass the thread between the right and center prongs o Thread guide plate 0 Prongs 8 Slip all the threads behind the needle bar thread guide from the right Thread e...
Страница 17: ...own A NOTE If the thread is coming out from the thread guide notch pass the thread through the thread guide hole again as shown B q Thread guide bar 2 Pass the thread through the holes on the right si...
Страница 18: ...the highest position so the eyes of the looper take up levers will align 6 Slip the thread behind the looper thread guide B from the right u Looper thread guide B 7 Pull the looper release knob and t...
Страница 19: ...orms a row of squares with diagonals q Wrong side of the fabric w Looper thread e Left needle thread r Right needle thread A If the needle thread tension is too loose The stitches on the right side ar...
Страница 20: ...dle being used 2 Check the tension balance by test stitching on the same fabric and threads as actual garment Fine tune the tension as necessary Balanced tension The straight stitch on the right side...
Страница 21: ...Insert the work fabric after the scrap as shown then start sewing on the work fabric w Scrap fabric e Work fabric End of the seam 3 Stop sewing at the end of the work fabric Insert another piece of sc...
Страница 22: ...sser foot with the presser foot lifter w Presser foot lifter 3 Pull the needle threads before the needle eyes This prevents the threads from being caught when removing the fabric 4 Pull the fabric to...
Страница 23: ...ear 6 Draw the needle threads to the wrong side of the fabric and knot them together q Marked line w Left needle e Right needle r Right side of the fabric Free Arm Hemming The extension table can be d...
Страница 24: ...ide of the fabric Attaching elastics q Right side of the fabric w Wrong side of the fabric e Elastic Decorative stitch q Right side of the fabric w Wrong side of the fabric Hemming on sleeves and wais...
Страница 25: ...rrounding area with the lint brush 5 Replace the needle plate needles and presser foot Close the looper cover r Looper cover Replacing the Light Bulb WARNING Turn the power off before replacing the li...
Страница 26: ...abric is forcedly pulled 1 The needle is not set correctly 2 The needle is bent or blunt 3 The tension is out of balance 4 The machine is not threaded correctly 1 The tension is out of balance 1 The m...