


81
RETRAIT DE L’UNITÉ DE BRODERIE
* Mettre la machine hors fonction.
* Retirez le cerceau de broderie de la machine.
(Reportez-vous aux pages 78 - 79.)
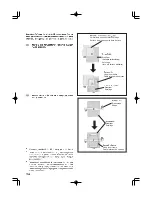
1. En tenant la poignée de l’unité de broderie, faites glisser
celle-ci progressivement vers la gauche tout en appuyant
sur le levier de déverrouillage.
Remarque:
Ne tirez pas le chariot lorsque vous retirez l’unité de broderie
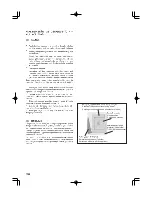
2. Insérez tout d’abord la languette dans le bas du couvercle du
connecteur, puis enfoncez le haut du couvercle du
connecteur avec le doigt, comme indiqué sur l’illustration.
ATTENTION
Veillez toujours mettre la machine hors fonction
avant d’installer l’unité de broderie.
CAUTION
Always be sure to turn off power to machine before
installing embroidery unit.
REMOVING EMBROIDERY UNIT
* Turn off power to machine.
* Remove embroidery hoop from machine.
(Refer to pages 78 - 79.)
1. Holding handle of embroidery unit, carefully slide toward the
left while pressing release lever.
Note:
Do not pull carriage when removing embroidery unit.
2. Insert the tab at the bottom of connector cap first, and push in
the top of the connector cap with your finger as illustrated.
Содержание FUTURA CE-200
Страница 3: ...3 ...
Страница 8: ...8 4 5 6 8 2 3 1 9 7 10 14 15 16 13 11 12 ...
Страница 16: ...16 ...
Страница 18: ...18 1 ...
Страница 20: ...20 1 2 3 4 ...
Страница 22: ...22 2 3 4 A B 5 6 1 ...
Страница 24: ...24 1 3 5 6 4 2 Thread take up Releveur de fil Tria hilos Tab Languette Lengüeta ...
Страница 26: ...26 1 2 3 ...
Страница 28: ...28 1 2 3 4 ...
Страница 38: ...38 F E A B C D I 2 3 4 1 G H 6 5 ...
Страница 46: ...46 ...
Страница 48: ...48 ...
Страница 50: ...50 ...
Страница 52: ...52 39 30 35 ...
Страница 54: ...54 19 20 21 70 71 72 80 81 82 83 84 ...
Страница 56: ...56 17 74 75 76 77 78 79 16 17 18 60 61 62 63 64 65 66 67 68 69 70 18 62 16 62 16 16 67 ...
Страница 58: ...58 A B C C C C Buttonhole foot Pied boutonnière Tab A Butée A BTab B Butée B ...
Страница 66: ...66 ...
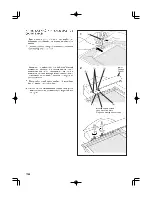
Страница 70: ...70 2 1 Hoop adjusting screw Vis de réglage de cerceau ...
Страница 76: ...76 2 1 USB cable Câble USB CD Insert Insertion Power light switch ON Interruptor corriente luz ON ...
Страница 78: ...78 A 2 1 B B D C D Hoop mounting plate Plaque de montage de cerceau Carriage Chariot ...
Страница 84: ...84 ...
Страница 86: ...86 92 93 72 75 70 71 78 79 ...
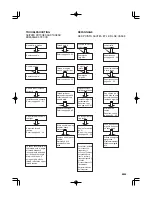
Страница 90: ...90 EM 01 EM 02 EM 03 EM 04 EM 05 EM 06 EM 07 EM 08 EM 09 SAFTY DEVICE ACTIVATED ...
Страница 92: ...92 2 1 A B 2 3 4 3 5 4 1 ...
Страница 96: ...96 ...
Страница 98: ... Part No 77191 1 05 ENGLISH FRANÇAIS ...
Страница 99: ...CE 200 INSTRUCTION MANUAL MANUEL D INSTRUCTION ...
Страница 100: ......


