65
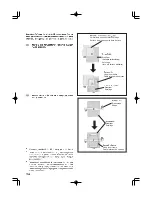
3. BRODERIE
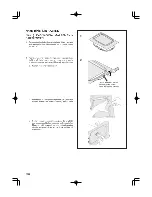
AVANT DE FIXER L’UNITÉ DE BRODERIE
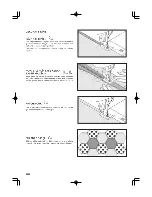
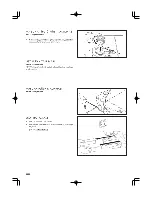
FIXATION DU PIED BRODERIE
* Élevez le releveur de pied presseur.
* Tournez le volant vers vous jusqu’à ce que l’aiguille soit à sa
position la plus haute.
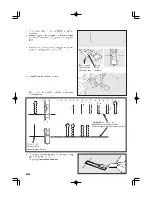
1. Retirez la vis du pied presseur, le pied presseur et le support
du pied presseur.
2. Fixez le pied presseur de broderie derrière la barre de pied
presseur de façon que le levier d’entraînement soit situé au-
dessus du serre-aiguille. Fixez-le en serrant la vis du pied
presseur
3. Tournez le volant vers vous pour déplacer l’aiguille vers le
haut et vers le bas, et vérifiez si le pied presseur de broderie
se déplace bien vers le haut et vers le bas en même temps
que l’aiguille.
ATTENTION
Veillez à toujours couper l’alimentation électrique
de la machine avant de changer le pied presseur.
ATTENTION
Veillez à ne pas toucher l’aiguille lorsque vous
remplacez le pied presseur.
3. EMBROIDERING
BEFORE ATTACHING EMBROIDERY UNIT
ATTACHING EMBROIDERY FOOT
* Raise presser foot lifter.
* Turn hand wheel toward you until needle is in its highest
position.
1. Remove presser foot screw, presser foot and foot holder.
2. Attach the embroidery presser foot behind presser bar so
that the drive lever is above the needle clamp. Secure it by
tightening presser foot screw.
3. Turn hand wheel toward you to move needle up and down,
and check that the embroidery presser foot moves up and
down together with the needle.
CAUTION
Always be sure to turn off power to machine before
changing presser foot.
CAUTION
Be careful not to touch the needle when
replacing presser foot.
Содержание FUTURA CE-200
Страница 3: ...3 ...
Страница 8: ...8 4 5 6 8 2 3 1 9 7 10 14 15 16 13 11 12 ...
Страница 16: ...16 ...
Страница 18: ...18 1 ...
Страница 20: ...20 1 2 3 4 ...
Страница 22: ...22 2 3 4 A B 5 6 1 ...
Страница 24: ...24 1 3 5 6 4 2 Thread take up Releveur de fil Tria hilos Tab Languette Lengüeta ...
Страница 26: ...26 1 2 3 ...
Страница 28: ...28 1 2 3 4 ...
Страница 38: ...38 F E A B C D I 2 3 4 1 G H 6 5 ...
Страница 46: ...46 ...
Страница 48: ...48 ...
Страница 50: ...50 ...
Страница 52: ...52 39 30 35 ...
Страница 54: ...54 19 20 21 70 71 72 80 81 82 83 84 ...
Страница 56: ...56 17 74 75 76 77 78 79 16 17 18 60 61 62 63 64 65 66 67 68 69 70 18 62 16 62 16 16 67 ...
Страница 58: ...58 A B C C C C Buttonhole foot Pied boutonnière Tab A Butée A BTab B Butée B ...
Страница 66: ...66 ...
Страница 70: ...70 2 1 Hoop adjusting screw Vis de réglage de cerceau ...
Страница 76: ...76 2 1 USB cable Câble USB CD Insert Insertion Power light switch ON Interruptor corriente luz ON ...
Страница 78: ...78 A 2 1 B B D C D Hoop mounting plate Plaque de montage de cerceau Carriage Chariot ...
Страница 84: ...84 ...
Страница 86: ...86 92 93 72 75 70 71 78 79 ...
Страница 90: ...90 EM 01 EM 02 EM 03 EM 04 EM 05 EM 06 EM 07 EM 08 EM 09 SAFTY DEVICE ACTIVATED ...
Страница 92: ...92 2 1 A B 2 3 4 3 5 4 1 ...
Страница 96: ...96 ...
Страница 98: ... Part No 77191 1 05 ENGLISH FRANÇAIS ...
Страница 99: ...CE 200 INSTRUCTION MANUAL MANUEL D INSTRUCTION ...
Страница 100: ......


