


59
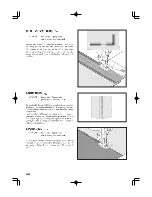
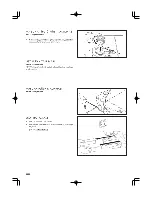
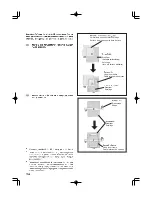
CONFECTION DES BOUTONNIÈRES
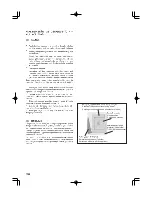
UTILISATION DU PIED BOUTONNIÈRE
1. Introduisez un bouton entre les butées A et B.
2. Les boutonnières peuvent être cousues de manière à
correspondre à la taille du bouton.
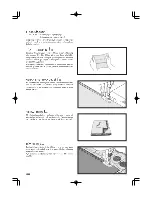
PROCÉDURE
* Utilisez un entoilage dans la partie du vêtement où les
boutonnières doivent être placées.
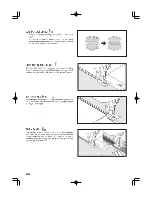
* Faites une boutonnière d’essai sur un échantillon du tissu
que vous utilisez. Essayez ensuite la boutonnière avec le
bouton choisi.
1. Sélectionnez l’un des motifs de boutonnières 85, 86, 87 et
88.
2. Remplacez le pied presseur par le pied boutonnière.
(Reportez-vous à la section "Remplacement du pied presseur"
à la page 32 - 33.)
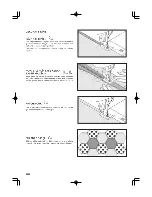
3. Introduisez le bouton dans le pied boutonnière.
(Reportezvous à la section "Utilisation du pied boutonnière"
ci-dessus.)
4. Réglez le levier de boutonnière (C) de manière qu’il s’abaisse
verticalement entre les butées (A) et (B).
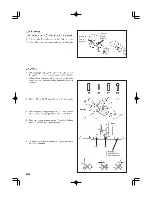
BUTTONHOLE MAKING
USING BUTTONHOLE FOOT
1. Insert a button in between tab A and tab B.
2. Buttonholes can be sewn to match the size of the button.
PROCEDURE
* Use an interfacing in the area of the garment where
buttonholes are placed. Stabilizer or regular interfacing can
be used.
* Make a practice buttonhole on a scrap of the fabric you are
using. Then try the buttonhole with the selected button.
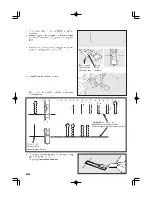
1. Select one of buttonhole patterns 85, 86, 87 and 88.
2. Replace the presser foot with the buttonhole foot. (Refer to
“Changing presser foot” on page 32 - 33.)
3. Insert the button into the buttonhole foot. (Refer to “Using
buttonhole foot” above.)
4. Set the buttonhole lever (C) so that it drops down vertically
between the stoppers (A) and (B).
Содержание FUTURA CE-200
Страница 3: ...3 ...
Страница 8: ...8 4 5 6 8 2 3 1 9 7 10 14 15 16 13 11 12 ...
Страница 16: ...16 ...
Страница 18: ...18 1 ...
Страница 20: ...20 1 2 3 4 ...
Страница 22: ...22 2 3 4 A B 5 6 1 ...
Страница 24: ...24 1 3 5 6 4 2 Thread take up Releveur de fil Tria hilos Tab Languette Lengüeta ...
Страница 26: ...26 1 2 3 ...
Страница 28: ...28 1 2 3 4 ...
Страница 38: ...38 F E A B C D I 2 3 4 1 G H 6 5 ...
Страница 46: ...46 ...
Страница 48: ...48 ...
Страница 50: ...50 ...
Страница 52: ...52 39 30 35 ...
Страница 54: ...54 19 20 21 70 71 72 80 81 82 83 84 ...
Страница 56: ...56 17 74 75 76 77 78 79 16 17 18 60 61 62 63 64 65 66 67 68 69 70 18 62 16 62 16 16 67 ...
Страница 58: ...58 A B C C C C Buttonhole foot Pied boutonnière Tab A Butée A BTab B Butée B ...
Страница 66: ...66 ...
Страница 70: ...70 2 1 Hoop adjusting screw Vis de réglage de cerceau ...
Страница 76: ...76 2 1 USB cable Câble USB CD Insert Insertion Power light switch ON Interruptor corriente luz ON ...
Страница 78: ...78 A 2 1 B B D C D Hoop mounting plate Plaque de montage de cerceau Carriage Chariot ...
Страница 84: ...84 ...
Страница 86: ...86 92 93 72 75 70 71 78 79 ...
Страница 90: ...90 EM 01 EM 02 EM 03 EM 04 EM 05 EM 06 EM 07 EM 08 EM 09 SAFTY DEVICE ACTIVATED ...
Страница 92: ...92 2 1 A B 2 3 4 3 5 4 1 ...
Страница 96: ...96 ...
Страница 98: ... Part No 77191 1 05 ENGLISH FRANÇAIS ...
Страница 99: ...CE 200 INSTRUCTION MANUAL MANUEL D INSTRUCTION ...
Страница 100: ......