background image


FS 70 Installation Instructions 

974-24007001/5.0 


73


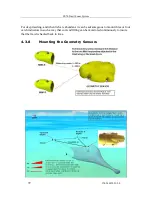
The PI Geometry sensors are mounted behind the headrope at the top of the trawl opening, 
or behind the footrope at the bottom depending on the required application.  

The two Mini-R responders are normally mounted in dedicated adaptors on the two doors. 
They may also be mounted on the trawl wings. 

Communication link between the PI sensors and the two Mini-R responders may be done 
via the FS 70 head rope unit forward hydrophone located inside the DP housing or via the 
PI hydrophone mounted below the ship hull. 

Refer to the SIMRAD supplied PI Net Geometry Installation Manual for additional 
information.  

4.3.9


PI Receiver Basic Configuration Settings 

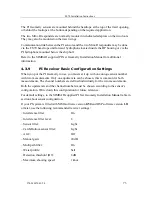
When you put the PI Geometry to use, you must set it up with one unique sensor number 
with two measurements. Only one update rate can be chosen, this is common for both 
measurements. The channel numbers are defined individually for the two measurements.  

Both the update rate and the channel numbers must be chosen according to the sensor’s 
configuration. Write down this configuration for future reference.  

For default settings, to the SIMRAD supplied PI Net Geometry Installation Manual table in 
section about sensor configuration. 

If your PI system is fitted with MMI software version 

0.50 

and DSP software version 

1.11


or later, use the following recommended receiver settings: 

– Interference filter:                On 

– Interference filter level:             8 

– Sensor filter:                    Light 

– Catch/Bottom sensor filter:          Light 

– AGC:                         Off 

– Manual gain:                    20 dB 

– Multipath filter:                  On 

– Water profile:                    Salt 

– Detection threshold (DT):            8 dB 

– Maximum shooting speed:           1 knot 


Содержание FS70 -

Страница 1: ...Kongsberg Mesotech Ltd Port Coquitlam BC Canada FS 70 Trawl Sonar System Operator Manual SIMRAD...

Страница 2: ......

Страница 3: ...974 24007001 5 0 I 974 24007001 5 0 FS70 Trawl Sonar System Operator manual...

Страница 4: ...document is subject to change without prior notice Kongsberg Mesotech Ltd shall not be liable for errors contained herein or for incidental or consequential damages in connection with the furnishing p...

Страница 5: ...epth Temperature Sensors NMEA Output 5 1 12 Trawl Cable Winch and Block 6 2 THEORY OF OPERATION 6 2 1 Introduction 6 2 2 Basic Principles 6 2 3 Determining Target Position 7 2 4 Forming an Image 7 2 5...

Страница 6: ...2 The transmit page 20 3 2 3 3 The TVG page 22 3 2 3 4 The Sensor page 24 3 2 4 Sonar Display 24 3 2 4 1 Using the reference cursors 25 3 2 4 2 Using the Tools 26 3 2 4 3 Using the Gauge Window 26 3 2...

Страница 7: ...ab 50 3 2 8 1 TVG selection 50 3 2 8 2 Sonar orientation 51 3 2 8 3 External Synchronization 52 3 2 8 4 Audio Setup 52 3 2 8 5 Acoustic interference Filter 53 3 2 8 6 Palette selection 53 3 2 8 7 Adva...

Страница 8: ...ing the USB RS232 to the TTM Unit 66 4 2 9 Connecting a GPS 67 4 2 10 Connecting a Echo Sounder 67 4 2 11 Connecting a Heading Sensor 67 4 2 12 Connection to Cable Winch Slip Rings 68 4 2 13 Assemblin...

Страница 9: ...PI Sensors 77 5 3 4 Winch Slip Rings and Trawl Cable 77 5 4 On board System Troubleshooting 78 5 4 1 System Tools 78 5 4 2 Test Cable 79 5 4 3 Power Supply Meter Readings 79 5 4 4 Trawl Cable Gain 80...

Страница 10: ...13 Diagnosing Problems 86 5 4 14 Troubleshooting Problems 87 5 4 15 Power up Sequence of Events 87 5 4 16 Host FS70 Software Start up Sequence of Events 88 5 4 17 What happens when you click RUN 88 5...

Страница 11: ...l door view and skim banks to avoid reefs and locate boulders on the ocean floor that may damage the trawl net The 200 kHz Echo Sounder capability ensures maximum control of the foot rope during the t...

Страница 12: ...DATSS PC based Processing Unit LCD display monitors 1 3 Typical System Configurations FS70 70 kHz System Configuration Overview SIMRAD POWER TTM RS232 or USB RS232 200 kHz Sounder 40 70 kHz Catch Hydr...

Страница 13: ...Interface Unit FS70 Software c w FS70 Dongle Internal Sensors Pitch Roll Depth Temp 40 kHz PI PS Sensors Test cable Or 3rd Wire Optional 27 40 kHz PI Door Spread Hydrophone 40 kHz PI PS Sensors Direc...

Страница 14: ...to enable full operation of the system 1 6 Power TTM Interface Module The FS 19 Rack mounted Power TTM interface Module unit provides the supply voltage required by the trawl sonar and the telemetry...

Страница 15: ...determined by the type of 3rd wire you are using 1 9 Catch Sensors The catch sensor eggs are wireless sensors mounted on the cod end of the trawl net to detect the stretch of the net as it fills up wi...

Страница 16: ...pulled out kept tight during towing and hauled in together with the trawl Control of the winch is done remotely from the bridge Any commercially available pulley block may be used to properly align th...

Страница 17: ...gain with time can compensate for this decrease in the signal level This is done automatically in the sonar with a Time Varying Gain TVG circuit After the TVG correction the absolute levels of the re...

Страница 18: ...lected by the RX Gain Type For the AGC this setting determines the speed by which the gain is adjusted For the RCG this setting determines the influence of the previous ping average over the current p...

Страница 19: ...ch the range unless manually adjusted by the operator 2 5 5 Peak Detection Depending on the operational settings the combination of small target size short pulse length and long sample period could re...

Страница 20: ...ettings and operating parameters of the DATSS System resizable display areas for the Sonar Head Sounder and Message Log a floating dockable Sensor Panel to monitor the sensors status toolbars for quic...

Страница 21: ...eo card with 1280 x 1024 or higher resolution Windows 7 Ultimate 64 bit Edition or higher 3 1 2 Installing DATSS Installation from the CD ROM DVD ROM Insert the DATSS installation CD in the drive sele...

Страница 22: ...FS70 Trawl Sonar System 12 974 24007001 5 0 The System Configuration page will appear showing available COM ports KML USB devices and Ethernet devices...

Страница 23: ...shes communication with the sonar heads The Part Number and Serial Number of the sonar head will be shown Click OK to exit the dialog Select System Run The system will automatically setup the sonar he...

Страница 24: ...sonar transducer to 180 degree angle The angle is not adjustable Smooth sounder the same function as Sounder except the horizontal pixel and the vertical pixel has one to one aspect ratio Lock used t...

Страница 25: ...sity image To change the Gain Click Gain button from the Operation tab 3 2 2 4 Changing the Scan Speed DATSS supports the following scan speed for the step motor in Polar and Sector scan mode 0 5 degr...

Страница 26: ...ation of the two AGC Automatic Gain Control provide automatic scaling to each sample in order to maintain proper dynamic range based on all sample values RCG Reverberation Controlled Gain the RCG func...

Страница 27: ...e affects the sonar image To change the Gain response Click Gain R button on the Operation tab 3 2 2 6 Changing the Resolution Select low resolution for faster scan rate Select high resolution for bet...

Страница 28: ...ick on the sonar image display select Control Head from the context menu NOTE Depending on the version of the DATSS software the operation pages will use either the Head Settings or the Sonar Head Con...

Страница 29: ...r is mounted pointing to the bow side Use the Sector controls to adjust the Heading of the area to be scanned as well as the Width of the sector Use the slider controls or the increase decrease button...

Страница 30: ...ut generating too many errors When using the Ethernet telemetry this control is disabled When Compression is set to on the colour depth of the sonar image will be one eighth of its maximum through a r...

Страница 31: ...to a ZOOM x2 operation The Panel Gain control is used to adjust the overall gain for the image from this head The Pulse Length control can be used to set the desired transmit pulse length Generally a...

Страница 32: ...the auxiliary transducer For example at transmit ration 1 4 the auxiliary transducer will transmit once every 4 primary transducer transmit 3 2 3 3 The TVG page The TVG Page is used to control the Ti...

Страница 33: ...s graphically The solid green line shows the current TVG curve The dashed red line shows the upper limit for the TVG curve The position of the yellow line can be adjusted up or down with the slider co...

Страница 34: ...pensate the depth reading Tilt Sensor enabled if tilt sensor is available Filter level is used to stabilize the sensor reading Pitch Roll offset is used to compensate the pitch roll value if the tilt...

Страница 35: ...rs are two cross hair type markers that can be placed on the sonar image to mark a point of interest User can use the reference cursors to measure the range and bearing from the origin Reference curso...

Страница 36: ...text simply double click on the text box Wiper Used to delete existing measurement overlays 3 2 4 3 Using the Gauge Window A gauge window is a small window containing data and appearing inside the so...

Страница 37: ...e Window The Overload Counter Gauge Window The Overload Counter window displays the percentage of sonar samples that are in saturation The display is logarithmic in nature where 10 count is displayed...

Страница 38: ...w select from the Used Parameters list then press the Remove button 6 Click Close button to finish 7 Use the Duplicate button to quickly duplicate an existing gauge window and add more parameters 8 Us...

Страница 39: ...k Connect 3 If you have User Defined sensors see section Creating user defined sensors select one or more from the User Defined list and click Connect 4 Select Ports Configuration tab to configure COM...

Страница 40: ...o make a new user defined sensor Change the assigned name by editing the contents of the Name box Use the Start Character box to select the start character of the user serial string Use the Field Deli...

Страница 41: ...cifies the distance units to be in nautical miles hh is a checksum CR LF is a terminating carriage return and line feed pair This sentence always starts with the character so we would set the Start Ch...

Страница 42: ...on page select the COM port that you want to configure in the tree under My Computer Set Bits Per Second Data Bits Parity and Stop Bits to match with the sensor settings Set the Time Interval for the...

Страница 43: ...COM port 3 2 6 Recording Playback and Exporting 3 2 6 1 Recording With DATSS you can record the sonar data and settings to the smb data file The recorded data are time stamped with UTC time and displa...

Страница 44: ...FS70 Trawl Sonar System 34 974 24007001 5 0 Click button on the recording tool bar...

Страница 45: ...ile will have the extension 001 The next file will have the extension 002 etc Select Sources Click on the sonar head that you want to record and then check Select Scheduled Recording The scheduled rec...

Страница 46: ...utton on the recording toolbar The playback data dialog box allows you to select a file for playback Select the file that you want to playback then click Open to start playback The Playback Progress d...

Страница 47: ...fast forward through the selected volume to the user selected position The Progress box shows the playback progress as a percentage of the total file group size Select Continuous to allow the system t...

Страница 48: ...FS70 Trawl Sonar System 38 974 24007001 5 0 The Ports Configuration page allows you to set the communications settings for the selected COM port...

Страница 49: ...e NMEA Settings button to quickly set all of the communication settings to those normally used by NMEA devices 3 2 6 4 Saving the sonar image To save the sonar image to BMP file Click on the recording...

Страница 50: ...l Panel are grouped into tabbed pages according to functionality Items that lead to dialog boxes are shown in the Advanced Menu All other items are system parameters that may be modified As you move t...

Страница 51: ...ngs Page 5 Sensors Control Page 6 Receiver Setup and Page 7 Advanced Each page allows you to change the system parameters To change the value of a system parameter move the mouse up or down until the...

Страница 52: ...ontrol panel allows you to select operational settings for the active sonar Click on the appropriate display window to activate the sonar you want to control next position the mouse cursor on the butt...

Страница 53: ...wn until the desired button is highlighted and click the left mouse button or right mouse button to activate the new setting 3 2 7 4 Setup Control Panel Tab The main Setup control panel allows you to...

Страница 54: ...the left mouse button or right mouse button to activate the new setting NOTE When you Save Setting you automatically save the setting for both the vertical and the sounder at the same time 3 2 7 6 Se...

Страница 55: ...wn to select the sensor you want to select and then left click the mouse on the appropriate selection to activate the mode of operation By placing the mouse cursor on the Sensors Panel button and then...

Страница 56: ...FS70 Trawl Sonar System 46 974 24007001 5 0 3 2 7 7 PI 40 kHz Channel Sensors Setup...

Страница 57: ...tional information on the Simrad PI Setup please refer to your PI Instruction Manual 3 2 7 8 PI 40 kHz Sensors Receiver Setup The main SENSORS RECEIVER SETUP control panel allows you to select the sen...

Страница 58: ...n Menu The main SENSORS ACTIVATION MENU control panel allows you to select the sensors you want to turn ON or OFF To change the value of the system parameter just left or right click the mouse over th...

Страница 59: ...007001 5 0 49 NOTE The PI sensor setup menus are not available if you are using a 70 kHz Catch Sensors system Refer to the following section for the 70 kHz Catch Sensors activation setup 3 2 7 10 PI 7...

Страница 60: ...ensors Page To activate or de activate individual Catch Sensors click on the appropriate button When you activate a Catch Sensor the sensor information is automatically displayed in the Control Panel...

Страница 61: ...pear Select the appropriate TVG for the current selected sonar head 3 2 8 2 Sonar orientation Click to change the sonar transducer orientation There are 2 types of transducer orientation which depends...

Страница 62: ...heads are attached to separate telemetry lines The selection options are Slave Input This head is synchronized with other heads It pings only when the other heads are ready to ping Master Output Allow...

Страница 63: ...oustic interference Filter Click to enable the filter to filter out the acoustic interference 3 2 8 6 Palette selection Click to select the palette to plot the sonar image 3 2 8 7 Advanced Menu Click...

Страница 64: ...wl Sonar System 54 974 24007001 5 0 Configuration opens the configuration menu Tools opens the tools menu 3 2 9 The Status Bar The status bar uses different colours to indicate different status of the...

Страница 65: ...shot without entering file name The file is automatically named with the current time and saved to Diagnostic folder under the DATSS installation directory Click to start recording without entering fi...

Страница 66: ...verload Counter Opens the Overload Counter window Clear Display Clear the current selected sonar image display Delete All Markers Delete all markers on the display Display Settings Opens the advanced...

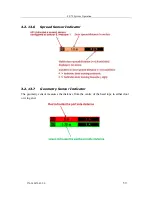
Страница 67: ...mbols in data windows Numeric display shows the present value of the sensor data in easy to read digits or symbols Changes in values are indicated with digits showing rate of change combined with grap...

Страница 68: ...m 58 974 24007001 5 0 3 2 13 3 Catch Sensor Indicator Catch sensor is activated data valid Catch sensor is pulled triggered the fish alarm for 4 minutes 3 2 13 4 Depth Sensor Indicator 3 2 13 5 Temper...

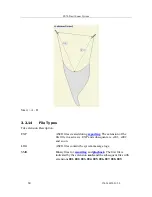
Страница 69: ...System Operation 974 24007001 5 0 59 3 2 13 6 Spread Sensor Indicator 3 2 13 7 Geometry Sensor Indicator The geometry sensor measures the distance from the centre of the head rope to either door or wi...

Страница 70: ...uring exporting The extension of the first file in a series is EXP and subsequent are e001 e002 and so on LOG ASCII files contain the system message logs SMB Binary files for recording and playback Th...

Страница 71: ...t and start the calibration of each sonar head connected to the TTM module When you click the Stop button you will automatically disconnect the sonar heads from the system NOTE If you only want to PAU...

Страница 72: ...s 4 2 Surface Unit Installation 4 2 1 Mounting of Units The display unit should be located in the wheel house in a place that provides a good view of the screen and avoids direct sunlight if possible...

Страница 73: ...lace the indicator pin to the selected voltage Reinsert the card reinstall the cover and verify that the indicator shows the desired voltage You must insure that the proper fuse rating is installed 2...

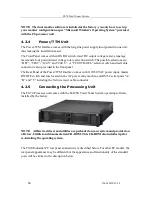
Страница 74: ...is also provided in the front panel The Rear Panel of the Power TTM Interface comes with 110 230 VAC power input master ON OFF switch and fuse located in the AC power entry module and RS232 serial po...

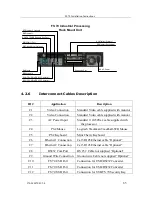
Страница 75: ...o cable supplied with monitor C2 Video Connection Standard Video cable supplied with monitor C3 AC Power Input Standard 110 230Vac cable supplied with the processor C4 PS2 Mouse Logitech Trackman Trac...

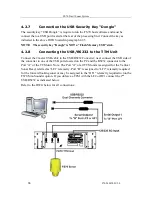
Страница 76: ...32 to the TTM Unit Connect the 2 meter USB cable to the USB RS232 Converter next connect the USB side of the converter to one of the USB ports located on the PC and the RS232 connector to the Port A o...

Страница 77: ...ort on the rear panel of the processing unit or an RS232 USB converter The processor will output the Temperature and the Depth from the trawl integrated sensor module in the NMEA 0183 format If port B...

Страница 78: ...h a 200 kHz echo sounder an FS 70 sensor module is integrated in the trawl sonar head The FS 70 polyurethane housing includes mounting and assembling hardware and a strain relief The trawl unit also c...

Страница 79: ...3 2 Start Up 1 Check that the system has been properly installed and that all connections have been made to the PWR TTM and the Processing Unit 2 First turn on the PWR TTM interface module The voltme...

Страница 80: ...WARNING Make sure you have selected the trawl voltage for the appropriate sonar head before turning power ON 4 3 5 Final System Test After preparing the trawl cable and before the final trawl unit as...

Страница 81: ...the trawl unit housing are properly placed to avoid being pinched and possibly damaged The top half of the trawl unit housing is then placed on top and the two halves are secured together with the bo...

Страница 82: ...ep trawling and when fish are abundant it can be advantageous to mount three or four catch indicators in such a way that cod end filling can be monitored continuously to insure that the trawl is haule...

Страница 83: ...When you put the PI Geometry to use you must set it up with one unique sensor number with two measurements Only one update rate can be chosen this is common for both measurements The channel numbers...

Страница 84: ...age the 120 and 200 VDC 1 A maximum for powering the trawl unit electronics and the voltage and ampere meters The low frequency telemetry adapter LF 1 Low Frequency PCB and the telemetry translation m...

Страница 85: ...ese surfaces will increase the likelihood of corrosion Ensure correct installation of the sonar head into the trawl housing to avoid improper operation A locking block is located at the end cap to sec...

Страница 86: ...sult in failure of the sonar system and possible water damage to the sonar head The following steps should be taken whenever the connectors are assembled or at regular intervals as outlined in the Mai...

Страница 87: ...ansducer and shaft are protected by a flexible dome and should be inspected for damage If the transducer dome has experienced an impact this could bend the shaft and eventually allow water into the ho...

Страница 88: ...trawl unit When not in use the pigtail should be wrapped in a plastic bag and stored out of the weather and away from being stepped on or damaged in any other way Polarity of the signals applied to th...

Страница 89: ...ch for continuous monitoring When the system is first installed or when the trawl cable is replaced the trawl cable voltage selection switch should be set to 200 VDC and current values should be recor...

Страница 90: ...e system unit and comparing it to a previously recorded value the condition of the 3rd wire trawl cable can be monitored Acceptable cable gain values have less than 10 XXX for the first gain number If...

Страница 91: ...luded For whatever cable type and length used the following specifications must be met for operation with the Simrad FS trawl Monitoring system Cable Closed Loop Resistance 100 ohms Signal Attenuation...

Страница 92: ...tance TTM Output Voltage Cable Voltage at the head Current through Cable Example The TTM output DC voltage is set at 200 VDC The Cable Voltage at the head is 192 7 VDC Total DC voltage drop along the...

Страница 93: ...etry errors is time outs This problem indicates the trawl unit electronics are not responding to the processor unit or the integrated sensor module is not responding to the sonar head If the processor...

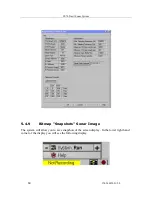
Страница 94: ...nar System 84 974 24007001 5 0 5 4 9 Bitmap Snapshots Sonar Image The system will allow you to save snapshots of the screen display In the lower right hand corner of the display you will see the follo...

Страница 95: ...same button again These recordings are saved into the record folder The traditional way of starting a recording also still exists on the system Go to the display toolbar and turn the Record Toolbar on...

Страница 96: ...you want to ensure that the auto recording of the event will not be overwritten In this event you want to simply move the file from the diagnostic folder and place it into a folder where you will easi...

Страница 97: ...system failed then you will have to troubleshoot the problem 5 4 14 Troubleshooting Problems The first step in troubleshooting the problem would be to retrieve the Errors message log file located in t...

Страница 98: ...mmend by clicking on Detect Head if the host do not detect the Head you will have to troubleshoot where the problem may be as indicated below Troubleshooting head detection problems Check COM port is...

Страница 99: ...fo page If the motor calibration fails the problem may be with the motor controller board of the optocouplers located in the motor housing Sensors Info Request The next step the host must know what is...

Страница 100: ...errors If none then problem is with the sonar head or the TTM unit Sonar head operates correctly but pauses periodically may not have sensor module data Check Message Log for errors If multiple errors...

Страница 101: ...ify display If no indication or indication is wrong then fault is with the internal sensor module NOTE If the FS unit is diagnosed as being faulty then the unit s should be returned to an authorized S...

Страница 102: ...Trawl Sonar System 92 974 24007001 5 0 6 Drawings Drawings List 436 00411000 Test Cable 901 60181001 FS power TTM Outline Dwg 901 60181003 FS Power TTM Wiring Diagram 974 80161000 FS 70 Housing Dwg 4...

Страница 103: ...974 24007001 5 0 93...

Страница 104: ...FS70 Trawl Sonar System 94 974 24007001 5 0...

Страница 105: ...974 24007001 5 0 95...

Страница 106: ...FS70 Trawl Sonar System 96 974 24007001 5 0...

Страница 107: ...974 24007001 5 0 97...

Страница 108: ...FS70 Trawl Sonar System 98 974 24007001 5 0...

Страница 109: ...974 24007001 5 0 99...

Страница 110: ...FS70 Trawl Sonar System 100 974 24007001 5 0 This page is left intentionally blank...

Страница 111: ...in Cable Pre Reg Voltage Shop Test Cable ______________ ____________________ Ship Test Cable ______________ ____________________ Ship Trawl Cable ______________ ____________________ Ship 3rd wire cabl...

Страница 112: ...FS70 Trawl Sonar System 102 974 24007001 5 0 This page is left intentionally blank...

Страница 113: ...2010 Kongsberg Mesotech...

Страница 114: ...SIMRAD...

Отзывы: