SimpliVity OmniCube CN-1400 Скачать руководство пользователя страница 21

Chapter 2: Install the server hardware

21

Note:

The blue bracket latches will not close properly if the front and rear rail brackets are not level. Make

sure that both rails are level, and that they occupy the same U location in the rack.

Next steps

You can now mount the system enclosure in the rails.

Mount the enclosure in the rails

It takes two people to install each system into the rails, one person on either side, each holding the

system enclosure at the front and rear.

Before you begin

You have read all supplied rack and safety information. This is important if you are installing the

enclosure into the upper U locations of tall racks, where you need to use steps or platforms.

Procedure
1.

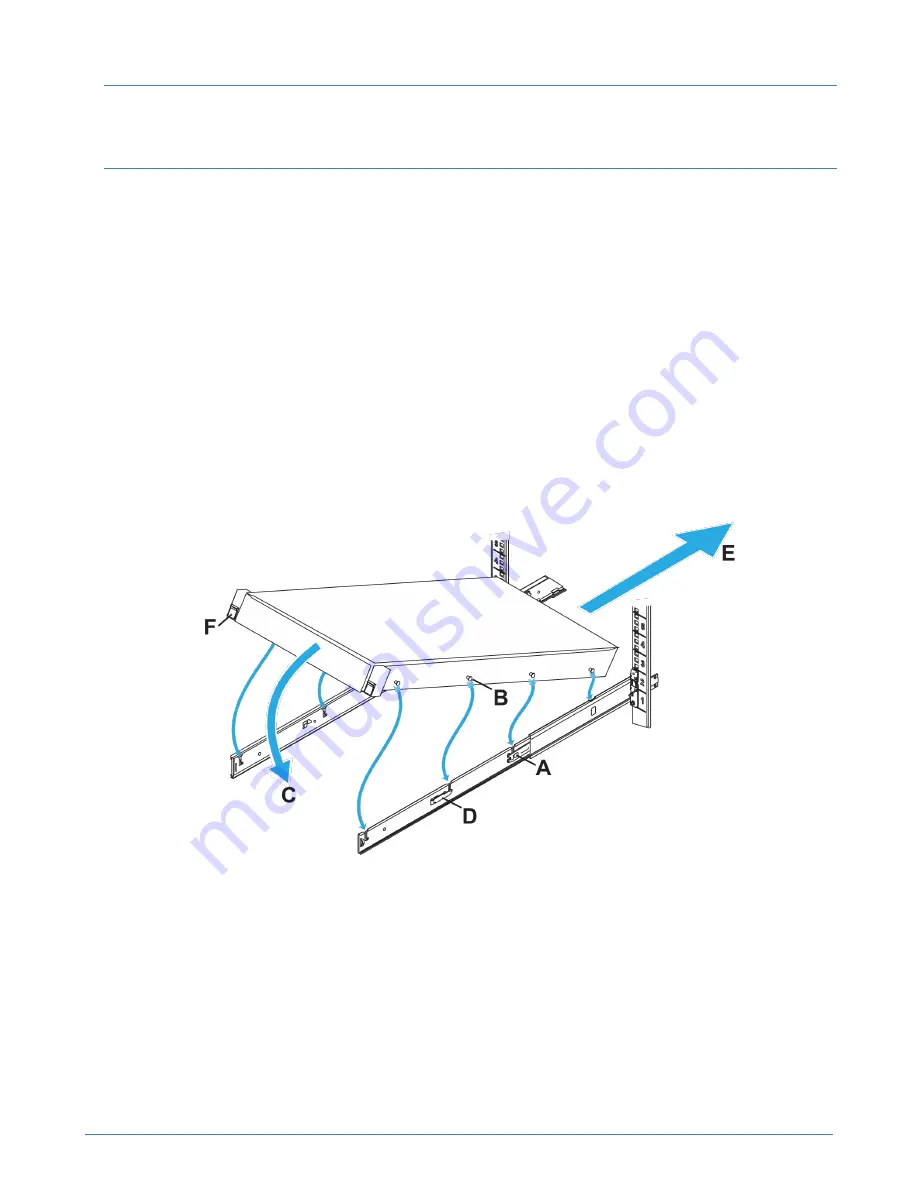
Extend each rail from the rack until it locks into place (callout A).

Figure 8: Enclosure installation

2.

Identify the location of the four lugs (callout B) on each side of the enclosure, and the corresponding

J-slots in the rails.

3.

Hold the enclosure over the rails, aligning the lugs with the J-slots.

4.

Starting at the back two lugs, gently rotate the enclosure down (callout C), engaging the lugs in the

J-slots.

5.

Ensure all eight lugs on the enclosure are seated firmly in the J-slots in the rails and that the lug lock

(callout D) engages.

Содержание OmniCube CN-1400

Страница 1: ...www SimpliVity com SimpliVity OmniCube CN 2000 CN 2200 CN 3000 and CN 5000 Hardware Installation and Maintenance Guide...

Страница 2: ...2010 151813 BR WO2010 151813 CA WO2010 151813 IN679 CHENP 2012A EP2734933 HK1196886 AU WO2012 177461 BR WO2012 177461 CA WO2012 177461 CN103703464A EP2724263 HK1197696 IN368 CHENP 2014A JP2014 524078...

Страница 3: ...or users of SimpliVity OmniStack products who want to install manage and monitor their hyperconverged IT infrastructure This information is intended for system administrators experienced in hypervisor...

Страница 4: ...epresents a user defined name or variable Bold font represents a user interface element such as a button or tab with which a user interacts Command Line formatting SimpliVity documentation uses the fo...

Страница 5: ...feedback We welcome your feedback suggestions and comments to help us continue to improve the quality of our documentation Send your comments to Documentation Feedback SimpliVity com and include as m...

Страница 6: ...dware not supplied in the shipping carton 18 Install the server enclosure in a rack 20 Mount the enclosure in the rails 21 Connect the network cables 22 Connect the power cables 23 Organize the cables...

Страница 7: ...ntenance 43 About power supply maintenance guidelines 43 Remove a power supply 43 Install a power supply 44 Chapter 7 About network cabling options 46 About the 10GbE only network configuration 46 Abo...

Страница 8: ...installing the hardware in a rack and connecting power and network cables you can deploy each OmniCube server into a SimpliVity Federation As your capacity and performance needs increase you can add...

Страница 9: ...n and system identification connector The system identification button helps you locate a system within a rack If you push the system identification button on the back panel or the front panel the sys...

Страница 10: ...es 2 to 9 are HDDs Drives 10 and 11 are empty If you pull the system enclosure from the rack the drive numbering scheme is described on a label attached to the top of the enclosure 6 Video input Enabl...

Страница 11: ...e rear boot drives installed in PCIe slot 6 of riser 3 The RAID Controller for the front data disks is a mezzanine card 4 System identification button System identification button and system identific...

Страница 12: ...ionally VM traffic 11 Power supplies Two redundant 750W or 1100W power supplies with fans numbered 1 and 2 from left to right Each power supply has a status indicator light in the handle Disconnect th...

Страница 13: ...e has sufficient electrical overload protection 100 220VAC autoranging Make sure each power source has sufficient electrical overload protection 100 240VAC autoranging Make sure each power source has...

Страница 14: ...6Grms at 5 350Hz in all orientations Vibration storage 1 87Grms at 10 500Hz for 15 minutes all six sides tested Shock operating One shock pulse in the positive z axis one pulse on each side of the sys...

Страница 15: ...mer Support Note Never install additional options other than those approved for installation by Customer Support Doing so will void your warranty and might cause serious server instability and potenti...

Страница 16: ...amage electronic components Ensure the server hardware is fully grounded at all times to prevent damage from electrostatic discharge When not installed in a rack server hardware must be stored in its...

Страница 17: ...kaging in case you need to return the system 4 Remove the rail kit callout 1 which contains the rails and the installation instructions Figure 6 OmniCube Shipping Carton Contents 5 Remove the cable ma...

Страница 18: ...d the distance between the server you might need different or additional cables Sliding rail kit Contains the left and the right rails two hook and loop straps and detailed installation documentation...

Страница 19: ...nstructions supplied with the rail kit for safety and installation instructions The racks you use for each server must meet these requirements The sliding rails support tool free mounting in 19 inch E...

Страница 20: ...plain stabilizing the rack installing devices and power distribution You have identified the rack location for the right rail The system requires 2U of rack space CAUTION Two people are required to sa...

Страница 21: ...lied rack and safety information This is important if you are installing the enclosure into the upper U locations of tall racks where you need to use steps or platforms Procedure 1 Extend each rail fr...

Страница 22: ...OmniStack Host Deployment Guide Figure 9 OmniCube host network ports The other networking interfaces are A separate 1GbE IPMI network interface that you can use for the initial system setup and remote...

Страница 23: ...dition SimpliVity recommends that you use redundant uninterruptible power supply UPS systems to protect against a complete power outage Procedure 1 Obtain the two power cables from the shipping carton...

Страница 24: ...ation see the Cable Management Arm Installation Instructions supplied in the cable management kit Power on the system Press the power button on the front panel of each OmniCube server to apply power t...

Страница 25: ...ing lugs on the right side of the system Figure 12 OmniCube Bezel Lugs 2 Insert the bezel tabs into the front panel mounting lugs Figure 13 OmniCube Bezel Tabs 3 Rotate the left side of the bezel inwa...

Страница 26: ...m the front panel of the system to gain access to the front drives Procedure 1 Hold the blue cube handle to detach the bezel and push up on the release latch Figure 15 OmniCube Bezel Latch 2 Rotate th...

Страница 27: ...s task and proceed with deploying an OmniCube host using Deployment Manager See the SimpliVity OmniStack Host Deployment Guide Procedure 1 Connect an Ethernet cable from the Ethernet port on the lapto...

Страница 28: ...he changes that you made in Step 2 on page 27 Next steps You can now connect to IPMI from any remote location See Connect to IPMI and launch the Virtual Console on page 28 Connect to IPMI and launch t...

Страница 29: ...you use DHCP to assign an IP address instead of using a static IP SimpliVity recommends that you check the option Register RAC on DNS and use the DNS RAC to reference the OmniCube host This prevents...

Страница 30: ...problems such as a component failing contact Customer Support About diagnostic indicators The left side of the front panel displays diagnostic indicators that glow when the system is functioning prop...

Страница 31: ...Customer Support to obtain a replacement drive of the same type size and speed The drives in the front panel store user and Federation data and are protected by RAID which provides different protectio...

Страница 32: ...drive failure Flashes amber four times per second Drive failed Flashes green every 2 seconds Drive is rebuilding Steady green Drive is online Flashes green three seconds amber three seconds and off si...

Страница 33: ...ves 0 to 5 are SSDs and drives 6 to 23 are HDDs About power supply monitoring The LEDs on the front of each power supply indicate when there is a problem such as a failed or failing power supply If a...

Страница 34: ...power supply is not compatible with the installed power supply About Accelerator card monitoring The LEDs on an Accelerator card indicate when there is a problem with the card If an Accelerator card...

Страница 35: ...red POST failure POST Steady green Steady green Normal operation passed POST State save Steady yellow Flashing green NVRAM state save in progress State restore Flashing yellow Flashing green NVRAM st...

Страница 36: ...d then restarting the server prompts the Accelerator card to fail and use its backup firmware If both LEDs on the Accelerator card are not glowing steady green or the server fails to return to normal...

Страница 37: ...tates Link Status top LED Activity Status bottom LED Description Off Off No network connection Off Flash green Sending or receiving network data Steady green Off Connected to the network Table 10 1GB...

Страница 38: ...Chapter 4 Server troubleshooting 38 Link Status left LED Activity Status right LED Status Description Off Flash green Sending or receiving network data...

Страница 39: ...s protected from electrostatic discharge Handle drives carefully Hold a drive only by the plastic part of the carrier or the handle Do not drop or jolt a drive or force a drive into a drive slot Do no...

Страница 40: ...nes for protecting hardware from electrostatic discharge Procedure overview Do not leave a drive slot empty Do not remove a failed drive unless you have a replacement drive or blank carrier ready to i...

Страница 41: ...same type speed and capacity of the drive you are replacing Read the guidelines for maintaining disk drives and verified that all backup operations have completed Read the guidelines for protecting h...

Страница 42: ...edge of the plastic drive carrier and slowly insert the drive into the slot stopping when you feel resistance 6 Simultaneously rotate the handle upward and press the drive completely into the slot 7...

Страница 43: ...leave a power supply slot open Do not remove a power supply until you are ready to replace it A server can operate with only one functioning power supply However replace a failed or failing power supp...

Страница 44: ...to the right 4 Gently pull the power supply from the slot Install a power supply You install a power supply to replace a failed or failing power supply Before you begin You have completed these tasks...

Страница 45: ...power supply is fully inserted and locked in by the orange spring loaded clip 5 Connect and secure the power cable to the new power supply 6 Ensure that the power cables are fully inserted at both en...

Страница 46: ...different options for cabling the 10GbE and 1GbE interfaces used for the SimpliVity networks Storage Federation and Management You select the configuration that best meets the needs of your environmen...

Страница 47: ...to different 10GbE switches Separate the SimpliVity Storage Management and Federation networks by using VLANs on each switch About the direct connected network configuration A direct connected networ...

Страница 48: ...use two network cables to connect the 1GbE network interfaces to different 1GbE switches 1GbE cables are not provided in the shipping carton Port 1 on system A must connect to port 1 on system B and...

Страница 49: ...guidelines For each system use two SFP Direct Attach active cables or Fiber Optic cables to connect the 10GbE network interfaces to different 10GbE switches For each system use two network cables to c...

Страница 50: ...ystem The operating system that runs inside a virtual machine host A generic term referring to either an OmniStack host or a legacy host legacy host A host that does not contain OmniStack software Omn...

Страница 51: ...acilitates communication between OmniStack hosts in a Federation and enables failover and recovery operations The Arbiter casts a tie breaking vote in datacenter or cluster failure scenarios that incl...

Отзывы: