background image

130

IT

ES

FR

BE

GB

RUS

RO

3.1

ELECTRONIC BOARD

Built according to Low Voltage direc-
tive 2006/95/CEE and powered at
230 Volt, via a transformer it sends
24 Volt power to the following compo-
nents: gas valve, safety thermostat,
heating probe, external temperature
pr obe (optional), wat er pr essur e
tr ansducer, air pr essur e switch,
room thermostat or “Remote Control
Logic”. An automatic and continual
modulation system permits the boiler
t o   a d j u s t   p o w e r   t o   t h e   v a r i o u s
system or user needs. Electronic
components are guaranteed to ope-
rate in a temperature range from 0
to +60°C.

3.1.1

Malfunctions

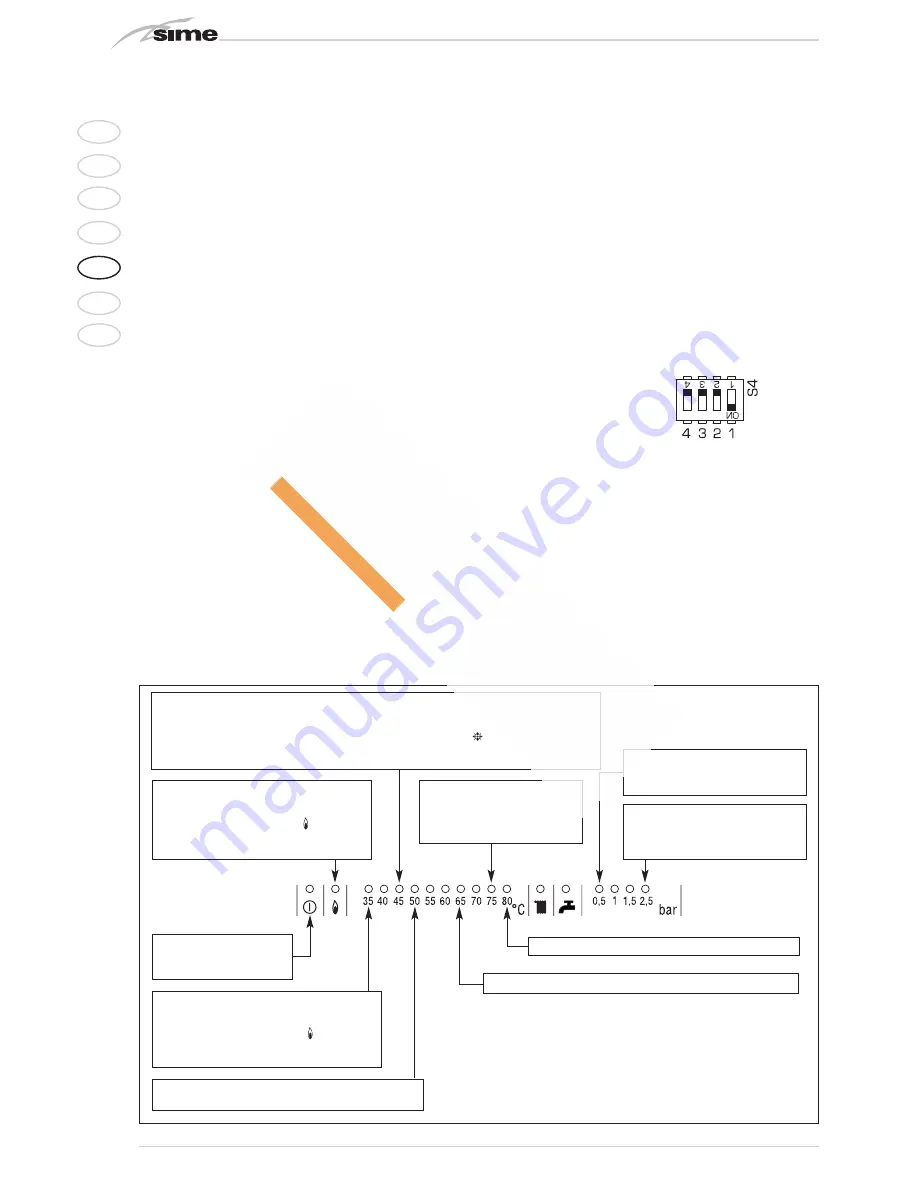
Boiler malfunctions or failures can be
indicated by a flashing temperature
LED as shown in fig 12.

3.1.2

Devices

The electronic board is equipped with
the following devices:

“HEATING POWER” TRIMMER 

(10 fig. 13)
Adjusts maximum heating power. To
increase the value, rotate the trim-
mer clockwise, to reduce it, rotate

the trimmer counter-clockwise.

“IGNITION POWER” TRIMMER 

(6 fig. 13)
Trimmer to vary the gas valve ignition
pressure level (STEP). According to
the type of gas the boiler is designed
for, the trimmer must be adjusted to
achieve a burner pressure of approxi-
mately 6.5 mm H

2

O for methane gas

and 9.5 mm H

2

O for propane gas

(G31). To increase pressure, rotate
the trimmer clockwise, to reduce it,
rotate the trimmer counter-clockwi-
se. The slow ignition pressure level
can be set during the first five
seconds after the burner is lit.

After setting the ignition pressure
level (STEP) according to the type of
gas, make sure that the heating gas
pressure is still the previously set
value.

“ANN. RIT.” CONNECTOR 

(5 fig. 13)
The electronic board is program-
med, during heating, with a techni-
c a l   b u r n e r   d e l a y   o f   a b o u t   9 0
seconds that is performed both at
cold start and subsequent ignitions.
This is to prevent rapid ignitions and
shutdowns that could, in particular,
occur in systems with high load los-
ses. Each time the boiler restarts,
after the slow ignition, for about 1
minute it will run at minimum modu-

lation pressure before moving to
the set heating pressure.
The addition of a bridge will cancel
both the programmed technical
delay and the minimum pressure
operating period at ignition.
In this case, the time between shut-
d o w n   a n d   t h e   n e x t   i g n i t i o n   w i l l
depend on a 5°C differential detec-
ted by the heating probe (SM).

DIP SWITCH 

(13 fig. 13)

For correct module operations, the
dip switches must be positioned as
indicated below:

“Modureg Sel.” connector 

(14 fig. 13)

The bridge must always be 

connec-

ted

“Albatros” connector 

(15 fig. 13)

The bridge must always be off. It is
only engaged in sequence/cascade
installations with several boilers. 

WARNING: All the above operations
must be performed by authorised
personnel, otherwise the warranty
shall be invalidated.

3

CHARACTERISTICS

Flashing red led, 

communication fault 

with “Logica Remote Control”

Green led off if 

power is cut-off

Blinking red air pressure switch fault led

Flashing red led, water 

pressure is too low (*)

Flashing red led, heating sensor fault (SM)

Flashing red led,

plant safety 

valve tripped (*)

Red led on, ignition blocked: 

rotate selector CR/OFF/EST/INV/RESET 

to release position (

to restore operation

Flashing red led, safety stat tripped. 

Rotate selector CR/OFF/EST/INV/RESET 

to release position (

)

to restore operation

(*)  When all 0.5 to 2.5 bar leds are off, check the water pressure transducer

connection.

WARNING: the operation of plants with open vessels is guaranteed only for

static pressures above 0.7 bar. 

On model “100 BFR” continuous operation can be guaranteed, even for pres-

sure reductions > 4 bars, by activating jumpers  X4 e X25 (fig. 13) only and

electrically disconnecting the connector from the water pressure transducer.

The operating pressure can be measured using the pressure gauge installed

in the plant. 

Fig. 12

Flashing red led, flame detection circuit fault

Blinking red fan fault led. 30 minutes after the fan turns off, the board attempts to

restart it. To identify where the fault occurred in sequence/cascade installations, turn

the CR/OFF/INV/RELEASE selector on each module to the (

) position and check

where the red fault led blinks.

Содержание PLANET DEWY 100

Страница 1: ...ro perly installed Make sure that any shutoff valves are open Make sure that the system is charged with water and is thoroughly vented Check that the circulating pump is not locked Purge the system bl...

Страница 2: ...Filling system G 1 2 UNI ISO 228 1 R3 Tank return G 1 UNI ISO 228 1 S3 Condensation outlet 25 CA Inlet 80 CS Outlet 80 ATTENTION the boiler is supplied as Class B device To install the boiler as Class...

Страница 3: ...panel 16 Safety valve 4 BAR 1 3 2 PLANET DEWY 100 BFR 1 2 3 4 5 6 7 8 18 13 9 10 11 14 17 15 Fig 2 a KEY 1 Gas valve 2 Condensation drain siphon 3 Fan 4 Air pressure switch 5 Ignition electrode 6 Det...

Страница 4: ...es temperature minimum 50 30 C C 32 32 Smokes flow kg h 97 166 CO2 maximum minimum G20 9 0 9 0 9 0 9 0 CO2 maximum minimum G31 10 0 10 0 10 0 10 0 Maximum pressure exhaust manifold output Pa 110 170 A...

Страница 5: ...trol unit code 8096301 supplied by Sime upon request a maximum of four boilers can be controlled The control unit kit is supplied with assembly and use instructions 2 INSTALLATION 45 146 R3 500 865 58...

Страница 6: ...poor gas valve operation or failure of any gas valve safety feature it is advisable to fit a suitable filter on the gas supply pipe 2 5 FILLING THE SYSTEM Cold system filling pressure must be 1 bar Th...

Страница 7: ...the internal section of the gaskets with silicon products and generally avoid the use of oils and greases TABLE OF LOAD LOSSES OF ACCESSORIES Fig 4 a KEY 1 80 curve 90 MF 6 pcs code 8077450 2 a 80 ext...

Страница 8: ...orizontal terminals must be LEVEL WARNING In the versions 60 BFR he insertion of a 90 additional curve reduces the available length by 2 meters end the insertion of a 45 additional curve reduces the a...

Страница 9: ...m use cables of sec tion 0 25 mm2 for longer lengths up to 50 m use cables of section 0 5 mm2 To gain access to boiler connector 3 remo ve the control panel cover and connect the external temperature...

Страница 10: ...mer NOTE Connect the room thermostat TA to terminals 5 6 after removing the bridge Fan control board SV MAX and MIN trimmers are sealed and must never be tampered with CONNECTOR SPARE PART CODES J2 co...

Страница 11: ...CR Remote Control Logic optional SV Fan board TF Exhaust thermostat PA Air pressure switch SB Boiler probe PB Boiler pump TRA Ignition transformer NOTE Connect the room thermostat TA to terminals 5 6...

Страница 12: ...ump PI System pump R R1 R2 Relay CR CR1 CR2 Relay contact TA Room thermostat VR Non return valve M C H flow R C H return Note The relay R disconnects the heating pump when the requirements of both ser...

Страница 13: ...must be installed in the main living room For installation follow the assembly instructions inserted in the package At this point with the selector knob on the installer can adjust the basic paramete...

Страница 14: ...e imposed value With the activation of the adaptation the pre set value transmitted to the boiler regulator is adapted to the effective heat need The adaptation functions with both the atmospheric gui...

Страница 15: ...ssible to switch over to reduced pre set value of the antifreeze ambient temperature short circuit 0 0 0 or interruption _ _ _ The display shows the current status of the external contact 64 Operating...

Страница 16: ...ting pressure The addition of a bridge will cancel both the programmed technical delay and the minimum pressure operating period at ignition In this case the time between shut down and the next igniti...

Страница 17: ...No flame detection At ignition the electrode continues to spark even though the burner is on After 10 sec it stops sparking the burner turns off and the block led turns on This may be due to a faulty...

Страница 18: ...Y 1 Gas valve 2 Condensation drain siphon 3 Boiler pump not supplied 4 Fan 5 Heating probe SM 6 Safety thermostat 95 C 7 Exhaust thermostat 8 Primary exchanger 9 Diaphragm 10 Differential pressure swi...

Страница 19: ...AR safety valve 18 Non return valve not supplied 19 Hydraulic compensator supplied in the kit 20 Drain tap not supplied 21 Expansion vessel 8 liter supplied in the kit 22 Air relief valve not supplied...

Страница 20: ...n 0 2 from the table values the following corrections must be made To correct CO2 to the MIN power use the OFF SET screw 2 Drawing 6 To correct CO2 to the MAX power use the shutter 1 Drawing 6 Drawing...

Страница 21: ...he spe cial opening fig 20 4 4 1 Chimney sweep function To check single module combustion rotate the selector to position until the yellow led starts to blink fig 21 At this time the module will start...

Страница 22: ...d the yel low heating led turns on simulta neously If the water return tempera ture is lower than about 55 C com bustion product condensates further increasing heat exchange efficiency GAS CONVERSION...

Страница 23: ...l the green 1 bar led turns on If all leds are off request an authorised engineer Safety exhaust thermostat triggered fig 5 If the safety exhaust thermostat triggers the red 35 C led blinks To attempt...

Страница 24: ...n 5 Operating mode button availability 6 Cover with instruction compartment 7 Temperature knob 8 Presence button Fig 8 KEY 1 Display time 2 Heating programme 3 Unit C 4 Presence button display 5 Exter...

Страница 25: ...to function independently of the display Day hour room temperature External temperature Hot water service temperature Only with outside sensor fitted Info key reference key grey colour The operating...

Страница 26: ...service temperature parameter press the and keys at the same time for at least 5 seconds and then go along the entered lines with the key until parameter 61 is reached Regulate the value with and Bef...

Страница 27: ...ter 3 1 standard Hot water according to the daily heating programme In the comfort periods of the heating the temperature of the boiler unit is regulated at the value set via para meter 61 2 sservice...

Страница 28: ...Setting the time To set the current day of the week 1 Monday 7 Sunday To set the current hour To set the current minute Once the hour is completed the setting of the hour changes 12 13 14 With and ke...

Отзывы: