SilverStone FORTRESS FT02 Скачать руководство пользователя страница 9

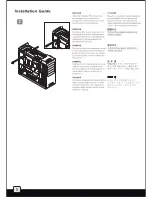
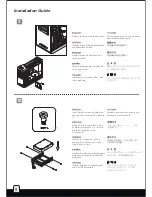
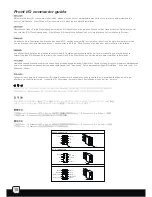
Push the 5.25” tool-less buttons to “unlock”  

position,then insert an optical drive or other  

5.25” device into the case and align its bezel  

to the front panel 

С


помощью


отвертки


удалите


стальные


пластины


на


отсеке


для


5,25-

дюймового


дисковода

затем


нажмите


безвинтовые


кнопки


отсека

,  

приведя


их


в


положение

 "unlock". 

Вставьте


оптический


привод


или


другое

 5,25-

дюймовое


устройство


в


корпус


и


выровняйте


его


лицевую


панель


с


передней


панелью

.

Drücken Sie die 5,25-Zoll-Knöpfe (kein 

Werkzeug erforderlich) in die „unlocked“

(entsperrt)-Position. Platzieren Sie dann 

optische Laufwerk oder ein anderes 

5,25-Zoll-Gerät im Gehäuse; richten Sie 

dessen Blende an der Vorderseite aus.

Poussez les boutons "sans-outils" pour 

déverrouillez la position, puis insérez un 

lecteur optique ou un autre appareil 

5.25” dans le boîtier et alignez sa façade 

avec le panneau frontal

Empuje de 5,25”la bahía para dispositivos 

los botones a la posición “abierto”. Luego 

inserte un dispositivo óptico u otro 

dispositivo de 5,25” en la carcasa y alinee 

su tapa con el panel frontal.

Premere  il 5,25 " bay il pulsante tool-less 

nella posizione di sblocco, quindi inserire 

un drive ottico o altre periferiche adatte 

nel bay da 5.25” ed allineare il frontalino 

al pannello frontale.

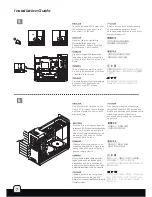
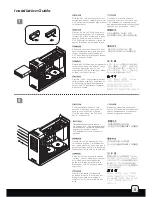
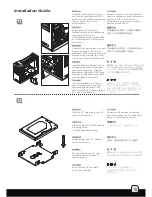
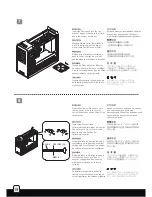
Push the tool-less button to “lock”  

position.  Optionally, screw A can be  

used to secure the drive or device  

from the other side of the 5.25” drive  

bay for extra security 

툴레스 버튼을 “Lock”(잠금) 
위치에 놓습니다. 부가적으로 
Screw A를 이용해, 좀더 단단히 
5.25” 장치를 고정시킬 수 
있습니다. 

5.25” 툴레스 버튼을 “Unlock”
(열림) 위치로 놓습니다, 
광드라이브 혹은 다른 5.25”
장치를 케이스에 삽입한 후, 
베젤을 전면 패널에 정렬 시킵니다. 

道具不要ボタンの位置を「ロック」
にします。オプションで、5.25イン
チのドライブベイの反対側からネジ
Aを使って、さらなる安全のために
ドライブまたはデバイスを固定する
こともできます。

5.25インチツール不要ボタンの位置を
「ロック解除」にします。光学ドライ
ブまたはその他5.25インチのデバイス
をケースに入れ、フロントパネルにそ
のベゼルを位置合わせします。


按壓右側開關至"LOCK"位置, 
另一邊也可以選擇用SCERW A 加強鎖固。 

按壓右側開關至"UNLOCK" 位置, 
將光碟機放入機殼,並對齊面板的位置。 

按压右侧开关至"LOCK"位置, 
另一边也可以选择用SCERW A 加强锁固。 

按压右侧开关至"UNLOCK" 位置, 
将光驱放入机箱,并对齐面板的位置。 

Приведите


безвинтовые


кнопки


в


положение

 “lock”. 

При


желании


можно


дополнительно


закрепить


привод


или


устройство


с


другой


стороны


5,25-

дюймового


отсека


с


помощью


шурупа


А

Poussez le bouton "sans-outils" pour 

verrouiller la position. Facultativement 

pour plus de sécurité, une vis de type A 

peut être utilisée pour fixer le lecteur ou 

l'appareil par l'autre côté de la baie 5.25”

Empuje el botón manual a la posición 

“cerrado”. Como opción, se puede usar 

el tornillo A para fijar el dispositivo 

desde el otro lado de la bahía para 

dispositivos de 5,25” para una mayor 

seguridad

Premere il pulsante tool-less nella 

posizione di blocco. E’ possibile, per 

maggior sicurezza nel montaggio, 

utilizzare le viti A per il serraggio del 

drive.

lnstallation Guide

Содержание FORTRESS FT02

Страница 1: ...MANUAL FORTRESS SERIES FT02...

Страница 2: ...this manual for future reference when upgrading or performing maintenance on your system A copy of this manual can also be downloaded from our website at http www silverstonetek com Disassemble chart...

Страница 3: ...FT02S W silver window 1 x 120mm exhaust 1200rpm 19dBA USB2 0 x 2 audio x 1 MIC x 1 1 x optional standard PS2 ATX Compatible with expansion card up to 12 inches 7 212mm W x 497mm H x 616mm D Model No E...

Страница 4: ...POWER SUPPLY SECURE FAN USB2 0 CONNECTOR PIN USB 5V GND NC LP LP USB 5V GND PIN LP LP AUD GND RET R RET L PIN NC MIC MIC BIAS FPOUT R FPOUT L NC PIN PIN HD CONNECTOR AUD GND PORT1L PORT2L PORT1R PORT...

Страница 5: ...igual en la direcci n que indica la flecha Porre una mano nel foro della maniglia posteriore posta in alto ed un altra nel foro dei cavi quindi tirare via il top nella direzione illustrata dalla frec...

Страница 6: ......

Страница 7: ...r la FA 4 5 Haga pasar la correa de la FA alrededor de la FA y a trav s del agujero correspondiente en la bandeja de la placa base para asegurar la FA 4 Installez l alimentation dans le bo tier comme...

Страница 8: ...gh oval holes located on the left front side as shown 5 25 PSU Screw C 5 25 PSU C CD COVER CD COVER SCREW C CD COVER CD COVER SCREW C Dr cken Sie die Abdeckungen der vorderen 5 25 Zoll Laufwerkseinsch...

Страница 9: ...ulsante tool less nella posizione di sblocco quindi inserire un drive ottico o altre periferiche adatte nel bay da 5 25 ed allineare il frontalino al pannello frontale Push the tool less button to loc...

Страница 10: ...d drive into the hard drive tray and then use screw B to secure it B B SCREW B SCREW B Setzen Sie die Festplatte in den Festplatteneinschub ein fixieren Sie die Festplatte mit der Schraube B Ins rez u...

Страница 11: ...uros completada de nuevo en la carcasa se pueden comprar por separado adaptadores adicionales CP05 para hacer que todos los discos duros SATA sean cambiables en caliente Inserire il complesso montato...

Страница 12: ...viti A per assicurare il drive da 2 5 alla staffa Use screw A to secure the 2 5 drive bracket to the case A 2 5 A 2 5 2 5 A 2 5 A SCREW A 2 5 SCREW A 2 5 2 5 SCREW A 2 5 SCREW A 2 5 2 5 Sichern Sie d...

Страница 13: ...a scheda madre quindi appoggiare la scheda madre sugli standoff ed assicurarla ai supporti con le viti C C C SCREW D SCREW C SCREW D SCREW C Remove the expansion slot covers as required then insert ex...

Страница 14: ...cables vuelva a poner los paneles laterales en la carcasa y f jelos con los tornillos que se quitaron en el paso 2 Dopo che tutti i cavi sono stati connessi e sistemati rimontare il pannello laterale...

Страница 15: ...he Power LED wires are separate pins for compatibility with different motherboard pin definition so please make sure they are connected in the right polarity by referring to your motherboard manual LE...

Страница 16: ...aci n se detallan los pines para conectores E S frontales compruebe tambi n por favor el manual de su placa base para cotejar los pines E S frontales de la misma Los conectores E S de SilverStone son...

Страница 17: ...switch for the 180mm fans from the top panel indicated by labels front middle and rear M2 3 180 front middle rear Entfernen Sie die vier M2 3 Schrauben vom oberen Paneel die den L ftermotorschalter de...

Страница 18: ...que sujetan la rejilla del ventilador al ventilador Rimuovere il supporto della ventola da 180mm dal case quindi svitare le otto viti che trattengono la griglia della ventola 180mm 8 180mm 8 180 8 180...

Страница 19: ...radiator alle ventole come mostrato Install the radiator fan assembly into the case and secure with screws Installieren Sie die K hler L fter Kombination im Geh use befestigen Sie diese mit Schrauben...

Страница 20: ...modo corretto 180 180 180 180 Reinstall all fan switches back onto the top panel be sure to note the correct orientation and position of the fan switches Installieren Sie s mtliche L ftermotorschalte...

Страница 21: ...e Einhaltung der folgenden Abmessungsrichtlinien Le FORTRESS FT02 a t con u pour accueillir des composants surdimensionn s mais nous recommandons de toujours vous r f rer aux dimensions maximales suiv...

Страница 22: ...SUS Rampage II Extreme is wider than standard ATX motherboard Although the FORTRESS FT02 was not designed for Extended ATX motherboard the internal space can still allow installation for a motherboard...

Страница 23: ...e hasta 11 pulgadas Placas base como la Asus Rampage II Extreme 10 6 pulgadas y la EVGA X58 SLI Classified 10 375 pulgadas son m s anchas que la especificaci n est ndar ATX para placas base de 9 6 pul...

Страница 24: ...s de 5 25 peuvent toujours accueillir des lecteurs d une profondeur de 180mm alors que les troisi me quatri me et cinqui me baies peuvent accueillir de lecteurs d une longueur de 185mm Si se usa el s...

Страница 25: ...24 The gap between I O and top cover is 70mm Acceptable connector Unacceptable connector 70mm Top cover limitation...

Страница 26: ...e recommend models that have fan blowing exhaust air to the rear slot this will ensure smooth and efficient airflow within the FT02 for maximum cooling performance FT02 Wenn Sie eine Grafikkarte ausw...

Страница 27: ...Geschwindigkeiten dienen einem ger uscharmen oder besonders leistungsstarken Betrieb Anleitung zum Motorschalter des 180 mm L fters L zeigt eine langsame Geschwindigkeit H eine hohe Geschwindigkeit a...

Страница 28: ...rpm 180 L H 180mm FT02 180mm 700 1000rpm 180 L H 180mm FT02 3 180mm 700rpm 1000rpm 2 180mm L H 180mm 3 Le tre ventole principali da 180mm di FT02 sono regolabili secondo due velocit 700 o 1000rpm Rego...

Страница 29: ...by labels front middle and rear M2 3 180 front middle rear 1 Fan removal guide If you need to replace clean or upgrade the fan please follow the steps below 6 M2x3 180mm front middle and rear 180 mm 1...

Страница 30: ...a 180mm dal case Use the included radiator bracket from the accessories box and secure them onto the radiator Verwenden Sie die mitgelieferte K hlerhalterung aus dem Zubeh rkarton befestigen Sie diese...

Страница 31: ...an den Luftzufuhrfiltern des FT02 anstatt an den Komponenten im Geh useinneren an Sie k nnen eine jahrelange optimale K hlleistung des FT02 gew hrleisten indem Sie alle L fterfilter regelm ig alle dr...

Страница 32: ...2 Gu a para quitar el filtro de la fuente de alimentaci n por favor presione los dos enganches del filtro de la fuente de alimentaci n como se muestra en la ilustraci n 1 luego tire de ellos para qui...

Страница 33: ...l des Geh uses bitte halten Sie sich an das nachs tehende Beispiel Le FT02 est compatible avec l installation du SST CLEARCMOS dans une partie sp ciale du bo tier voici un exemple ci dessous La FT02 a...

Страница 34: ...swap vous avez besoin d tre sur et certains que la puce SATA ou la puce southbridge de la carte m re utilis pour brancher le disque dur poss de un bon support et un bon pilote pour cette fonctionnali...

Страница 35: ...sistema per hard disk hot swap fate riferimento al video presente presso il seguente link http www youtube com watch v NoNiEMPnSEk B Una volta configurato il sistema per la funzionalit hot swap vi rac...

Страница 36: ...September 2009 Issue date G11210830...

Отзывы: