background image

SilverCrest SDA 260 A1


96 - English  


Service


Phone: 

0207 – 36 50 744 

   E-Mail: 

[email protected] 


Phone: 

01 – 242 15 83 

   E-Mail: 

[email protected] 


Phone: 

800 – 62 175 

   E-Mail: 

[email protected] 


Phone: 

800 – 92 496 

   E-Mail: 

[email protected] 


IAN: 111549


Manufacturer


Please note that the following address is not a service address. First contact the service point stated above. 

 TARGA 

GmbH 

Coesterweg 45 

59494 SOEST 

GERMANY 


Содержание 111549

Страница 1: ......

Страница 2: ......

Страница 3: ...Deutsch 2 Français 25 Italiano 51 English 75 V 1 4 ...

Страница 4: ...onen zum Dörren 12 Inbetriebnahme 13 Erste Inbetriebnahme 13 Dörrautomaten gebrauchen 14 Lebensmittel zum Dörren vorbereiten 14 Dörrautomaten aufstellen 15 Dörreinsätze belegen und installieren 15 Dörrautomaten einschalten und programmieren 16 Tipps für gute Dörrergebnisse 17 Wartung Reinigung 20 Dörrautomaten lagern 21 Problemlösung 22 Umwelthinweise und Entsorgungsangaben 22 Konformität 23 Garan...

Страница 5: ...insatz bestimmt Dieser Dörrautomat darf nur in geschlossenen Räumen und nicht im Freien verwendet werden Achten Sie immer auf einen festen Stand des Dörrautomaten Das Gerät erfüllt alle im Zusammenhang mit der CE Konformität relevanten Normen und Standards Bei einer nicht mit dem Hersteller abgestimmten Änderung des Gerätes ist die Einhaltung dieser Normen nicht mehr gewährleistet Vorhersehbarer M...

Страница 6: ...n Umschlag versehen In der Innenseite des Umschlags ist der Dörrautomat mit einer Bezifferung abgebildet Die Ziffern haben folgende Bedeutung 1 Deckel 2 Dörreinsätze 3 Netzkabel 4 Sockel 5 Display 6 Taste Wert verringern 7 Taste Temp Einstellung der Dörrtemperatur 8 Taste Start Reset Dörrautomaten ein ausschalten laufenden Dörrvorgang abbrechen 9 Taste Timer Einstellung der Dörrzeit 10 Taste Wert ...

Страница 7: ...rreinsätze ineinander gestapelt ca 30 5 x 32 x 29 5 cm B x T x H Dörreinsätze hochgestellt ca 30 5 x 32 x 38 5 cm B x T x H Abstand der Dörreinsätze Dörreinsätze ineinander gestapelt ca 2 6 cm Dörreinsätze hochgestellt ca 4 7 cm Umgebungsbedingungen Betriebstemperatur 10 bis 35 C Lagertemperatur 1 bis 40 C Gewicht ca 2 495 g Deckel ca 250 g Dörreinsatz ca 198 g Sockel ca 1 255 g TÜV Rheinland gepr...

Страница 8: ...urch Stromschläge Dieses Symbol warnt vor Gefahren die bei Nichtbeachtung Leib und Leben durch Stromschläge gefährden können Gefahr von Verbrennungen Dieses Symbol warnt vor heißen Oberflächen WARNUNG Dieses Symbol kennzeichnet wichtige Hinweise für den sicheren Betrieb des Gerätes und zum Schutz des Anwenders Es warnt vor Gefahren die bei Nichtbeachtung Leib und Leben gefährden sowie Verletzungen...

Страница 9: ...r nur unter Beaufsichtigung durchgeführt werden Kinder unter 8 Jahren sind vom Gerät und dem Netzkabel fernzuhalten WARNUNG vor Erstickung Verpackungsmaterial ist kein Kinderspielzeug Kinder dürfen nicht mit den Kunststoffbeuteln spielen Es besteht Erstickungsgefahr Bewahren Sie das Gerät außerhalb der Reichweite von Kindern auf Allgemeine Sicherheitshinweise Gefahr durch Stromschläge Das Sockelge...

Страница 10: ... werden bevor eine Überprüfung durch einen Fachmann durchgeführt wurde Atmen Sie keinesfalls Rauch aus einem möglichen Gerätebrand ein Sollten Sie dennoch Rauch eingeatmet haben suchen Sie einen Arzt auf Das Einatmen von Rauch kann gesundheitsschädlich sein Stellen Sie sicher dass das Netzkabel 3 nicht durch scharfe Kanten oder heiße Stellen beschädigt werden kann Stellen Sie sicher dass das Netzk...

Страница 11: ...nur an eine ordnungsgemäß installierte leicht zugängliche Steckdose an deren Netzspannung der Angabe auf dem Typenschild entspricht Die Steckdose muss nach dem Anschließen weiterhin leicht zugänglich sein damit Sie im Notfall den Netzstecker schnell ziehen können Tauchen Sie den Sockel 4 das Netzkabel 3 oder den Netzstecker niemals in Wasser oder andere Flüssigkeiten Sollte Flüssigkeit in den Sock...

Страница 12: ...en Sie niemals die Lüftungsschlitze auf der Unterseite des Sockels oder decken diese mit Stoff ab Anderenfalls kann der Dörrautomat überhitzen und einen Brand verursachen Legen Sie kein Papier Stoff oder andere Gegenstände auf die Dörreinsätze Stellen Sie den Dörrautomat nicht in der Nähe von Wärmequellen wie Radiatoren Öfen oder anderen Geräten einschließlich Verstärker die Wärme abgeben auf Gefa...

Страница 13: ...en Dörrautomaten nicht länger als 72 Stunden am Stück gebrauchen Anderenfalls kann die Lebensdauer der Heizeinheit beeinträchtigt werden Die Dörreinsätze 2 sind nicht geeignet Gewicht zu tragen Legen Sie keine schweren Lebensmittel oder gar andere Gegenstände auf die Dörreinsätze 2 Netzkabel Fassen Sie das Netzkabel 3 immer am Netzstecker und ziehen Sie nicht am Kabel selbst Stellen Sie weder das ...

Страница 14: ...en wie Schwefel hohe Stickstoffkonzentration o ä werden vermieden Beim Dörren wird den Lebensmitteln möglichst viel Wasser entzogen um den für den Verderb derselben verantwortlichen Mikroorganismen Schimmelpilze Bakterien usw die Lebensgrundlage zu entziehen Die meisten Bakterien benötigen einen Wassergehalt von mindestens 35 Schimmelpilze sind noch bis zu einem Wassergehalt von ca 15 tätig In Ihr...

Страница 15: ...ichter Geruch entstehen Daher sollten Sie den Deckel 1 und die Dörreinsätze 2 zunächst abspülen und gut abtrocknen den Sockel 4 feucht abwischen und gut abtrocknen und das Gerät anschließend ohne Dörrgut und mit allen 5 Dörreinsätzen 2 und Deckel 1 ca 30 Minuten lang auf 70 C betreiben Dazu gehen Sie folgendermaßen vor 1 Stellen Sie den Sockel 4 auf eine ebene rutschfeste und trockene Oberfläche 2...

Страница 16: ...zur verbesserten Haltbarkeit und für maximalen Geschmack zu erhalten Dörren Sie keine fettigen oder ölhaltigen Lebensmittel z B fettiges Fleisch oder Fleisch das in einer öligen Marinade eingelegt war Fett und Öl wird beim Dörren ranzig Ähnlich verhält es sich mit Sahne Milch oder Butter verwenden Sie diese auch nicht für Marinaden Sie sollten alle Lebensmittel gut abwaschen bevor Sie sie dörren W...

Страница 17: ...nn Sie zwei Dörreinsätze 2 ineinander stapeln und feststellen dass der obere Dörreinsatz 2 auf dem Dörrgut aufliegt müssen den oberen Dörreinsatz 2 hochstellen siehe die folgende Abbildung Dörreinsätze 2 hochgestellt Dörreinsätze 2 ineinander gesetzt Richten Sie die innen am unteren Rand der Dörreinsätze 2 vorhandenen Kunststofflaschen mit den 4 senkrechten Kunststoffnasen aus Drehen Sie die Dörre...

Страница 18: ...ehrmals die Taste 6 bzw 10 bis die gewünschte Dörrzeit eingestellt ist siehe die Empfehlungen ab Seite 17 Nach ca 2 Sekunden wird der eingestellte Wert übernommen 5 Drücken Sie die Taste Temp 7 Daraufhin blinkt die Temperaturanzeige Die Voreinstellung ist 70 C Drücken Sie ggf mehrmals die Taste 6 bzw 10 bis die gewünschte Temperatur eingestellt ist siehe die Empfehlungen ab Seite 17 Nach ca 2 Seku...

Страница 19: ...e Dörren Sie keine fettigen oder ölhaltigen Lebensmittel z B fettiges Fleisch oder Fleisch das in einer öligen Marinade eingelegt war Fett und Öl wird beim Dörren ranzig Ähnlich verhält es sich mit Sahne Milch oder Butter verwenden Sie diese auch nicht für Marinaden Die nachfolgend angegeben Dörrzeiten sind Richtwerte Sie können je nach Menge des Dörrguts seiner Dicke und Größe usw abweichen Mache...

Страница 20: ...ere halbiert oder ganz 70 8 10 hart Feigen halbiert Schale nach unten 70 8 10 trocken Kirsche ganz entkernt 70 10 12 lederartig Pflaume halbiert Schale nach unten 70 10 12 biegsam Weintraube halbiert Schale nach unten 70 12 14 gut biegsam Gemüse Vor dem Dörren sollten Sie das Gemüse blanchieren Gedörrtes Gemüse muss vor dem Kochen eingeweicht werden Sie können es auch in gedörrtem Zustand zermahle...

Страница 21: ...anz große Pilze in Scheiben 50 4 6 zäh Sellerie geschält ca 8 mm dicke Scheiben 70 6 10 hart Tomate halbiert Schale nach unten ca 6 mm dicke Scheiben 70 70 12 14 7 10 biegsam hart Zucchini ungeschält ca 8 mm dicke Scheiben 60 6 8 hart Kräuter Kräuter sollten schonend bei niedriger Temperatur gedörrt werden Wenn während des Dörrvorgangs ein intensiver Geruch entsteht regeln Sie die Temperatur herun...

Страница 22: ...ei 60 Fisch Verwenden Sie nur frischen Fisch Entfernen Sie die Gräten und die Haut und waschen Sie den Fisch gut ab Fisch sollte vor dem Dörren mariniert werden Beträufeln Sie ihn mit Zitronensaft und legen Sie ihn ca Stunde in Salzwasser ein Schneiden Sie den Fisch in dünne Scheiben bevor Sie ihn dörren Dörren ca 10 bis 12 Stunden bei 60 Gedörrter Fisch muss vor der Zubereitung wieder eingeweicht...

Страница 23: ...rn Wenn Sie den Dörrautomaten lagern möchten lassen Sie ihn am besten montiert um ihn zu schützen Dazu müssen die Dörreinsätze 2 ineinander greifen siehe die folgende Abbildung damit ihr Abstand verringert ist So nimmt das Gerät weniger Platz weg und die Dörreinsätze können auch nicht versehentlich umfallen 1 Drehen Sie die Dörreinsätze 2 so dass die innen am unteren Rand der Dörreinsätze 2 vorhan...

Страница 24: ...tellen Sie ggf eine größere Dörrzeit ein Umwelthinweise und Entsorgungsangaben Wenn dieses Symbol eines durchgestrichenen Abfalleimers auf einem Produkt angebracht ist unterliegt dieses Produkt der europäischen Richtlinie 2012 19 EU Alle Elektro und Elektronikaltgeräte müssen getrennt vom Hausmüll über dafür staatlich vorgesehene Stellen entsorgt werden Das Gerät darf nicht mit dem Haus oder Sperr...

Страница 25: ...t Dies gilt auch für ersetzte und reparierte Teile Eventuell schon beim Kauf vorhandene Schäden und Mängel müssen sofort nach dem Auspacken gemeldet werden Nach Ablauf der Garantiezeit anfallende Reparaturen sind kostenpflichtig Garantieumfang Das Gerät wurde nach strengen Qualitätsrichtlinien sorgfältig produziert und vor Auslieferung gewissenhaft geprüft Die Garantieleistung gilt für Material od...

Страница 26: ...lnummer bzw wenn vorhanden die Seriennummer als Nachweis für den Kauf bereit Für den Fall dass eine telefonische Lösung nicht möglich ist wird durch unsere Hotline in Abhängigkeit der Fehlerursache ein weiterführender Service veranlasst Service Telefon 0049 0 211 547 69 93 E Mail service DE targa online com Telefon 0043 0 1 79 57 60 09 E Mail service AT targa online com Telefon 0041 0 44 511 82 91...

Страница 27: ...ation de l appareil 37 Utilisation du déshydrateur 38 Préparation des aliments pour la déshydratation 38 Installation du déshydrateur 38 Remplissage et installation des plateaux de déshydratation 39 Mise en marche et programmation du déshydrateur 40 Conseils pour obtenir de bons résultats de déshydratation 41 Entretien nettoyage 45 Stockage du déshydrateur 45 Résolution des problèmes 46 Réglementa...

Страница 28: ... usage commercial Le déshydrateur ne doit être utilisé qu en intérieur Il ne convient pas à une utilisation en extérieur Veillez toujours à ce que le déshydrateur repose sur une surface stable Cet appareil satisfait à toutes les normes de conformité CE et aux autres normes qui s appliquent Toute modification apportée à l appareil et non expressément approuvée par le fabricant peut avoir pour consé...

Страница 29: ...couverture comporte une illustration du déshydrateur avec des numéros Voici la liste des pièces auxquelles correspondent les numéros 1 Couvercle 2 Plateaux de déshydratation 3 Câble d alimentation 4 Unité de base 5 Écran 6 Bouton diminue la valeur 7 Bouton Temp règle la température de déshydratation 8 Bouton Start Reset met en marche à l arrêt le déshydrateur annule le processus de déshydratation ...

Страница 30: ...e Dimensions plateaux de déshydratation imbriqués les uns dans les autres environ 30 5 x 32 x 29 5 cm L x P x H plateaux de déshydratation empilés les uns sur les autres environ 30 5 x 32 x 38 5 cm L x P x H Espacement des plateaux de plateaux de déshydratation imbriqués les uns dans les autres déshydratation env 2 6 cm plateaux de déshydratation empilés les uns sur les autres env 4 7 cm Condition...

Страница 31: ... partie du produit Explication des symboles Dans ce manuel d utilisation les symboles suivants sont utilisés pour vous avertir des dangers éventuels Risque d électrocution Ce symbole vous informe de risques qui si vous n y prenez pas garde pourraient mettre en danger votre vie et votre intégrité physique suite à une électrocution Risques de brûlure Ce symbole indique la présence de surfaces chaude...

Страница 32: ...ience ou de connaissances en la matière à condition qu ils soient supervisés ou qu ils aient reçu les instructions nécessaires pour utiliser l appareil en toute sécurité et qu ils aient compris les dangers impliqués Ne laissez pas les enfants jouer avec l appareil Les enfants ne peuvent nettoyer et entretenir l appareil que s ils sont surveillés Les enfants de moins de 8 ans doivent être tenus à d...

Страница 33: ... aucun accessoire de l unité de déshydratation n est endommagé avant toute utilisation N ouvrez pas le boîtier de l unité de base 4 Il ne contient pas de pièces pouvant être réparées par l utilisateur L ouverture du boîtier de l unité de base 4 peut vous exposer à un risque d électrocution En cas de fumée d odeur ou de bruit inhabituel éteignez immédiatement l appareil et débranchez le de la prise...

Страница 34: ...iche d alimentation doit être retirée de la prise murale Pour débrancher le câble d alimentation de la prise de cou rant tirez toujours sur sa fiche et jamais sur le câble lui même Si vous remarquez des dégâts visibles sur le déshydrateur ou le câble d alimentation 3 éteignez l appareil débranchez le de la prise murale et contactez notre centre d assistance clientèle voir Informations concernant l...

Страница 35: ...e Ne placez jamais le déshydrateur sous ou à proximité immédiate d éléments inflammables tels que des rideaux ou des draps Ménagez un espace autour de l appareil d au moins 50 cm dans lequel il n y a pas de matériaux inflammables et combustibles Assurez vous que l air peut circuler librement Laissez un espace suffisant autour du déshydrateur et un espacement d au moins 1 mètre au dessus de l appar...

Страница 36: ...areil Par conséquent prenez garde de ne pas vous brûler Attendez que le déshydrateur et tous ses accessoires aient complètement refroidi avant de procéder à leur nettoyage Avertissement relatif aux dommages matériels Ne posez aucun objet sur le dessus du déshydrateur ou des plateaux de déshydratation 2 Placez le déshydrateur sur une surface régulière robuste résistante au feu et protégée contre le...

Страница 37: ...eurs ou de rallonges non conformes aux normes de sécurité en vigueur dans votre pays et ne modifiez pas le câble d alimentation 3 vous même Si jamais le câble d alimentation se trouve endommagé il doit obligatoirement être remplacé par le fabricant ou un centre d assistance clientèle agréé afin d éviter tous les risques Le déshydrateur n est pas conçu pour être utilisé avec une minuterie externe o...

Страница 38: ...nt des temps de déshydratation plus longs que ceux qui sont déjà relativement secs p ex les carottes Les vitamines les fibres et les minéraux sont préservés pendant le processus de déshydratation Comme l eau s évapore et le volume des aliments est réduit non seulement les vitamines et les minéraux sont concentrés mais la saveur l est également Les aliments déshydratés sont plus savoureux et leur g...

Страница 39: ...e est réglée 7 Appuyez sur le bouton Temp 7 L affichage de la température clignote Le réglage par défaut devrait déjà être 70 C Sinon appuyez plusieurs fois sur le bouton 6 ou sur le bouton 10 jusqu à ce que la température soit réglée sur 70C Après environ 2 secondes la valeur sélectionnée est réglée Pendant le fonctionnement un ventilateur tourne pour envoyer le flux d air dans les plateaux de dé...

Страница 40: ...s petites après la déshydratation Ne coupez pas les aliments en morceaux trop petits Comme la déshydratation réduit encore la taille des morceaux ils risqueraient de passer à travers les trous du tamis des plateaux de déshydratation Placez les morceaux de fruit non épluchés sur les plateaux de déshydratation avec la peau dessous le côté coupé doit donc être orienté vers le haut Une fois que les al...

Страница 41: ...ncoches verticales en plastique Tournez les plateaux de déshydratation 2 de sorte que les languettes en plastique situées sur le bord inférieur des plateaux de déshydratation 2 soient placées en regard des 4 encoches verticales en plastique Pour installer les plateaux de déshydratation 2 procédez comme suit 1 Placez les aliments préparés sur le plateau de déshydratation 2 2 Placez le premier plate...

Страница 42: ...ns les plateaux de déshydratation 2 Il est possible qu un clic se fasse entendre de temps à autre pendant le fonctionnement Cela est dû aux variations de température de sorte que l élément chauffant s allume s éteint Ces bruits ne sont pas le signe d un dysfonctionnement L écran 5 affiche maintenant le temps restant jusqu à ce que l appareil s éteigne Une fois que le compte à rebours est écoulé l ...

Страница 43: ...iliser dans les marinades Les temps de déshydratation indiqués dans les pages suivantes sont des valeurs indicatives Ces temps peuvent varier en fonction de la quantité d aliments déshydratés de leur épaisseur de leur taille etc Effectuez le test au toucher recommandé à intervalles réguliers pour déterminer si les aliments sont suffisamment déshydratés Si ce n est pas le cas poursuivez la déshydra...

Страница 44: ...lesse Abricots Non pelés coupés en deux côté peau dessous 70 10 12 Souple Banane Épluchée coupée en deux en quatre 70 8 10 Croustillant Poire Coupée en tranches d env 3 mm d épaisseur Coupée en deux côté peau dessous 70 70 8 10 14 18 Souple Souple Fraises Coupées en deux ou entières 70 8 10 Dur Figues Coupées en deux côté peau dessous 70 8 10 Sec Cerises Entières dénoyautées 70 10 12 Coriace Prune...

Страница 45: ...également être moulus de sorte que vous pouvez utiliser une poudre de champignon épicée pour vos soupes et sauces Aliment Préparation Température de déshydratation C Temps de déshydratation heures Test au toucher Haricots Entiers blanchis 70 6 8 Cassant Pois Décortiqués blanchis 50 6 8 Dur Cornichon Non pelé coupé en tranches d env 1 cm d épaisseur 50 6 8 Dur Carotte Épluchée coupée en rondelles d...

Страница 46: ...ntement à faible température Si une forte odeur se fait sentir pendant le processus de déshydratation baissez la température Une déshydratation de trop longue durée peut altérer le goût des herbes aromatiques Conservez vos herbes aromatiques déshydratées dans des bocaux hermétiques Veillez à ce que vos mélanges d herbes ne contiennent pas de tiges longues ou dures car celles ci pourraient constitu...

Страница 47: ... avant et après chaque utilisation Risques de brûlure Attendez que le déshydrateur ait complètement refroidi avant de le nettoyer Sinon vous pourriez vous brûler Avertissement relatif aux dommages matériels N utilisez pas de détergents abrasifs ou astringents ou d ustensiles qui pourraient rayer la surface de l appareil ex éponges métalliques Vous pourriez endommager le déshydrateur 1 Mettez le dé...

Страница 48: ...nne pas normalement suivez les instructions ci dessous afin d essayer de résoudre le problème Si les conseils ci dessous ne vous permettent pas de résoudre le problème veuillez contacter notre service d assistance téléphonique voir Informations concernant la garantie à la page 48 Problème Causes possibles Solution Le déshydrateur ne fonctionne pas Le câble d alimentation n est pas connecté Branche...

Страница 49: ...hets Les matériaux d emballage doivent être mis au rebut de manière respectueuse de l environnement Les cartons d emballage peuvent être déposés dans des centres de recyclage du papier ou dans des points de collecte publics destinés au recyclage Tous les films ou plastiques contenus dans l emballage doivent être déposés dans des points de collecte publics Conformité Cet appareil a été testé et cer...

Страница 50: ... avant d être livré La garantie s applique aux défauts matériels ou de fabrication Cette garantie ne s étend pas aux pièces soumises à une usure normale et qui peuvent donc être considérées comme des pièces d usure ni aux dégâts sur les pièces fragiles comme p ex les interrupteurs les piles rechargeables ou les pièces en verre Cette garantie est invalidée si le produit est endommagé est utilisé ou...

Страница 51: ...rter une so ion technique en commerciale sou dans les conditio 641 et suivants d 01 712 30 service FR ta 02 700 16 service BE ta 800 24 14 service LU ta 044 511 8 service CH t st pas l adresse s ci dessus de l article et si d re achat olution par télé n fonction de l o uscrite le vende ons prévues aux du Code Civil 02 83 arga online com 6 43 arga online com 4 3 arga online com 82 91 targa online c...

Страница 52: ...SilverCrest SDA 260 A1 50 Français ...

Страница 53: ...tilizzo del dispositivo 62 Utilizzo dell essiccatore 63 Preparazione del cibo per l essiccazione 63 Preparazione dell essiccatore 63 Riempimento e montaggio dei vassoi d essiccazione 64 Accensione e programmazione dell essiccatore 65 Suggerimenti per migliorare i risultati 66 Manutenzione pulizia 70 Conservazione dell essiccatore 70 Risoluzione dei problemi 71 Normativa in materia ambientale e inf...

Страница 54: ...utilizzo commerciale L essiccatore deve essere utilizzato solo in ambienti interni Non è adatto a un impiego in esterni Accertarsi sempre del fatto che l essiccatore poggi su una superficie stabile Il dispositivo è conforme a tutte le norme e gli standard in materia di Conformità CE Ogni alterazione dell elettrodomestico diversa da quelle consigliate dal produttore può rendere nulla la conformità ...

Страница 55: ...ella copertina In essa è illustrato l essiccatore con i numeri di riferimento Il significato dei numeri è il seguente 1 Coperchio 2 Vassoi d essiccazione 3 Cavo d alimentazione 4 Base 5 Display 6 Pulsante diminuisce il valore 7 Pulsante Temp imposta la temperatura di essiccazione 8 Pulsante Start Reset accende spegne l essiccatore annulla il processo di essiccazione in corso 9 Pulsante Timer impos...

Страница 56: ...x H vassoi d essiccazione impilati uno sopra all altro circa 30 5 x 32 x 38 5 cm L x P x H Distanziamento dei vassoi d essiccazione vassoi d essiccazione inseriti uno dentro l altro circa 2 6 cm vassoi d essiccazione impilati uno sopra all altro circa 4 7 cm Condizioni ambientali temperatura operativa da 10 a 35 C temperatura di conservazione da 1 a 40 C Peso circa 2 495 g coperchio circa 250 g va...

Страница 57: ...olo mette in guardia contro i rischi che ignorando l avvertimento possono mettere in pericolo la vita e o danneggiare gli arti con scosse elettriche Rischio di ustioni Questo simbolo avverte della presenza di superfici calde ATTENZIONE Questo simbolo indica informazioni importanti per operare in sicurezza con il prodotto e per la sicurezza dell utente Avvisa di rischi che se sottovalutati potrebbe...

Страница 58: ...lto Tenere lontano dal prodotto e dal cavo d alimentazione i bambini di età inferiore a 8 anni ATTENZIONE PERICOLO DI SOFFOCAMENTO Il materiale da imballaggio non è un gioco Non permettere ai bambini di giocare con le buste di plastica Rischio di soffocamento Tenere il prodotto lontano dalla portata dei bambini Istruzioni generali di sicurezza Rischio di scossa elettrica L esterno della base 4 del...

Страница 59: ...Non inalare mai il fumo derivante da un possibile incendio del dispositivo In caso di inalazione accidentale consultare immediatamente un medico L inalazione di fumo può arrecare danni alla salute Accertarsi che il cavo d alimentazione 3 non venga danneggiato da oggetti taglienti o caldi Assicurarsi che il cavo d alimentazione 3 non venga rotto o schiacciato Quando l elettrodomestico viene lasciat...

Страница 60: ...icata sull etichetta di classificazione Una volta collegata l apparecchiatura la presa di alimentazione deve rimanere facilmente accessibile in modo tale da poter staccare la spina rapidamente in caso di emergenza Non immergere mai in acqua o altri liquidi la base 4 il cavo d alimentazione 3 o la spina In caso di penetrazione di liquidi nella base 4 staccare immediatamente la spina dalla presa e c...

Страница 61: ...l surriscaldamento dell essiccatore e provocare incendi Non posizionare carta tessuti o altri oggetti sui vassoi d essiccazione Non posizionare il dispositivo vicino a fonti di calore come termosifoni forni o altri dispositivi compresi amplificatori che generino calore Rischio di ustioni Durante il funzionamento il coperchio 1 i vassoi d essiccazione 2 la base 4 e gli alimenti essiccati diventano ...

Страница 62: ...tri oggetti sui vassoi d essiccazione 2 Cavo d alimentazione Scollegare il cavo d alimentazione 3 impugnandolo sempre dalla spina e mai tirando il cavo stesso Non posizionare mai il dispositivo oggetti pesanti o mobili sul cavo e fare attenzione che esso non rimanga bloccato Non annodare mai il cavo d alimentazione 3 né legarlo insieme ad altri cavi Tutti i cavi devono essere collocati in modo tal...

Страница 63: ...uto idrico non scende sotto al 15 Nell essiccatore l aria calda e secca circola sulla superficie degli alimenti Ciò causa l evaporazione dell acqua presente sulla superficie del cibo Anche l acqua che fuoriesce dagli alimenti evapora Questo processo continua fino a quando il contenuto idrico dei pezzi di cibo è talmente basso da rendere impossibile un ulteriore fuoriscita di acqua Chiaramente gli ...

Страница 64: ...play 5 verrà visualizzato il periodo di tempo predefinito 10 00 5 Premere il pulsante Timer 9 Il periodo di tempo lampeggerà 6 Premere più volte i pulsanti 6 o 10 fino a impostare il periodo di tempo su 00 30 Dopo circa 2 sec il valore selezionato verrà impostato 7 Premere il pulsante Temp 7 La temperatura lampeggerà Il valore predefinito dovrebbe essere già 70 C Se così non fosse premere ripetuta...

Страница 65: ...isultato uniforme Anche se le fettine sottili impiegano tempi minori potrebbero diventare troppo piccole dopo l essiccazione Non tagliare il cibo in pezzi troppo piccoli L essiccazione fa rimpicciolire i pezzi che potrebbero diventare così piccoli da cadere nei fori dei vassoi d essiccazione Posizionare la frutta non sbucciata sui vassoi d essiccazione con la buccia rivolta verso il basso ovvero l...

Страница 66: ... d essiccazione 2 con le 4 chiusure in plastica verticali Ruotare i vassoi d essiccazione 2 in modo tale che le linguette in plastica sul bordo inferiore dei vassoi d essiccazione 2 siano posizionate vicino alle 4 chiusure in plastica verticali Per montare i vassoi d essiccazione 2 procedere come segue 1 Posizionare gli alimenti lavorati sul vassoio d essiccazione 2 2 Posizionare il primo vassoio ...

Страница 67: ...i riscaldamento che si spegne si accende Tali rumori non indicano un malfunzionamento A questo punto sul display 5 viene visualizzato il tempo rimanente prima dello spegnimento del dispositivo Una volta terminato il conto alla rovescia l apparecchio si spegne Si udranno cinque segnali acustici brevi e sul display 5 lampeggerà Se necessario successivamente sarà possibile regolare la temperatura e i...

Страница 68: ...menti A intervalli regolari toccare il cibo per controllare che sia sufficientemente essiccato Se non ha raggiunto il punto d essiccazione ottimale prolungare il procedimento Frutta La frutta essiccata può essere usata come spuntino o come ingrediente per ricette creative La frutta può essere tagliata in piccoli pezzi macinata o reidratata Se si intende consumarla come spuntino non essiccarla trop...

Страница 69: ...ante Pera Fette di circa 3 mm di spessore Tagliate a metà la parte con la buccia rivolta verso il basso 70 70 8 10 14 18 Flessibile Flessibile Fragole A metà o intere 70 8 10 Dure Fichi Tagliati a metà la parte con la buccia rivolta verso il basso 70 8 10 Secchi Ciliegie Forate senza nocciolo 70 10 12 Dure Prugne Tagliate a metà la parte con la buccia rivolta verso il basso 70 10 12 Flessibili Uva...

Страница 70: ...nati e utilizzati per zuppe e salse Alimento Preparazione Temperatura d essiccazione C Tempo d essiccazione ore Controllo al tatto Fagioli Interi sbollentati 70 6 8 Friabili Piselli Senza baccello sbollentati 50 6 8 Duri Cetriolini Con la buccia fette di circa 1 cm di spessore 50 6 8 Duri Carote Sbucciate fette di circa 8 mm di spessore 70 6 8 Dure Porri Tagliati a metà in pezzi di circa 6 8 cm di...

Страница 71: ...re delicatamente a basse temperature Se durante il processo d essiccazione si sentisse un odore forte abbassare la temperatura Un processo d essiccazione troppo lungo può portare a una perdita di sapore Conservare le erbe essiccate in un barattolo richiudibile Assicurarsi che mischiati alle erbe non vi siano steli duri o di grandi dimensioni che potrebbero arrecare fastidio durante il consumo Alim...

Страница 72: ... dopo ogni utilizzo pulire l essiccatore Rischio di ustioni Attendere che l essiccatore si sia raffreddato completamente prima di pulirlo In caso contrario ci si potrebbero procurare scottature Avvertenza relativa ai danni alla proprietà Non utilizzare detergenti abrasivi o caustici o strumenti che potrebbero graffiare la superficie per es spugnette metalliche in quanto potrebbero danneggiare l es...

Страница 73: ...e non funziona Il cavo di alimentazione non è collegato Collegare la spina del cavo d alimentazione 3 a una presa di rete L essiccatore non si accende Premere il pulsante Start Reset 8 per accendere il dispositivo L essiccatore si spegne da solo Il tempo d essiccazione impostato è trascorso Se necessario impostare un tempo d essiccazione maggiore Normativa in materia ambientale e informazioni sull...

Страница 74: ...i materiale o di fabbricazione il prodotto sarà a nostra discrezione riparato o sostituito gratuitamente Durata della garanzia e diritti per difetti La durata della presente garanzia non viene prolungata dalla garanzia legale Ciò vale anche per i pezzi sostituiti e riparati Eventuali danni e difetti già presenti al momento dell acquisto devono essere notificati immediatamente dopo l apertura della...

Страница 75: ...ni richiesta si prega di custodire come prova d acquisto lo scontrino fiscale e il codice articolo oppure il numero di serie se esistente Nel caso in cui non sia possibile trovare una soluzione per via telefonica tramite la nostra assistenza clienti viene contattata una seconda assistenza in base alla causa del difetto Assistenza Telefono 02 69 68 28 59 E Mail service IT targa online com Telefono ...

Страница 76: ...SilverCrest SDA 260 A1 74 Italiano ...

Страница 77: ...ting started 85 Using the appliance for the first time 85 Using the dehydrator 86 Preparing food for dehydration 86 Setting up the dehydrator 87 Filling and installing the dehydration trays 87 Switching on and programming the dehydrator 88 Tips for good dehydration results 89 Maintenance cleaning 92 Storing the dehydrator 93 Troubleshooting 94 Environmental regulations and disposal information 94 ...

Страница 78: ...home and is not intended for commercial use The dehydrator may only be used indoors Not suitable for outdoor use Always make sure the dehydrator is on a stable surface The appliance fulfils all relevant norms and standards relating to CE conformity Any modifications to the appliance other than recommended changes by the manufacturer may result in these standards no longer being met Predictable mis...

Страница 79: ...d out cover On the inside of the cover the dehydrator is shown with a numbered key The meanings of the numbers are as follows 1 Lid 2 Dehydration trays 3 Power cable 4 Base unit 5 Display 6 button Decrease value 7 Temp button Sets the dehydration temperature 8 Start Reset button Switches the dehydrator on off cancels the current dehydration process 9 Timer button Sets the dehydration time 10 butto...

Страница 80: ...her approx 30 5 x 32 x 29 5 cm W x D x H Dehydration trays stacked on top of each other approx 30 5 x 32 x 38 5 cm W x D x H Spacing of dehydration trays Dehydration trays nested within each other approx 2 6 cm Dehydration trays stacked on top of each other approx 4 7 cm Environmental conditions Operating temperature 10 to 35 C Storage temperature 1 to 40 C Weight approx 2 495 g Lid approx 250 g D...

Страница 81: ...unheeded cause damage to life and limb through electric shock Risk of burns This symbol warns of hot surfaces WARNING This symbol denotes important information for the safe operation of the product and user safety It warns against risks which could if left unheeded cause danger to life and limb injuries or material damage Risk of fire This symbol warns that fires could start if the warning is left...

Страница 82: ...low children to play with plastic bags There is a risk of suffocation Keep the appliance out of the reach of children General safety instructions Risk of electric shock The base unit housing 4 of the dehydrator and the power cable 3 must not be damaged Never replace a damaged power cord instead contact our hotline see Warranty information on page 95 If the base unit housing 4 or power cable 3 is d...

Страница 83: ...harp edges or hot spots Make sure that the power cord 3 cannot become crushed or squashed The appliance must always be disconnected from the mains when left unsupervised and before assembly disassembly or cleaning Even when switched off the dehydrator is not fully disconnected from the mains To disconnect the dehydrator completely from the mains remove the mains plug from the wall outlet When disc...

Страница 84: ... 4 disconnect the mains plug from the wall outlet immediately and contact customer service see Warranty Information on page 95 Risk of fire Do not place the dehydrator on painted surfaces or on textiles such as a tablecloth Never place the dehydrator under or directly next to flammable items such as curtains or drapes Maintain a clearance of at least 50 cm around the appliance to flammable and com...

Страница 85: ...careful not to burn yourself Allow the dehydrator and all accessories to cool down completely before cleaning or transportation Warning about property damage Do not place any objects on top of the dehydrator or the dehydration trays 2 Place the dehydrator only on an even sturdy and fireproof surface protected against spray water Do not expose the dehydrator to extremely high or low temperatures Do...

Страница 86: ... start Unpack the appliance First check whether all the parts are complete and undamaged see Package contents on page 77 If any items are missing or damaged please phone our hotline see Warranty information on page 95 Keep the packaging material away from children and dispose of appropriately General information about dehydrating Dehydration is a process for air drying foodstuffs in order to exten...

Страница 87: ...r and at least 1m clearance above the device Never block the ventilation holes on the underside of the base unit or cover these with cloth This can cause the dehydrator to overheat and cause a fire Do not place any paper cloth or other objects on top of the dehydration trays Place the dehydrator in a position where it is not in the way Remember that the dehydration process takes several hours Usin...

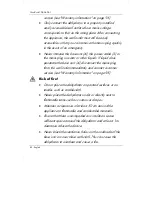
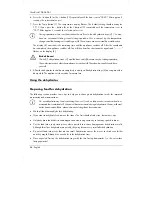
Страница 88: ...8 Allow the dehydrator to cool down completely and wipe all dehydration trays 2 once again with a damp cloth The appliance is then ready for normal use Using the dehydrator Preparing food for dehydration The following section provides some tips to help you achieve good dehydration results for improved preservation and maximum taste Do not dehydrate any food containing fat or oil such as fatty meat...

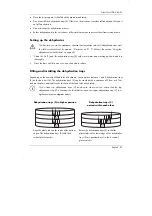
Страница 89: ...hydration trays 2 can be stacked with a clearance of 2 6cm or 4 7cm and are therefore adjustable to the thickness of the food to be dehydrated If you stack two dehydration trays 2 inside each other and you notice that the top dehydration tray 2 is touching the food below move the upper dehydration tray 2 to a higher position see diagram below Dehydration trays 2 in higher position Dehydration tray...

Страница 90: ... 9 The time display flashes 4 Press the 6 button and button 10 repeatedly until the required dehydration time is set see the recommendations on page 89 After approx 2 seconds the selected value is set 5 Press the Temp button 7 The temperature display flashes Press the 6 button and button 10 repeatedly until the required dehydration temperature is set see the recommendations on page 89 After approx...

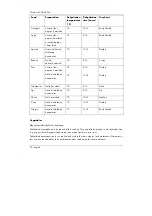
Страница 91: ...eat or meat soaked in a marinade that contained oil Fat and oil becomes rancid during dehydration Cream milk and butter have similar effects please also avoid using them for marinades The dehydration times provided in the following are guideline values The times may differ depending on the quantity of dehydrated food its thickness and size etc At regular intervals perform the recommended touch tes...

Страница 92: ... 18 Flexible Flexible Strawberries Halved or whole 70 8 10 Hard Figs Halved skin facing downwards 70 8 10 Dry Cherry Hole deseeded 70 10 12 Leathery Plums Halved skin facing downwards 70 10 12 Flexible Grapes Halved skin facing downwards 70 12 14 Easily flexible Vegetables Blanch vegetables before dehydrating Dehydrated vegetables must be soaked before cooking They can also be ground in a dehydrat...

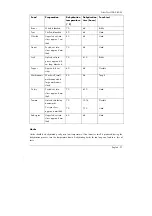
Страница 93: ... Brittle Pepper Approx 6 8 cm strips 60 6 8 Flexible Mushroooms Wash well small mushrooms whole large mushrooms sliced 50 4 6 Tough Celery Peeled cut into slices approx 8 mm thick 70 6 10 Hard Tomato Halved skin facing downwards Cut into slices approx 6 mm thick 70 70 12 14 7 10 Flexible Hard Aubergine Unpeeled cut into slices approx 8 mm thick 60 6 8 Hard Herbs Herbs should be dehydrated gently a...

Страница 94: ...ing some flavour Cut the meat into thin slices before dehydration Dehydrate for approx 10 to 12 hours at 60 C Fish Only use fresh fish Remove the bones and skin and rinse the fish thoroughly Fish should be marinated prior to dehydration Baste the fish with lemon juice and place it in salted water for approx 30 minutes Cut the fish into thin slices before dehydration Dehydrate for approx 10 to 12 h...

Страница 95: ... storing the dehydrator it is best to leave it assembled to protect it The dehydration trays 2 must be nested within each other see diagram below to reduce the space between them This means that the appliance takes up less space and the dehydration trays cannot accidentally fall off 1 Rotate the dehydration trays 2 so that the plastic tabs on the lower edge of the dehydration trays 2 are positione...

Страница 96: ...ject to European Directive 2012 19 EU All electrical and electronic devices must be disposed of separately from household waste at official disposal centres Do not dispose of the appliance in household waste or bulky waste collections Information on collection points and pick up times can be obtained from your local council or waste disposal company Dispose of all packaging in an environmentally f...

Страница 97: ...hich are subject to normal wear and which can therefore be regarded as wearing parts or damage to fragile components such as switches rechargeable batteries or components made of glass This warranty is void if the product is damaged incorrectly used or serviced To ensure correct use of the product always comply fully with all instructions contained in the user manual The warnings and recommendatio...

Страница 98: ... E Mail service IE targa online com Phone 800 62 175 E Mail service MT targa online com Phone 800 92 496 E Mail service CY targa online com IAN 111549 Manufacturer Please note that the following address is not a service address First contact the service point stated above TARGA GmbH Coesterweg 45 59494 SOEST GERMANY ...

Страница 99: ...SilverCrest SDA 260 A1 English 97 ...

Страница 100: ...56 EN 6232 15 _________ Matthia of Con declare on o ator rest SDA 26 549 tions which magnetic Co tage Related Pro ect of the de rmity with D an Parliame 11 on the re ous substan ent lowing stan 14 1 2006 14 2 1997 00 3 2 200 00 3 3 200 35 2 9 200 007 A13 2 35 1 2012 33 2008 64 2011 wi 21 2009 _________ s Klauke nformit our own res 60 A1 applies to it ompatibility oducts eclaration d Directive 201 ...

Отзывы: