background image

Operating manual - English

UNOCODE PRO

Copyright Silca 2017

47

6.9.1

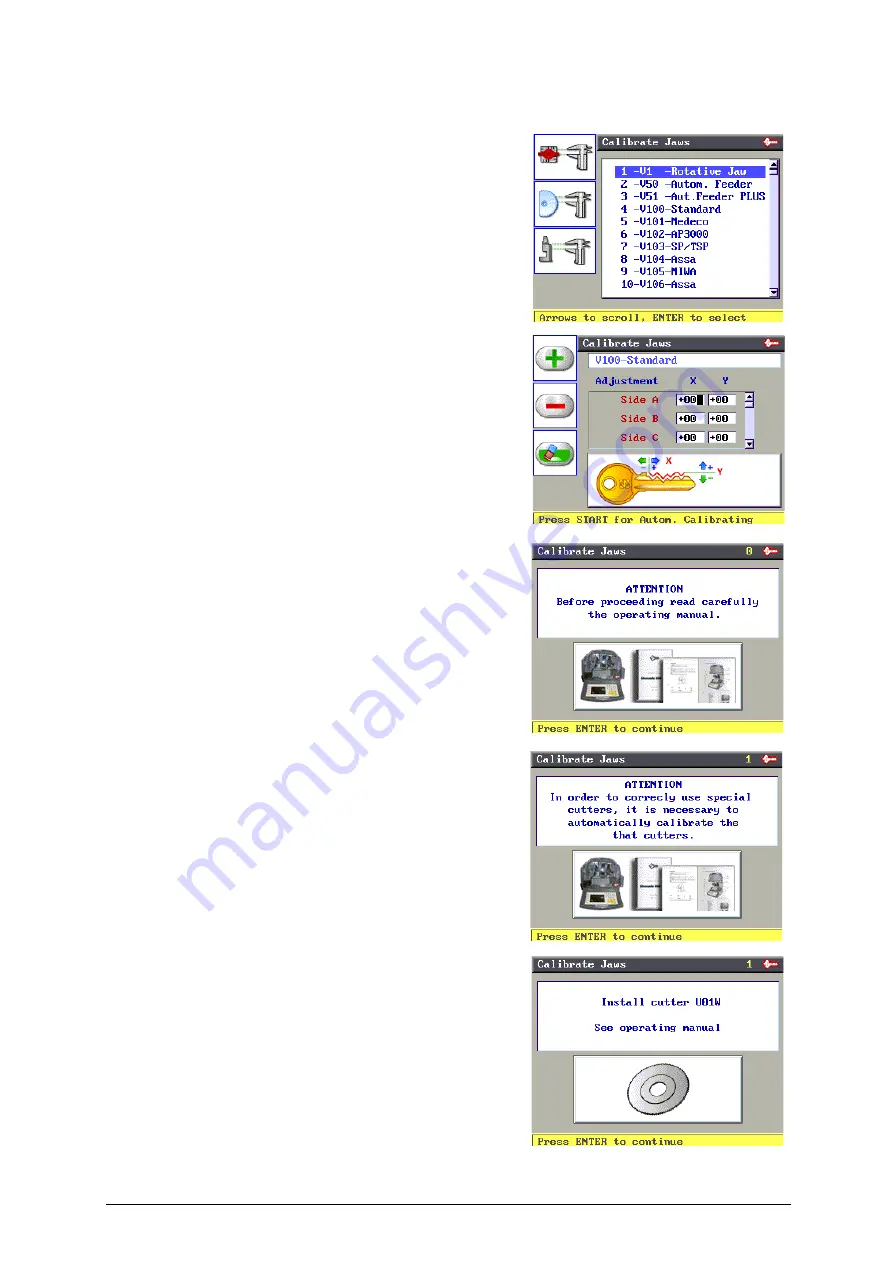
CALIBRATE JAWS

Press F1 to access the list of clamps.

Use the up/down arrow keys to select clamp 3-V100, then press
ENTER.

The display will show:

Some manual adjustments can be made from this screen.

ATTENTION: adjustments are made only if necessary and only after
automatic gauging.

Press START to proceed with automatic gauging; the display will show:

ATTENTION: before gauging carefully read the operating flow below.

Press ENTER, the display will show:

Press ENTER, the display will show:

Make sure the U01W standard prismatic cutter is installed. 

ATTENTION: If the original Silca U01W cutter is replaced
with one that is NOT original or has been sharpened, it will
be necessary to repeat clamp gauging and also gauge all
the optional cutters.

F1

Содержание Unocode PRO

Страница 1: ...D446068XA vers 3 0 Operating Manual EN Original instructions FLAT STEEL...

Страница 2: ...safety This document or any of its parts cannot be copied altered or reproduced without written authorization from the Manufacturer Keep the manual and look after it for the entire life cycle of the m...

Страница 3: ...ion UTP 16 6 OPERATING GUIDE 17 6 1 INITIAL OPERATIONS 17 6 2 MACHINE KEYBOARD AND FUNCTION BUTTONS 18 6 3 COPY FROM ORIGINAL 20 6 4 COPY WITH ADJUSTMENTS 21 6 5 COPY FROM CUTTING CARD 24 6 5 1 SPECIA...

Страница 4: ...REPLACEMENT 75 8 4 BELT REPLACEMENT AND TENSION ADJUSTMENT 76 8 5 CHECKING AND OR REPLACING FUSES 77 8 6 ELECTRONIC CIRCUIT BOARD REPLACEMENT 78 8 7 KEYBOARD DISPLAY REPLACEMENT 79 8 8 ACCESS TO BACK...

Страница 5: ...tly CONSULTATION The contents of the manual are divided into sections relating to TECHNICAL TERMS Common technical terms are used in this manual To assist those with little experience of keys and key...

Страница 6: ...s written in this manual The manufacturer may decline all guarantees and responsibilities It is therefore essential to carefully read this operating manual IMPROPER USE OF ELECTRIC CONTACT it is not p...

Страница 7: ...GRAPHICS ON THE UNOCODE PRO KEY CUTTING MACHINE Do not clean with compressed air Obligation to read the manual Obligatory use of safety goggles Symbol on UTP versions Adhesive label Mass RPM Unocode P...

Страница 8: ...y with a laser reader and reproducing it linking to a PC and Silca software Fig 4 1 1 MAIN CHARACTERISTICS Movements Movement of the two axes X Y operates on ball screws activated by step motors on re...

Страница 9: ...the right hand side of the machine is used to stop it immediately in the event of faulty operation or danger for the operator When the cause of the emergency has been eliminated turn the button 45 cl...

Страница 10: ...clamp knob E1 optical reader clamp knob F key gauge cutter side F1 key gauge optical reader side H cutter I cutter shield L optical reader N emergency button O 3rd axis P IN OUT port Q serial port Q1...

Страница 11: ...nocode PRO Flat Steel 50Hz 2340 rpm 10 60Hz 2800 rpm Movements on 2 axes with ball screws activated by step motors on rectified roller guides Possibility to add a 3rd axis to activate the optional til...

Страница 12: ...emplate tip stop bar 2 Amp fuse delayed Z3 template regulating key cutter release rod 230V 50Hz 4 Amp fuse rapid 100V 50 60Hz 5 Amp fuse rapid Z4 serial test connector 1 5 mm allen key 2 mm allen key...

Страница 13: ...ed and a cardboard box as a cover a The machine is fixed to the base of the pallet with screwed down brackets that hold it firm into place This prevents the machine and its protective shield from any...

Страница 14: ...s on the feet 6 check the contents in the box that should comprise with the following 1 UNOCODE PRO key cutting machine 1 set of documents including an operating manual a spare parts list and a guaran...

Страница 15: ...aired area which is not too damp The ideal conditions for the machine are temperature between 10 C and 40 C relative humidity approx 60 3 3 POSITIONING AND INSTALLATION 1 Place the machine on a horiz...

Страница 16: ...an be fitted to any side A B C or D of the clamp For keys to be cut by code the side of the clamp on which to place the key is shown on the machines display For keys to be copied with the optical read...

Страница 17: ...00 clamp gauge must be lowered manually USING THE PINS Copying with the optical reader For keys with narrow stems the pins must be placed between the bottom of the clamp and the back of the key so tha...

Страница 18: ...or iron with or without nickel plating Press F2 to enable or disable the electrical contact function to read the key blank measurements The symbol in the clamp field means that the key will be cut re...

Страница 19: ...ome special keys with particular type cuts require different cutters To change the cutter see chapter 4 5 4 5 CHANGING THE CUTTER 1 raise the protective shield 2 remove the cutter protective shield i...

Страница 20: ...nger be used to cut keys it is operative only for decoding To continue using all the machine functions contact a Silca distributor to purchase another UTP package Ch 6 11 2 UTP SETTINGS UTP Unlimited...

Страница 21: ...nected to the mains Ch 3 3 page 11 proceed as follows 1 make sure that the emergency button is not turned on 2 turn the machine on by means of the main switch that is located on the back of the machin...

Страница 22: ...s active from any of the windows Function keys select the on screen options Arrow keys used to move the pointer navigation in the on screen fields CLEAR used to delete a single character SHIFT CLEAR p...

Страница 23: ...Original Copy card PC queue CodeMaker not enabled on the UTP version Gauging Maintenance Options Enabling UNOCODE PRO UNOCODE PRO UTP Press the MENU key repeatedly to view the list of icons relating t...

Страница 24: ...y 2nd side The set figure is 50 hundredths of a mm which can be varied min 0 max 99 hundredths of a mm ATTENTION settings that are too high may render precise cuts impossible with the following messag...

Страница 25: ...copied in 3 stages Reading Setting up of adjustments Cutting The icon in the lower left corner of the menu can be activated by the F4 key Press F4 again to return to the Copy from Original menu When y...

Страница 26: ...n arrow keys over the fields Depths and Spaces in which the adjustments are to be made Press F1 to get positive values Press F2 to get negative values Press F3 to cancel the set adjustments Adjustment...

Страница 27: ...ine of the key to be cut with the adjustments made Fit the key blank into the clamp on the cutter side and secure Lower the safety shield and press START to proceed with cutting Warning The presence o...

Страница 28: ...rs on SILCA cards can be edited but the adjustments CANNOT BE SAVED in the machine memory The number of SILCA cards is periodically increased with the Silca Code Program update which can be purchased...

Страница 29: ...the machine Press F3 to view a list of CodeMaker cards EXAMPLE Copy from SILCA cutting Card 1 Digit the card number e g 50 Press ENTER the display shows The dots shown represent possible cuts The same...

Страница 30: ...ent of cutting depths and spaces the adjustment values entered can be saved as User Parameters Card No Number of cuts per side for current key Cutting Symbols associated to cutting depths Symbols allo...

Страница 31: ...one value positive or negative moves all cuts from the stop to the left or right Press STOP to exit Warning The presence of this symbol indicates that adjustments to the card have been applied 3 Press...

Страница 32: ...shows Figura 23 Press ENTER the key will be cut with the original measurement of the card F1 In the event of decoding keys with asymmetrical cuts press F1 to view the values for the 2nd side Decoding...

Страница 33: ...measurements The symbol in the clamp field means that the key will be cut reading the key blank measurements by electrical contact A red X on the electrical contact icon means that it has been disable...

Страница 34: ...ax 3 Default 1 Note the editing can be saved as User Parameters Editing working speed To edit carriage movement speed set a lower or higher percentage using the F1 and F2 keys Note the maximum variati...

Страница 35: ...right Silca 2017 31 2 proceed with cutting the first side by pressing the START key 3 Turn the key and cut the second side if the key is symmetrical as in this case Press START When the last side of t...

Страница 36: ...ss ENTER to continue From the keyboard digit a number from 0 to 9 to assign a position to the data card to be saved If all the numbers are taken re use an existing position Press ENTER the display wil...

Страница 37: ...nabled Press F2 to copy a SILCA data card on the CODEMAKER and change some of the parameters ATTENTION not all SILCA data cards can be copied onto CODEMAKER If there is no icon the data card involved...

Страница 38: ...ts is explained simply in the case shown With regard to the cut that originated the message NON FEASIBLE COMBINATION it can be seen that between the two deep cuts 8 and the constant angle 100 the inte...

Страница 39: ...placed with a specific cutter NORMAL For conventional car and door keys FLAT Mainly used for car keys where the cut edges are rounded to facilitate the movement of the blades when the key is put into...

Страница 40: ...ss to some of the data in the Database in compliance with agreements with some makers Limitations apply to DATA CARD If the key cutting card is protected access is denied Gain access to protected data...

Страница 41: ...on the Password line as shown in the example given If the correct password has been entered the screen shows The password can be saved so that it need not be entered whenever the protected data card i...

Страница 42: ...each cutting process transmitted the number of pieces to be cut is set a sign shows when the cycle is finished The sign warns the operator that the last cutting operation has been carried out Should...

Страница 43: ...tact function for reading the key blank measurements 1 A red X on the electrical contact icon means that it has been disabled 2 The symbol in the clamp field means that the key will be cut reading the...

Страница 44: ...tted into the clamp on the cutter side and the safety shield is down press START The cutting process starts The display will show When the first side has been cut the display will show Raise the safet...

Страница 45: ...Creating of new cards is allowed for two key types SINGLE side DOUBLE SYMMETRICAL side Creating a new card with Code Maker Assign a name description to the new card All data except the card number can...

Страница 46: ...cutting space values from the key stop to the centre of the first cut then from the centre of the first cut to the centre of the second cut and so on The cut bases can vary from 0 to 200 which is the...

Страница 47: ...the card to be deleted Press F3 for the deletion control The display appears as follows Press ENTER to confirm deletion Press STOP to stop the operation ATTENTION when a card is deleted the number of...

Страница 48: ...ate Time when the mother board battery is replaced 6 8 1 DOWNLOAD THE UTP PACKAGE Note do not turn the machine off during data transfer The machine must be on Connect a PC serial or USB cable to the k...

Страница 49: ...1 Turn the machine on and wait for an ALARM message to appear 2 Turn the machine off 3 Turn the machine on again and proceed with Date Time synchronisation Synchronisation procedure Connect a PC seri...

Страница 50: ...on This operation is semi automatic and requires close attention to the instructions listed below From the initial screen press MENU then F1 to enable the func tion Clamps Cutters Adapters EVENT MACHI...

Страница 51: ...f necessary and only after automatic gauging Press START to proceed with automatic gauging the display will show ATTENTION before gauging carefully read the operating flow below Press ENTER the displa...

Страница 52: ...ght hand clamp Stop 0 Fig 28 Lower the safety shield and press START When reading is complete the display will show Raise the safety shield remove the Z3 template from the right hand clamp and replace...

Страница 53: ...ons The X measurement read should be the same as the theoretical one value 400 in brackets If not raise the safety shield and proceed as follows For an X value lower than 400 loosen the grub screw P1...

Страница 54: ...at the operation until the right values of X and Y are set When the X and Y values are the same as the theoretical ones in brackets or with errors between 0 03mm press STOP The display will show Press...

Страница 55: ...cut at user s discretion with the selected cutter With the up down arrow keys select the U01W standard cutter and press ENTER The display will show The positive or negative values are obtained by pres...

Страница 56: ...e the up down arrow keys to select the adapter to be gauged and press ENTER The display will show Use the right or left arrow keys to change the adjustment field X or Y Positive or negative values are...

Страница 57: ...vice If the value to the left is higher than 90 clean the reader glass slide with a clean cloth If the value remains over 90 or lower 50 contact Silca after sales Service 6 10 2 MOTOR TESTS Read the i...

Страница 58: ...illuminate momentarily Note if this is not so contact Silca s Technical Assistance Dept This test Exit can be carried out only when an automatic feeder or other optional component is installed on the...

Страница 59: ...ded page 8 the machine provides a self setting proce dure These procedures must be carefully carried out following the descriptions and illustrations indicated below The table below indicates the situ...

Страница 60: ...nce Fig 32 Lower the gauge and press ENTER to continue The display shows Read the instructions on the display move the carriages manually so that the Z20 template is taken into contact with the Z1 tem...

Страница 61: ...one value or more on OFF The previous values remain valid already in the machine s memory ATTENTION if the STOP key is pressed the new settings will be lost If so only the previous setting values will...

Страница 62: ...rriage fig 35 6 unscrew the 3 B5 fixing screws and remove the Y axis protective cover by pulling it in the direction shown in fig 36 7 plug the Y axis J1 cable 8 turn the machine on and carry on with...

Страница 63: ...ors Fig 36 Regulating the Y axis sensor raise the protective shield use the provided allen key to loosen the C1 grub screw manually rotate the C2 rod in both directions up until the changeover point f...

Страница 64: ...39 C2 C2 C1 Y axis sensor bottomview ATTENTION if it is necessary to work close to this area with the machine turned on e g to regulate the X axis sensor take great care not to touch any components on...

Страница 65: ...age use the arrow keys rh lh to select the measuring unit required mm millimetres inches then press ENTER to confirm Measuring unit use the arrow keys rh lh to select the measuring unit required mm mi...

Страница 66: ...messages Date deadline indicates the date on which the UTP package expires After this date the machine will no longer cut keys operational for decoding only Note when the UTP has expired to continue u...

Страница 67: ...ng cutting speed page 30 6 11 4 MACHINE OPTIONS PAGE 3 4 The display shows Head stop processing Min cut distance The number shown on the machine s display represents the X axis distance between the ke...

Страница 68: ...equired then press ENTER to confirm Setup date and time use the up down arrow keys to enter the field to be edited and use the arrow keys rh lh to go to the item to be edited Edit with the numerical k...

Страница 69: ...ted again if necessary E g In this case a single protected card has been previously enabled As explained on the display use the arrow keys up and down to select the enabled protected system Press F1 t...

Страница 70: ...not available in the machine s data base This cutter is not available in the machine s data base This adapter is not available in the machine s data base The entered data card number requires a type o...

Страница 71: ...ssage appears when axis clearance has not been successful Indicates that the adjustments inserted can only be applied to the two cases and not to Copy from original This message appears if you wish to...

Страница 72: ...tes see Ch 6 10 8 page 55 This message indicates that during the reading cycle an anomalous form has been revealed that cannot be reproduced with the cutters provided The Machine ID has not been set I...

Страница 73: ...Trouble shooting page 73 Indicates that the fuse has probably blown see Ch 8 1 Trouble shooting page 73 Indicates a fault on the electronic control board This message appears when the machine detects...

Страница 74: ...flare is not within the limits The set combination of spaces and flares exceeds the maximum run allowed for the space axis Appears when the value of a set flare would overlay a previous flare Appears...

Страница 75: ...e of stop set Appears when the key blank measurement is altered and the depths exceed such measurement The cut depth is not compatible with cutting edge of the cutter See operating manual The cut dept...

Страница 76: ...where they accumulate during cutting operations Under no circumstances must compressed air be used to clear the work zone of chippings as this will blow them onto the moving parts Never use oil based...

Страница 77: ...ective shield is not making proper contact with the safety microswitch fig 43 b the F1 fuse on the electronic control board is faulty c motor wire not properly attached to the connector d defective el...

Страница 78: ...ol board faulty Working electronic control board faulty The display shows the message I O POWER ALARM check fuse F4 a fuse F4 on the electronic control board faulty b short circuit on inlets or outlet...

Страница 79: ...onment with a temperature of 10 to 40 C and relative humidity of approximately 60 The workbench must be clean free of foreign bodies and covered in shockproof material Do not use compressed air Do not...

Страница 80: ...on of rotation is correct 7 using the provided belt tension plate and the W2 screw adjust the belt s tension by turning the W2 screw 8 tighten the 4 W screws back into place securing the motor 9 remou...

Страница 81: ...Fig 47 4 fuses F1 F2 F3 e F4 F1 10 Amps delayed protects the cutter motor and its electronic controls 230V a c F2 6 3 Amps delayed protects the step motors and their electronic controls 32V d c F3 4 A...

Страница 82: ...electronic circuit board fig 49 Fig 49 4 take the electronic circuit board off by unscrewing the Y1 nuts off fig 50 5 mount the new electronic circuit board and re connect all cables all cable connec...

Страница 83: ...supply cable 2 remove the display s support by unscrewing the 2 B1 fixing screws fig 51 and fig 52 3 detach the flat cable and ground wire from the keyboard fig 53 4 unscrew the keyboard s fixing nut...

Страница 84: ...ystem s connector U2 fig 54 3 unscrew the 6 M1 screws that secure the back panel fig 54 thus removing it Fig 54 8 9 ACCESS TO BOTTOM COMPARTMENT To gain access to the bottom compartment proceed as fol...

Страница 85: ...the electronic circuit board fig 56 4 loosen the L3 nut Unscrew the sensor from the plate and remove fig 57 5 remove the front cover on the X axis lower carriage by unscrewing the 3 B4 screws fig 58 6...

Страница 86: ...cover in the direction shown in fig 59 5 disconnect the M3 sensor s connector fig 60 6 slightly loosen the M2 grub screw with the provided allen key 7 remove the faulty sensor and replace it with a n...

Страница 87: ...THE Y AXIS PHOTOCELL 1 turn the machine off and unplug it from its power supply cable 2 disconnect the J1 Y axis cable from the carriage fig 63 3 remove the Y axis carriage cover by unscrewing the 3...

Страница 88: ...ottom compartment 3 Use pliers with insulated tips to grip the battery and pull it out taking care to push towards the pressure tab to remove from its shaped housing 4 Use the pliers with insulated ti...

Страница 89: ...llows gauge as explained in chapter 6 10 8 MACHINE ZERO POINTS and Ch 6 9 1 Calibrate JAWS in the user s manual first gauge the V100 clamp Ch 6 9 1 page 47 then the R100 clamp continue with the gaugin...

Страница 90: ...qui pment placed on the market before 31 December 2010 at the end of its useful life and replace it with an equivalent product designed for the same use In this latter case the user may ask the manufa...

Страница 91: ...out by the manufacturer or recom mended Silca Service Centres On the back cover of this manual is a list of the manufacturer s addresses listed below are the addresses of specialized service centres...

Страница 92: ......

Страница 93: ...c 3 5 4 2 GND 18 Vac 18 Vac 24 Vac L1 J 16 GND N1 INTERRUTTORE FILTRO SWITCH FILTER INTERRUPTEUR FILTRE INTERRUPTOR FILTRO SCHALTER FILTER PULSANTE EMERGENZA EMERGENCY PUSH BUTTON POUSSOIR D URGENCE P...

Страница 94: ...PP AZUL MARRONE B A ROSSO RO RED AZ 24V NE 1 12V NOIR BIANCO BLANCO ANARANJADO ARANCIO M AZ JA1 3 2 JA1 INFX GND RO AZ ROT ORANGE J7 NE GND AZZURRO MARRON 4 GND A RO 8 uF 230V M 1 2 GND L1 N1 1 2 MOTO...

Страница 95: ...AU 4 J8 MA 1 VE VERDE 2 OUT INS BRUN 1 9 VE 5 Y 3 J12 MA BRAUN 12V 11 INSB RO 4 2 J18 GND ROSSO AZ 3 ORANGE 14 1 9 MA 5 NE WEISS 6 ORANGE AZ BLUE MA 2 B ROUGE B 4 VERDE 14 12 ORANGE VERDE 3 1 MY BLANC...

Страница 96: ...IN 3 4 1 IN 0 25 INAUX 2 1 2 22 10 OUTAUX 0 GND 17 20 IN 8 24V 12 5 24V IN 6 7 15 IN 3 IN 1 2 INAUX 1 25 24 OUT 13 J2 0 20 9 GND GND 15 19 24V 24V 10 4 IN6 IN 4 5 14 IN 1 13 INAUX 1 3 23 23 OUT GND 1...

Страница 97: ...VACUUM SOLENOID VALVE ELECTROVANNE ASPIRATION ELECTROVALVULA ASPIRADOR ELEKTROVENTIL SPANEABSAUGANLAGE CONTATTO ELETTRICO CHIAVE ELECTRIC CONTACT CONTACT ELECTRIQUE CONTACTO ELECTRICO ELEKTRISCH KONTA...

Страница 98: ...UNOCODE PRO VI Copyright Silca 2017 J24 LAMPADA LED LED LAMPE LAMPE LED LAMPARA LED LAMPE LED...

Страница 99: ...an Union DIRECTIVE 2006 42 CE Machines and with the EN 12100 1 EN 12100 2 EN ISO 13849 1 2006 EN ISO 13849 2 2003 Standards European Union DIRECTIVE 2004 108 CE Electromagnetic Compatibility and with...

Страница 100: ...Siemensstrasse 33 42551 VELBERT Phone 49 2051 2710 Fax 49 2051 271172 E mail info silca de www silca de Central America Mexico Guatemala Belize El Salvador Honduras Nicaragua Costa Rica Panama Corpor...

Отзывы: