background image


Home Screen 

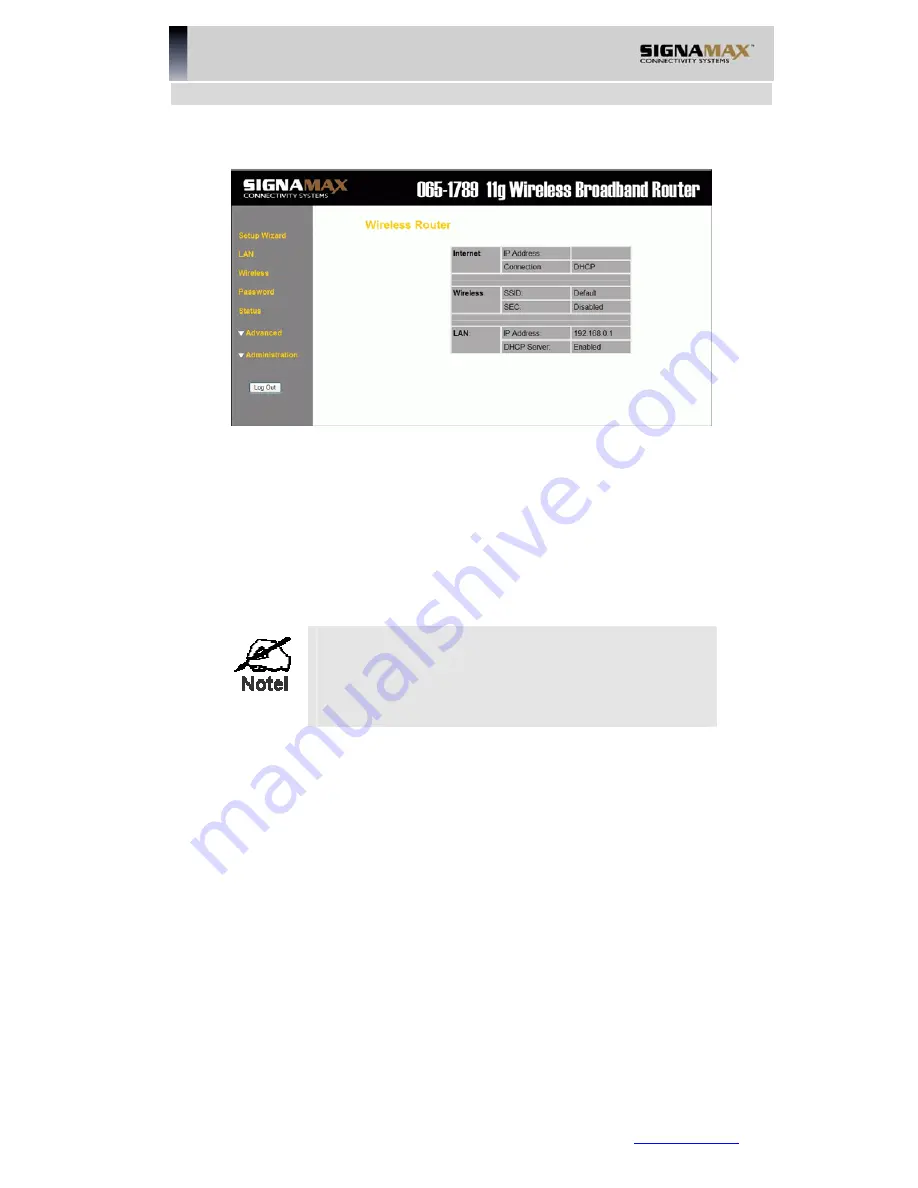
After finishing the Setup Wizard, you will see the 

Home

 screen. When you connect in 

future, you will see this screen when you connect. An example screen is shown below. 


Figure 5: Home Screen 

Navigation & Data Input 

• 

Use the menu bar on the left of the screen, and the "Back" button on your Browser, 
for navigation. 

• 

Changing to another screen without clicking "Save" does NOT save any changes 
you may have made. You must "Save" before changing screens or your data will 
be ignored. 


On each screen, clicking the "Help" button will 
display help for that screen. 

From any help screen, you can access the list of all 
help files (help index). 


SIGNAMAX LLC • 

www.signamax.eu

  16 

Содержание 065-1789

Страница 1: ...i 802 11b g Multi Function Wireless Access Point 4 port Switching Hub Model 065 1789 User s Guide...

Страница 2: ...guration 39 CHAPTER 5 OPERATION AND STATUS 40 Operation 40 Status Screen 40 Connection Status PPPoE 43 Connection Status PPTP 45 Connection Status L2TP 46 Connection Status Telstra Big Pond 48 Connect...

Страница 3: ...ESS LANS 98 Modes 98 BSS ESS 98 Channels 99 WEP 99 WPA PSK 99 WPA2 PSK 100 Wireless LAN Configuration 100 APPENDIX C SPECIFICATIONS 102 Multi Function Wireless Router 102 Wireless Interface 102 Regula...

Страница 4: ...ons while being easy to use Internet Access Features Shared Internet Access All users on the LAN or WLAN can access the Internet through the Wireless Router using only a single external IP Address The...

Страница 5: ...tion with Servers or individual users on the Internet This provides the ability to run pro grams which are incompatible with Firewalls URL Filter Use the URL Filter to block access to undesirable Web...

Страница 6: ...and built in static routing table Configuration Management Easy Setup Use your WEB browser from anywhere on the LAN or WLAN for configuration Configuration File Upload Download Save download the conf...

Страница 7: ...us attacks from external sources Protection against DoS attacks DoS Denial of Service attacks can flood your Internet connection with invalid packets and connection requests using so much bandwidth an...

Страница 8: ...hould be included The Wireless Router Unit Power Adapter Quick Installation Guide CD ROM containing the on line manual If any of the above items are damaged or missing please contact your dealer imme...

Страница 9: ...vailable Flashing Data is being transmitted or received via the Wireless access point This includes network traffic as well as user data Connected LED On Internet connection is available Off No Intern...

Страница 10: ...released the Wireless Router will reboot restart Clear All Data This button can also be used to clear ALL data and restore ALL settings to the factory default values To Clear All Data and restore the...

Страница 11: ...ess Point all Wireless devices must be compliant with the IEEE802 11b or IEEE802 11g specifications Procedure Figure 4 Installation Diagram 1 Choose an Installation Site Select a suitable place on the...

Страница 12: ...ct the DSL or Cable modem to the WAN port on the Wireless Router Use the cable supplied with your DSL Cable modem If no cable was supplied use a standard cable 4 Power Up Power on the Cable or DSL mod...

Страница 13: ...be required depending on which features and functions of the Wireless Router you wish to use Use the table below to locate detailed instruc tions for the required functions To Do this Refer to Config...

Страница 14: ...eatures Config File download upload Logs Network Diagnostics Ping DNS Lookup Options Backup DNS UPnP PC Database QoS Remote Management Routing RIP and static Routing Security settings Upgrade Firmware...

Страница 15: ...that a new network device has been found and offering to create a new desktop shortcut to the newly discovered device Unless you intend to change the IP Address of the Wireless Router you can accept t...

Страница 16: ...ddress See next item If your PC is using a fixed IP Address its IP Address must be within the range 192 168 0 2 to 192 168 0 254 to be compatible with the Wireless Router s default IP Address of 192 1...

Страница 17: ...m screen use the Clone MAC address button to copy the MAC address from your PC to the Wireless Router Common Connection Types Cable Modems Type Details ISP Data required Dynamic IP Address Your IP Add...

Страница 18: ...Details ISP Data required Dynamic IP Address Your IP Address is allocated automatically when you connect to you ISP None Static Fixed IP Address Your ISP allocates a perma nent IP Address to you IP A...

Страница 19: ...menu bar on the left of the screen and the Back button on your Browser for navigation Changing to another screen without clicking Save does NOT save any changes you may have made You must Save before...

Страница 20: ...ddresses to PCs DHCP clients on your LAN when they start up The default and recommended value is Enabled If you are already using a DHCP Server this setting must be Disabled and the existing DHCP serv...

Страница 21: ...Router s DHCP Server This is the default setting The DHCP Server settings are on the LAN screen On this screen you can Enable or Disable the Wireless Router s DHCP Server function Set the range of IP...

Страница 22: ...Wireless Screen Identification Region Select your region from the drop down list This field displays the region of operation for which the wireless interface is intended It may not be legal to operate...

Страница 23: ...value can then adopt the correct SSID for connections to this Access Point WMM Support Enable or disable this feature as required Wireless Security Current Setting The current security setting is disp...

Страница 24: ...sabled no data encryption is used WEP data is encrypted using the WEP standard WPA WPA2 PSK data is encrypted using the WPA standard This is a later standard than WEP and provides much better security...

Страница 25: ...ata WPA WPA2 PSK screen Authentication Select the desired option WPA PSK Like WEP data is encrypted before trans mission WPA is more secure than WEP and should be used if possible WPA2 PSK This is a f...

Страница 26: ...se the same channel SSID as well as the wireless encryption method Figure 10 WDS Screen Data WDS Setup Screen WDS Enable WDS Enable the feature as required Allow device can associ ate Check this check...

Страница 27: ...less client to initiate WPS mode You will also need to press the actual WPS button of the Wireless Router PIN Either enter the PIN number which is founded in the utility of the client device or enter...

Страница 28: ...word to the Wireless Router on the Password screen above you will be prompted for the password when you connect as shown below If no password has been set this dialog will not appear Figure 13 Passwor...

Страница 29: ...on each PC TCP IP Settings Overview If using the default Wireless Router settings and the default Windows TCP IP settings no changes need to be made By default the Wireless Router will act as a DHCP S...

Страница 30: ...n 95 Ensure your TCP IP settings are correct as follows Using DHCP To use DHCP select the radio button Obtain an IP Address automatically This is the default Windows setting Using this is recommended...

Страница 31: ...ou of the IP Address they assigned to the Wireless Router Figure 16 Gateway Tab Win 95 98 On the DNS Configuration tab ensure Enable DNS is selected If the DNS Server Search Order list is empty enter...

Страница 32: ...NT4 0 1 Select Control Panel Network and on the Protocols tab select the TCP IP protocol as shown below Figure 18 Windows NT4 0 TCP IP 2 Click the Properties button to see a screen like the one below...

Страница 33: ...it obtains an IP Address from the Wireless Router Specify an IP Address If your PC is already configured check with your network administrator before making the following changes 1 The Default Gatewa...

Страница 34: ...he DNS should be set to the address provided by your ISP as follows Click the DNS tab On the DNS screen shown below click the Add button under DNS Service Search Order and enter the DNS provided by yo...

Страница 35: ...Figure 21 Windows NT4 0 DNS SIGNAMAX LLC www signamax eu 32...

Страница 36: ...ck the Local Area Connection icon and select Properties You should see a screen like the following Figure 22 Network Configuration Win 2000 3 Select the TCP IP protocol for your network card 4 Click o...

Страница 37: ...from the Wireless Router Using a fixed IP Address Use the following IP Address If your PC is already configured check with your network administrator before making the following changes Enter the Wir...

Страница 38: ...Local Area Connection and choose Properties You should see a screen like the following Figure 24 Network Configuration Windows XP 3 Select the TCP IP protocol for your network card 4 Click on the Pro...

Страница 39: ...e Wireless Router Using a fixed IP Address Use the following IP Address If your PC is already configured check with your network administrator before making the following changes In the Default gatewa...

Страница 40: ...lect Set up or change your Internet Connection 3 Select the Connection tab and click the Setup button 4 Cancel the pop up Location Information screen 5 Click Next on the New Connection Wizard screen 6...

Страница 41: ...default most Unix installations use a fixed IP Address If you wish to continue using a fixed IP Address make the following changes to your configuration Set your Default Gateway to the IP Address of t...

Страница 42: ...SSID ESSID This must match the value used on the Wireless Router The default value is default Note The SSID is case sensitive Wireless Security By default Wireless security on the Wireless Router is d...

Страница 43: ...receives an incoming connection Refer to Chapter 6 Ad vanced Features for further details Applications which use non standard connections or port numbers may be blocked by the Wireless Router s built...

Страница 44: ...button to find out more information Internet IP Address This IP Address is allocated by the ISP Internet Service Provider If there is no current connection this will be blank or 0 0 0 0 WAN MTU This...

Страница 45: ...ates the Wireless security system currently used System Device Name This displays the current name of the Wireless Router Firmware Version The current version of the firmware installed in the Wireless...

Страница 46: ...evice as seen by Internet users This address is allocated by your ISP Internet Service Provider Network Mask The Network Mask associated with the IP Address above PPPoE Link Status This indicates whet...

Страница 47: ...onnection PPP up successfully Able to login to ISP s Server and establish a PPP con nection Idle time out reached The connection has been idle for the time period speci fied in the Idle Time out field...

Страница 48: ...he local LAN IP Address The IP Address of this device as seen by Internet users This address is allocated by your ISP Internet Service Provider Connection Status This indicates whether or not the conn...

Страница 49: ...currently in the Log This will make it easier to read new messages Refresh Update the data on screen Connection Status L2TP If using L2TP a screen like the following example will be displayed when th...

Страница 50: ...sconnect buttons unless the setting Connect automati cally as required is disabled Connection Log Connection Log The Connection Log shows status messages relating to the existing connection The Clear...

Страница 51: ...ce Pro vider Connection Status This indicates whether or not the connection is currently established If the connection does not exist the Connect button can be used to establish a connection If the co...

Страница 52: ...ked Figure 31 Connection Details RAS Data RAS Screen Internet RAS Plan The RAS plan connection speed currently used Physical Ad dress The hardware address of this device as seen by remote devices on t...

Страница 53: ...n is not operational Buttons Release Renew This button is only useful if the IP address shown above is allocated automatically on connection Dynamic IP address Otherwise it has no effect This button w...

Страница 54: ...Network Mask The Network Mask associated with the IP Address above Default Gateway The IP Address of the remote Gateway or Router associated with the IP Address above DNS IP Address The IP Address of...

Страница 55: ...an IP Address allocated by the ISP s DHCP Server Clicking the Release button will release the IP Address and break the connection If the button says Renew this indicates that the ISP s DHCP Server ha...

Страница 56: ...ure allows administrators to restrict the level of Internet Ac cess available to PCs on your LAN With the default settings everyone has unrestricted Internet access To use this feature 1 Set the desir...

Страница 57: ...SIGNAMAX LLC www signamax eu 54...

Страница 58: ...is blocked Use this to create the most restrictive group Block selected Services You can select which Ser vices are to block Use this to gain fine control over the Internet access for a group Block by...

Страница 59: ...This screen is displayed when the Edit Service List button on the Access Control screen is clicked Figure 34 Access Control Services Data Services Screen Available Services Available Services This li...

Страница 60: ...ided Click the View Log button on the Access Control screen to view this log This log shows attempted Internet accesses which have been blocked by the Access Control function Data shown in this log is...

Страница 61: ...4 The Wireless Router will then automatically ensure that your current IP Address is recorded at the DDNS server If the DDNS Service provides software to perform this IP address update you should dis...

Страница 62: ...message you need to contact the DDNS Ser vice and correct the problem User Name Enter your Username for the DDNS Service Password Enter your current password for the DDNS Service Domain Name Enter the...

Страница 63: ...by the Wireless Router But sometimes it is not clear which PC should receive an incoming connection This problem could arise with the Communication Applications listed on this screen If this problem...

Страница 64: ...nd that they do not function correctly because they are blocked by the Wireless Router s firewall In this case you can define the application as a Special Application Special Applications Screen This...

Страница 65: ...tion server for data you send to it If the application uses a single port number enter it in both the Start and Finish fields Using a Special Application Configure the Special Applications screen as r...

Страница 66: ...ss field Select the PC to be the DMZ PC for traffic sent to this IP address Enable this DMZ If you have multiple Internet IP addresses you can assign one DMZ PC for each Internet IP address If you onl...

Страница 67: ...e screen is shown below Figure 39 URL Filter Screen Data URL Filter Screen Settings Enable This lists any existing entries If you have not entered any val ues this list will be empty Schedule If you a...

Страница 68: ...on An entry may be a Domain name e g www trash com or simply a string e g ads Any URL which contains ANY entry ANYWHERE in the URL will be blocked Add Button Use this to add the entry in the Filter St...

Страница 69: ...r day is blank no action will be performed Figure 40 Define Schedule Screen Data Define Schedule Screen Day Each day of the week can be scheduled independently Session 1 Session 2 Two 2 separate sessi...

Страница 70: ...ed Group Group Mem bers This lists all PCs which are currently members of the selected group Other PCs This lists all other PCs those which are not currently members of the selected group Del Use this...

Страница 71: ...rs IP Address seen by Internet Users Note that in this illustration both Internet users are connecting to the same IP Ad dress but using different protocols To Internet users all virtual Servers on yo...

Страница 72: ...lect the protocol TCP or UDP used by the Server Internal LAN Ports Enter the range of port numbers which the Server software is configured to use External WAN Ports Traffic from the Internet using thi...

Страница 73: ...ing your own Virtual Servers If the type of Server you wish to use is not listed on the Virtual Servers screen you can define and manage your own Servers Create a new Server 1 Click Clear Form 2 Enter...

Страница 74: ...allocated to you by your ISP e g http 203 70 212 52 ftp 203 70 212 52 It is more convenient if you are using a Fixed IP Address from your ISP rather than Dynamic However you can use the Dynamic DNS f...

Страница 75: ...fication Hostname Normally there is no need to change the default name but if your ISP requests that you use a particular Hostname enter it here Domain Name If your ISP provided a domain name enter it...

Страница 76: ...s above Gateway The address of the router or gateway as supplied by your ISP Note For PPPoE connections the Network Mask and Gateway IP address are NOT required For PPPoE Unnumbered IP connections the...

Страница 77: ...rver Address If using PPTP L2TP or Big Pond Cable the Server address is required For PPTP and L2TP you can select and enter either the name or IP address of your ISP s server For Big Pond Cable you mu...

Страница 78: ...actually change the address used Copy from PC Inserts the MAC address from your PC into the MAC address field You must click Save to actually change the address used Save Save your changes to the Wir...

Страница 79: ...ear all logs set E Mailing of log files Network Diag Ping DNS Lookup Options Various options such as backup DNS UPnP and enable TFTP firmware upgrade option PC Database This is the list of PCs shown w...

Страница 80: ...a Config File Screen Backup Config Use this to download a copy of the current configuration and store the file on your PC Click Download to start the download Restore Config This allows you to restore...

Страница 81: ...s Screen Data Logs Screen Enable Logs Outgoing If selected Outgoing Internet connections are logged Normally the Internet Destination will be shown as an IP address But if the URL Filter is enabled th...

Страница 82: ...cted the log is sent at the specified If the day is specified the log is sent once per week o Select the time of day you wish the E mail to be sent If the log is full before the time specified to send...

Страница 83: ...a Timeout error In that case wait a few seconds and try again Ping Button After entering the IP address click this button to start the Ping procedure The results will be displayed in the Ping Results...

Страница 84: ...e will be visible via UPnP If Disabled this device will not be visible via UPnP Allow Configu ration If checked then UPnP users can change the configuration If Disabled UPnP users can only view the co...

Страница 85: ...the database and updated as required By default non Server versions of Windows act as DHCP Clients this setting is called Obtain an IP Address automatically The Wireless Router uses the Hardware Addre...

Страница 86: ...dd it Buttons Add This will add the new PC to the list The PC will be sent a ping to determine its hardware address If the PC is not available not connected or not powered On you will not be able to a...

Страница 87: ...dit Use this to change the data for the selected PC in the list The data for the selected PC will then be shown in the Properties area where it may be edited Click Update to save any changes Delete Us...

Страница 88: ...ntact the PC and find its MAC address This is only possible if the PC is connected to the LAN and powered On MAC address is Enter the MAC address on the PC The MAC address is also called the Hardware...

Страница 89: ...number 1 From a remote location start your Browser 2 In the Address or Location field enter the Internet IP address of this device NOT the LAN IP address followed by the port number as follows http i...

Страница 90: ...ar enter HTTP followed by the Internet IP Address of the Wireless Router If the port number is not 80 the port number is also required After the IP Address enter followed by the port number e g HTTP 1...

Страница 91: ...Windows 2000 settings are correct Open Routing and Remote Access In the console tree select Routing and Remote Access server name IP Routing RIP In the Details pane right click the interface you want...

Страница 92: ...ties Destination Network The network address of the remote LAN segment For standard class C LANs the network address is the first 3 fields of the Destination IP Address The 4th last field can be left...

Страница 93: ...e or Default Gateway Local Router The local router is the Router installed on the same LAN segment as the Wireless Router This router requires that the Default Route is the Wireless Router itself Typi...

Страница 94: ...192 168 0 100 Wireless Router s local Router Metric 2 Entry 2 Segment 2 Destination IP Address 192 168 2 0 Network Mask 255 255 255 0 Standard Class C Gateway IP Address 192 168 0 100 Metric 3 For Ro...

Страница 95: ...tings Button If you wish to adjust the settings used by the DoS firewall click this button to open a sub window Options Respond to ICMP The ICMP protocol is used by the ping and traceroute pro grams...

Страница 96: ...led Block UDP Flood A UDP flood is excessively large number of UDP packets This is often a DoS Denial of Service attack but some streaming applications also use UDP and blocking UPD packets may preven...

Страница 97: ...creen To perform the Firmware Upgrade 1 Click the Browse button and navigate to the location of the upgrade file 2 Select the upgrade file Its name will appear in the Upgrade File field 3 Click the St...

Страница 98: ...tic IP address ensure that it is using an IP Address within the range 192 168 0 2 to 192 168 0 254 and thus compatible with the Wireless Router s default IP Address of 192 168 0 1 Also the Network Mas...

Страница 99: ...group does NOT match workgroup Both your PC and the Wireless Router must have the same setting for WEP The default setting for the Wireless Router is disabled so your wireless station should also have...

Страница 100: ...experiment by switching other devices Off and see if this helps Any noisy devices should be shielded or relocated RF Shielding Your environment may tend to block transmission between the wireless stat...

Страница 101: ...nfrastructure mode and can communicate only with Wireless Stations which are set to Infrastructure mode BSS ESS BSS A group of Wireless Stations and a single Access Point all using the same ID SSID fo...

Страница 102: ...it is transmit ted This is desirable because it is impossible to prevent snoopers from receiving any data which is transmitted by your Wireless Stations But if the data is encrypted then it is meanin...

Страница 103: ...e Access Point must use the same settings as follows Mode On client Wireless Stations the mode must be set to Infrastruc ture The Access Point is always in Infrastructure mode Most Wireless stations w...

Страница 104: ...have the same Pre shared Key and encryption system For Ad hoc networks no Access Point all Wireless stations must use the same security settings SIGNAMAX LLC www signamax eu 101...

Страница 105: ...LEDs 9 Power Adapter 5V External Wireless Interface Standards IEEE802 11g WLAN JEIDA 4 2 roaming support Frequency 2 4 to 2 4835GHz Industrial Scientific Medical Band Channels Maximum 14 Channels dep...

Страница 106: ...uding the following safety and EMC standards EN300328 2 EN301489 1 17 EN60950 CE Marking Warning This is a Class B product In a domestic environment this product may cause radio interference in which...

Отзывы: