background image

GB

- Before leaving, check that the rear lights function correctly. Also check 

that the indicator lights work correctly.

- Keep the connections clean (lighting board power plug and power outlet 

on the vehicle ); use suitable cleaning materials when necessary.

- Do not use and/or attach the bike rack to the car before making the 

electrical connections.

- Check  that  the  electrical  cables  are  not  damaged  or  likely to be 

damaged by interference with other elements of the vehicle or that they 
could, in any way, be accidently cut.

- The  lighting devices are not designed t be immersed in water.
- Any major work required to be done on the electrical system and 

connections must be performed by qualified personnel.

- Provide an additional number plate to be attached to the towball bike 

rack.

- Keep in mind that when driving a vehicle with a towball bike carrier the 

rear load projection is different to the normal projection, therefore, take 
care when reversing  or parking  as you need to consider the longer 
length of the vehicle; also be aware that the weight of the bikes loaded 
on  the  carrier  alter  the  handling  characteristics  of  the  vehicle 
particularly in crosswind conditions, on bends or when braking; When on 
the road, respect the highway code speed limits and pay attention to the 
road conditions to prevent jolts.

- If the driver’s rear view is obstructed the vehicle must be equipped with 

rearview mirrors to ensure safe driving.

- To avoid damage, if the boot lid is equipped with an automatic opening 

function, use this function with care.

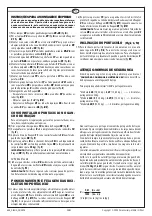
- The rear lights of the vehicle are partially or completely covered when 

using  the towball  carrier  which is  why the model  that  you have 
purchased is equipped with an extra light and numberplate system. The 
necessary number and type of lights depend on the date of the vehicle’s 
first registration, as set out below:

- If the load protrudes more than 40 cm beyond the surface of the lights of 

the towball bike carrier then a visual sign must be attached to it.

- Check all the bike rack fixing elements after a short while, then at 

regular intervals.

- Check the distance between the bike rack, the bikes and the exhaust 

pipe(s) to avoid heat damages.

- To increase road safety and to reduce fuel consumption, remove the bike 

rack when not in use.

- Modifications to the bike rack and its components are not permitted. 

Immediately replace any worn or damaged part using original spare 
parts exclusively.

- The bike rack can be cleaned by using warm water and/or car shampoo. 

Store the bike rack in dry conditions at moderate temperatures.

The manufacturer is not responsible for damage caused by 

improper use of this product, nor for any objection made by the 

competent authorities with regard to the highway code.

The manufacturer shall only be responsible for manufacturing 

defects in the bike rack and accessory components.

THE TYPE APPROVAL CERTIFIATE CAN BE DOWNLOADED FROM THE 

PRODUCT TECHNICAL DATA SHEET ON OUR WEB SITE 

www.peruzzosrl.com

It is not obligatory to use fog 

lights or reversing lights on the 

towball bike carrier.

Use of a 7 pin plug is permitted.

REGISTRATION BEFORE 

01.01.1987

It is not obligatory to use fog 

lights but it is mandatory to use 

the reversing lights of the 

towball bike carrier.

Use of a 7 pin plug is permitted. 

In the event of incompatibility 

between socket and plug use 

suitable adaptors that are  

readily available on the market.

REGISTRATION BETWEEN  

01.01.1987  AND  31.12.1990

All the lights of the towball bike 

carrier must be operational. Fog 

lights and reversing lights are 

obligatory.

It is necessary to use a relay or 

electric plug with a cutoff system 

that ensures that the vehicle's 

fog lights switch off 

automatically when the towball 
bike carrier is used and come on 

as soon as the plug is removed 

(Only a 13 pin plug complies 

with this requirement).

REGISTRATION AFTER 

01.01.1991

REGISTRATION AFTER 

01.01.1998

The towball bike carrier must not 

cover the third brake lights. The 

third brake light must be visible 

otherwise it must be repeated on 

the towball bike carrier.

668_SIENA_2

8/09/16

10/31

Copyright  ©  2009 Peruzzo Italy - MADE IN ITALY

Содержание 668

Страница 1: ...ZUR MONTAGE AUF DER ANHÄNGERKUPPLUNG PORTE VELOS ARRIERE POUR DISPOSITIF D ATTELAGE PORTABICI POSTERIORE GANCIO DI TRAINO PORTA BICICLETA PARAAPLICAR A LA BOLA DE REMOLQUE BAGAŻNIK ROWEROWY NA HAK HOLOWNICZY ZADNÍ NOSIČ JÍZDNÍCH KOL PRO MONTÁŽ NA TAŽNÉ ZAŘÍZENÍ NOSILEC KOLES NA VLEČNI KLJUKI PORTACICLO TRASEIRO PARA O GANCHO DE TRAÇÃO FIETSENHOUDER VOOR ACHTERAAN OP TREKHAAK Art 669 3 13 33 Kg Art...

Страница 2: ...13 10 8 5 Fig A 668_SIENA_28 09 16 2 31 Copyright 2009 Peruzzo Italy MADE IN ITALY ...

Страница 3: ...Fig B Fig C 668_SIENA_28 09 16 3 31 Copyright 2009 Peruzzo Italy MADE IN ITALY ...

Страница 4: ...Fig D1 Fig D2 1 1 2 2 Art 668 4 668_SIENA_28 09 16 4 31 Copyright 2009 Peruzzo Italy MADE IN ITALY ...

Страница 5: ...Fig E 668_SIENA_28 09 16 5 31 Copyright 2009 Peruzzo Italy MADE IN ITALY ...

Страница 6: ...Fig F 0 668_SIENA_28 09 16 6 31 Copyright 2009 Peruzzo Italy MADE IN ITALY ...

Страница 7: ...Fig F1 Fig G Fig H1 Fig H2 1 2 Art 668 4 Art 668 4 668_SIENA_28 09 16 7 31 Copyright 2009 Peruzzo Italy MADE IN ITALY ...

Страница 8: ...Fig I Fig L Fig M Clack 668_SIENA_28 09 16 8 31 Copyright 2009 Peruzzo Italy MADE IN ITALY ...

Страница 9: ... strap 30 Fig H1 Secure the wheels by means of the fixing straps 37 Fig G Check that the belts are mounted correctly by pulling on them 16 Repeat the operations in 15 for the second third and fourth bikes The second and third bikes are secured to the fixing arch 31 with the fixing arms 15 16 Fig H1 whereas the fourth bike is secured to the third bike with fixing arm 41 Fig H2 IMPORTANT For safe tr...

Страница 10: ...a visual sign must be attached to it Check all the bike rack fixing elements after a short while then at regular intervals Check the distance between the bike rack the bikes and the exhaust pipe s to avoid heat damages To increase road safety and to reduce fuel consumption remove the bike rack when not in use Modifications to the bike rack and its components are not permitted Immediately replace a...

Страница 11: ...r Fahrt und während der Fahrtpausen die Riemenspannung POSITIONIERUNG UND BEFESTIGUNG DER FAHRRÄDER AUF DEM FAHRRADTRÄGER 15 Als erstes das größte und schwerste Fahrrad auf demTräger positionieren die Räder in den Radaufnahmen 21 unterbringen und das Fahrrad an den Befestigungsbügel 31 anlegen Die Fahrräder mit dem Befestigungsriemen 30 am Befestigungsbügel 31 fixieren Abb H1 Die Räder mit den Bef...

Страница 12: ...alig zugelassen worden ist Wenn die Last weiter als 40 cm über die Leuchten des auf der Anhängerkupplung angebrachten Fahrradträgers hervorsteht muss sie gekennzeichnet werden Kontrollieren Sie anfänglich nach einer kurzen Fahrtstrecke anschlie ßend in regelmäßigen Zeitabständen alle Befestigungselemente des Fahrradträgers Prüfen Sie den Abstand zwischen dem Fahrradträger den Fahrrädern und dem Au...

Страница 13: ... vélo le plus grand et le plus lourd sur le porte vélo mettez les roues dans les logements correspondants 21 et appuyez le contre le montant de fixation 31 Fixez le vélo avec la sangle de fixation 30 au montant de fixation 31 Fig H1 Fixez les roues avec les sangles de fixation 37 Fig G Assurez vous en tendant suffisam ment les sangles qu elles sont montées correctement 16 Répétez les opérations 15...

Страница 14: ...porte vélos est équipé d un système supplémentaire de feux et plaque d immatriculation Le nombre et le type de feux nécessaires dépendent de la date de la première immatriculation du véhicule conformément aux dispositions suivantes Si la charge déborde de plus de 40 cm de la surface des feux du porte vélos d attelage il est nécessaire de la signaler visuellement Contrôlez initialement tous les élé...

Страница 15: ...correttamente 16 Ripetere le operazioni 15 per la seconda la terza e la quarta bicicletta La seconda e la terza bicicletta sono fissate all arco di fissaggio 31 con i braccetti di fissaggio 15 16 Fig H1 mentre la quarta è fissata alla terza con il braccetto di fissaggio 41 Fig H2 IMPORTANTE Per trasportare in sicurezza il carico il portabici è fornito della cinghia 38 che deve legare tutte le bici...

Страница 16: ...inizialmente dopo un breve percorso e successivamente a intervalli regolari tutti gli elementi di fissaggio del portabici Verificare la distanza tra il portaciclo le biciclette e il i tubo i di scarico per evitare eventuali danni imputabili al calore Per aumentare la sicurezza stradale e per un corretto risparmio ener getico smontare il portaciclo quando non viene utilizzato E vietato modificare i...

Страница 17: ...OCACIÓN Y FIJACIÓN DE LAS BICI CLETAS EN EL PORTABICICLETAS 15 Coloque primero en el portabicicletas la bicicleta más grande y pesada introduzca las ruedas en los alojamientos correspondientes 21 y apoye el cuadro contra el arco de fijación 31 Fije la bicicleta con la correa de fijación 30 al arco de fijación 31 Fig H1 Sujete las ruedas con las correas de fijación 37 Fig G Verificar tensando sufic...

Страница 18: ...la adicionales El número y el tipo de luces necesarias dependen de la fecha de primera matriculación del vehículo tal como se indica a continuación Si la carga sobresale más de 40 cm con respecto a la superficie de las luces del portabicicletas con gancho de remolque es necesario indicarlo visualmente Después de un breve recorrido y a intervalos regulares durante el viaje controle todos los elemen...

Страница 19: ... 15 Jako pierwszy na bagażniku należy ustawić rower który jest największy i najcięższy Ustawić koła w uchwytach na koła 21 i oprzeć je o poręcz mocującą 31 Przymocować rower do poręczy mocującej 5 przy pomocy taśmy mocującej 30 Rys H1 Przymocować koła przy pomocy taśm mocujących 37 Rys G Upewnić się odpowiednio naprężając taśmy czy zostały one prawidłowo zamontowane 16 Powtórzyć czynności opisane ...

Страница 20: ...tracji pojazdu zgodnie z tym co zostało wskazane poniżej Jeżeli ładunek wystaje na ponad 40 cm poza powierzchnię świateł bagażnika rowerowego montowanego na haku holowniczym wówczas jest konieczne zasygnalizowanie tego w widoczny sposób Sprawdzać wszystkie elementy mocujące bagażnika rowerowego początkowo już po przebyciu krótkiego odcinka drogi a następnie w regularnych odstępach czasu Sprawdzić ...

Страница 21: ... obr G Utáhněte pásky a ujistěte se že je jízdní kolo k nosiči řádně připevněno 16 Zopakujte postup z bodu 15 i pro druhé třetí a čtvrté jízdní kolo Pro připevnění druhého a třetího jízdního kola k upevňovacímu držáku 31 použijte upevňovací ramena 15 16 Obr H1 zatímco čtvrté kolo je nutno připevnit ke třetímu upevňovacím ramenem 41 Obr H2 DŮLEŽITÉ UPOZORNĚNÍ Pro bezpečnější přepravu kol je nosič v...

Страница 22: ...ujetí krátkého úseku a poté v pravidelných intervalech veškeré upínací prvky nosiče Zkontrolujte vzdálenost mezi nosičem jízdními koly a výfukem abyste se vyhnuli případným škodám způsobeným vysokou teplotou Pro zvýšení bezpečnosti silničního provozu a pro úsporu energie nosič odmontujte jestliže ho nepoužíváte Je zakázáno provádět na nosiči a jeho komponentech jakékoliv úpravy Při výměně jakékoli...

Страница 23: ...G Prepričajte se z zategovanjem jermenov da so le ti pravilno montirani 16 Ponovite celoten postopek 15 za drugo tretje in četrto kolo Drugo in tretje kolo sta pritrjeni na pritrdilni lok 31 s pritrdilnimi ročicami 15 16 Slika H1 medtem ko je četrto kolo pritrjeno na tretje s pritrdilno ročico 41 Slika H2 POMEMBNO Za varno prevažanje tovora ima nosilec koles jermen 38 ki mora vsa kolesa privezati ...

Страница 24: ...ratki vožnji in kasneje v rednih intervalih vse pritrdilne elemente nosilca koles Preverite razdaljo med nosilcem koles kolesi in izpušno cevjo izpušnimi cevmi da bi se izogibali morebitnih poškodb zaradi toplote Za večjo varnost na cesti in za pravilno varčevanje z energijo odstranite nosilec koles ko ga ne uporabljate Prepovedano je spreminjati nosilec koles in njegove sestavne elemente Takoj za...

Страница 25: ...ETAS NO PORTACICLO 15 Colocar no portaciclo em primeiro lugar a bicicleta mais grande e mais pesada meter as rodas nos alojamentos roda 21 e apoiar la contra o arco de fixagem 31 fixar a bicicleta com a correia de fixagem 30 ao arco de fixagem 31 fig H1 fixar as rodas com as correias de fixagem 37 fig G Assegurar se esticando suficientemente as correias que estas estejam montadas corretamente 16 R...

Страница 26: ... O numero e o tipo de luzes necessarias dependem da data da prima matriculação do veiculo segundo quanto segue Se o cargo projeta mais de 40 cm alèm da superficie das luzes do portabici gancho tração então è necessàrio assinalar lo visivamente Controlar inicialmente depois de um breve percurso e successivamente a intervalos regulares todos o s elementos de fixagem do porta bicicletas Fazer atenção...

Страница 27: ...de fietsenhouder plaats de wielen in de wielsteunen 2 1 en plaats de fiets tegen de bevestigingsboog 31 Bevestig de fiets met de bevestigingsriem30 aan de bevestigingsboog 31 Fig H1 Bevestig de wielen met de bevestigingsriemen 37 Fig G Span de riemen voldoende aan en controleer dat ze correct werden aangebracht correct werd aangebracht 16 Herhaal de handelingen 15 voor de tweede en derde fiets ind...

Страница 28: ...ust met een extra systeem voor verlichting en aanbrenging van de kentekenplaat Het aantal en soort lichten is afhankelijk van de datum voor eerste inschrijving van het voertuig Indien de last voor meer dan 40 cm buiten het oppervlak van de verlichting van de fietsenhouder met trekhaak uitsteekt breng dan een waarschuwingsbord aan Controleer vóór vertrek na een kort rijtraject en vervolgens op rege...

Страница 29: ... Ersatzteile Pièces détachées Ricambi Refacciones PL CZ Części zamienne Náhradní díly SLO PT Peças Onderdelen NL Rezervni deli Art 668 668 3 668 4 669 669 3 668_SIENA_28 09 16 29 31 Copyright 2009 Peruzzo Italy MADE IN ITALY ...
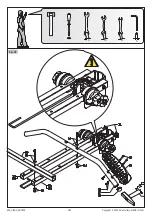
Страница 30: ...XW VFKZDPP 7XEH HQ PRXVVH 6SXJQD WXERODUH VSRQMD WXERODU LNH IL LQJ DUFK HIHVWLJXQJVE JHO 0RQWDQW GH IL DWLRQ UFR GL ILVVDJJLR UFR GH IL DJHP 6TXDUH FDS 9LHUNDQWVWRSIHQ RXFKRQ FDUUp 7DSSR TXDGUR 5ROKD TXDGUDGD GMXVWPHQW HOHPHQW IRU URXQG WXEH LQVWHOOHOHPHQW I U 5XQGURKU OpPHQW GH UpJODJH SRXU WXEH URQG 5XRWD GL UHJROD LRQH SHU WXER WRQGR 5RGD GH UHJXODomR SDUD WXER UHGRQGR GMXVWPHQW HOHPHQW IRU UR...

Страница 31: ...DPL 6FKURHI PHW URQGH NRS PHW ODPHOOHQ VSRQMD WXEXODU ąEND RFKURQQD 3ČQRYi WUXELFH DãþLWQD JRELFD 0RXVVH EXLV UFR GH ILMDFLyQ 3RUĊF PRFXMąFD 8StQDFt UiP 3ULWUGLOQL ORN HYHVWLJLQJVERRJ 7DSyQ FXDGUDGR RUHN NZDGUDWRZ ýW ĜKUDQQê X iYČU YDGUDWQL þHS 9LHUNDQWH GRS OHPHQWR GH UHJXODFLyQ SDUD WXER UHGRQGR 7DUF D UHJXODF MQD GOD UXU RNUąJáHM XODWp VHĜL RYDFt NROR ROHãþHN D UHJXOLUDQMH D RNURJOR FHY 6WHOZLH...

Отзывы: