background image

7

Contents

Conducting Two Calls Simultaneously  . . . . . . . . . . . . . . . . . . . . . . . . .  80

Consultation . . . . . . . . . . . . . . . . . . . . . . . . . . . . . . . . . . . . . . . . . . .  80
Call transfer . . . . . . . . . . . . . . . . . . . . . . . . . . . . . . . . . . . . . . . . . . .  82
Alternate – Alternating Between Two Parties . . . . . . . . . . . . . . . . .  84
Redial Last Number   . . . . . . . . . . . . . . . . . . . . . . . . . . . . . . . . . . . .  85

Call Log . . . . . . . . . . . . . . . . . . . . . . . . . . . . . . . . . . . . . . . . . . . . . . . . .  86

Dialed Calls  . . . . . . . . . . . . . . . . . . . . . . . . . . . . . . . . . . . . . . . . . . .  86
Missed Calls  . . . . . . . . . . . . . . . . . . . . . . . . . . . . . . . . . . . . . . . . . .  87
Received Calls . . . . . . . . . . . . . . . . . . . . . . . . . . . . . . . . . . . . . . . . .  89
Do Not Disturb . . . . . . . . . . . . . . . . . . . . . . . . . . . . . . . . . . . . . . . . .  90

Character Input  . . . . . . . . . . . . . . . . . . . . . . . . . . . . . . . . . . . . . . . . . . .  91

Changing Character Mode . . . . . . . . . . . . . . . . . . . . . . . . . . . . . . . .  91
Switching Between Overwrite and Insert Mode . . . . . . . . . . . . . . .  92

Navigating on the Display Module. . . . . . . . . . . . . . . . . . . . . . . . . . . . .  94

Selecting and Activating Control Elements . . . . . . . . . . . . . . . . . . .  94
Edit Fields  . . . . . . . . . . . . . . . . . . . . . . . . . . . . . . . . . . . . . . . . . . . .  95
Control Keys on the Telephone . . . . . . . . . . . . . . . . . . . . . . . . . . . .  95

Setup Menu in the Display Module . . . . . . . . . . . . . . . . . . . . . . . . . . . .  96

Web Interface. . . . . . . . . . . . . . . . . . . . . . . . . . . . . . . . 97

General Information . . . . . . . . . . . . . . . . . . . . . . . . . . . . . . . . . . . . . . . .  97
Preparatory Steps  . . . . . . . . . . . . . . . . . . . . . . . . . . . . . . . . . . . . . . . . .  98
Menu Structure . . . . . . . . . . . . . . . . . . . . . . . . . . . . . . . . . . . . . . . . . . .  99

Change User Password . . . . . . . . . . . . . . . . . . . . . . . . . . . . . . . . . .  99
Function Keys  . . . . . . . . . . . . . . . . . . . . . . . . . . . . . . . . . . . . . . . .  100
Select Function Key . . . . . . . . . . . . . . . . . . . . . . . . . . . . . . . . . . . .  101
Country Settings  . . . . . . . . . . . . . . . . . . . . . . . . . . . . . . . . . . . . . .  102
Language Settings . . . . . . . . . . . . . . . . . . . . . . . . . . . . . . . . . . . . .  102
Audio Settings . . . . . . . . . . . . . . . . . . . . . . . . . . . . . . . . . . . . . . . .  103
Call-Related Parameters. . . . . . . . . . . . . . . . . . . . . . . . . . . . . . . . .  103

Alphabetic Reference  . . . . . . . . . . . . . . . . . . . . . . . . . . . . . . . . . . . . .  104

Using Editors. . . . . . . . . . . . . . . . . . . . . . . . . . . . . . . . 110

Entering Text . . . . . . . . . . . . . . . . . . . . . . . . . . . . . . . . . . . . . . . . . . . .  110
Entering Characters . . . . . . . . . . . . . . . . . . . . . . . . . . . . . . . . . . . . . . .  110
Navigating During Text Entry . . . . . . . . . . . . . . . . . . . . . . . . . . . . . . . .  112

Содержание optiPoint 410 advance S

Страница 1: ...HiPath2000 HiPath 3000 HiPath 4000 optiPoint 410 advance S V6 0 optiPoint 420 advance S V6 0 User Manual ...

Страница 2: ...n bathrooms etc as it is not splash proof Before connecting or disconnecting the LAN cable pull the power plug out of the plug receptacle first The device must not come into contact with abrasive liquids or liquids which are liable to discolor it such as tea coffee fruit juices or soft drinks Location of the Telephone The telephone should be operated in a controlled environment with an ambient tem...

Страница 3: ...ce with our certified environ mental management system ISO 14001 This process ensures that energy consumption and the use of primary raw materials are kept to a minimum thus reducing waste production All electrical and electronic products should be disposed of separately from the municipal waste stream via designated collection facilities appointed by the government or the local authorities The co...

Страница 4: ... Overview 12 Features 13 Telephone Types 13 Layout of the optiPoint 420 advance S V6 0 14 Display and Dialog Keys 15 Keypad 16 Programmable Keys 17 Control Keys 18 Operating the Telephone with the Display 19 Standard Telephone Functions 19 Function Selection 19 Incoming Calls 20 Answering a Call With the Handset 20 Answering a Call Without the Headset Speakerphone Mode 20 Ending a Call 21 Switchin...

Страница 5: ...viated Dialing 33 Using Notebook Functions 33 Using Repdial Keys 34 Deactivating the Ringer 35 Activating Do Not Disturb 35 Activating Deactivating Do Not Disturb 35 Using a Key to Activate Deactivate Do Not Disturb 36 Customizing the Telephone 37 Accessing the Setup Menu 37 Settings 38 Configuration 38 Country Options 38 Language 39 Date Time 39 Call Duration 40 Call Transfer 41 Call Join 41 Cont...

Страница 6: ... Function Key 58 Using Function Keys 60 Audio Settings 61 Loudspeaker Volume 61 Ringer Volume 62 Ringer 63 Handset Volume 63 Headset Volume 64 Room Acoustics 64 Key Clicks 65 Operating the Telephone with the optiPoint display module 66 Using the Display 66 Call View Start Display 66 Swap Display 67 Applications Display 67 Incoming call 68 Incoming Call in Idle Mode 68 Answering a Call 69 Reject Ca...

Страница 7: ... 92 Navigating on the Display Module 94 Selecting and Activating Control Elements 94 Edit Fields 95 Control Keys on the Telephone 95 Setup Menu in the Display Module 96 Web Interface 97 General Information 97 Preparatory Steps 98 Menu Structure 99 Change User Password 99 Function Keys 100 Select Function Key 101 Country Settings 102 Language Settings 102 Audio Settings 103 Call Related Parameters ...

Страница 8: ... 113 User Menu 114 Telephone Menu 117 Dialing 117 Connection Status 117 Consultation Call 118 Incoming Calls 118 Messages and Alarms 119 Status Messages 119 Error Messages 120 Labeling the Keys 121 Index 122 Important Functions at a Glance 125 ...

Страница 9: ...ns through con figuration of all operating parameters to a description of the additional fea tures Administrative tasks are described in a separate manual The quick reference guide is meant to give you quick and reliable explanations regard ing frequently used functions Intended Use The optiPoint 410 420 advance S V6 0 telephone is a desktop unit de signed for voice transmission and for connection...

Страница 10: ...ages is marked specially as they are important instructions for correct use of the unit The Siemens service department can only help you with encoun tered problems or defects on the unit itself Should you have any questions regarding the operation your spe cialist retailer or network administrator will gladly help you with the right answers For any questions regarding the telephone connection plea...

Страница 11: ...ook t Replace the handset s Conduct a call o Enter a telephone number or code dd Enter the code u or v Increase or reduce the value depending on the current operating mode Press key Press the illuminated key Press the blinking key The option appears on the display Use the key to confirm your selection Search for an option Press the keys until the option appears on the display Then press the key to...

Страница 12: ... 0 also supports other standard proto cols which optimizes the data and voice transmission and simplifies the administration of the unit For example the administrator can download updates for equipment software or feature enhancements to the optiPoint 410 420 advance S V6 0 via the FTP server The optiPoint 410 420 advance S V6 0 features a four line display and spe cial dialog keys which allow use...

Страница 13: ...0 advance S V6 0 function keys which are all programmable on two levels 3 dialog keys for menu navigation Assignment of selected destination numbers to dialing keys Display of the caller s phone number or name Call Transfer Toggle Call Holding Password protected user settings Variable ringer tone volume and sequence Telephone Types The administrator can set up the optiPoint 410 420 advance S V6 0 ...

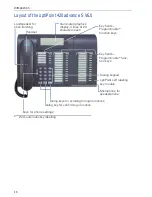
Страница 14: ... for open listening Dialog key for confirming a function Dialog keys for scrolling through functions Handset Dialing keypad Illuminated graphics display 4 lines of 24 characters each Key fields Programmable func tion keys Key fields Programmable function keys optiPoint self labeling key module With automatic key labelling ...

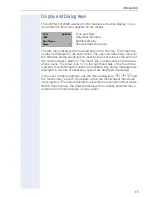
Страница 15: ...tele phone menu The arrow icon on the right hand side of the fourth line indicates that additional functions are available Any status messages are displayed in this line if necessary several are displayed alternately If you want to define settings use the three dialog keys and the function key Cancel to navigate within the hierarchically structured menu system The menu structure is nested into a m...

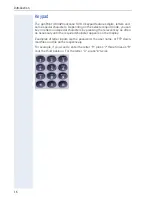
Страница 16: ...n letters and special characters by pressing the relevant key as often as necessary until the required character appears on the display Examples of letter inputs are the password the user name or FTP down load files and file paths respectively For example if you want to enter the letter R press 7 three times as R is at the third position For the letter U press 8 twice ...

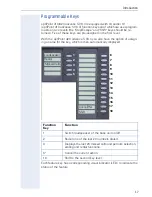
Страница 17: ...also have the option of assign ing a name for the key which is then automatically displayed Each feature key has a corresponding visual indicator LED to indicate the status of the feature Function Key Function 1 Switch loudspeaker of the base unit on off 2 Redial one of the last 20 numbers dialed 3 Displays the last 20 missed calls and permits selection editing and redial functions 17 Cancel the c...

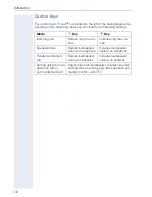
Страница 18: ... ring tone vol ume Increase ring tone vol ume Speakerphone Reduce loudspeaker volume on telephone Increase loudspeaker volume on telephone Handset controlled call Reduce loudspeaker volume on handset Increase loudspeaker volume on handset Setting using the con figuration menu and Audio Settings Adjust volume of loudspeaker handset key click and ring tone as well as ring tone sequence and melody co...

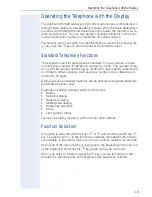
Страница 19: ...r and the log on number for user mobility is restricted to 20 digits Other numbers such as phone numbers to be dialed are re stricted to 24 digits Dialing aids and enhanced functions can be activated using individually pro grammable function keys Examples of dialing aids and enhanced functions Redial Selected dialing Repertory dialing Abbreviated dialing Handsfree operation Mute Last number redial...

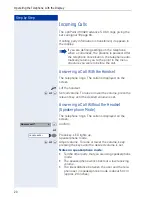
Страница 20: ...ne rings The caller is displayed on the screen Confirm or Press key LED lights up Speakerphone mode u or v Adjust volume To raise or lower the volume keep pressing the keys until the desired volume is set Notes on speakerphone mode Tell the other party that you are using speakerphone mode The speakerphone works bests at a low receiving volume The ideal distance between the user and the tele phone ...

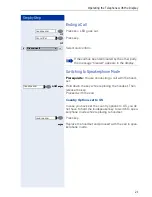
Страница 21: ...e handset Then release the key Proceed with the call Country Options set to US In case you have set the country options to US you do not have to hold the loudspeaker key to switch to spea kerphone mode while replacing te handset Press key t Replace the handset and proceed with the call in spea kerphone mode Loudspeaker Cancel Rel Disconnect If the call has been terminated by the other party the me...

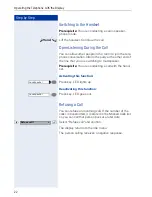
Страница 22: ...he line that you are switching to loudspeaker Prerequisite You are conducting a call with the hand set Activating this function Press key LED lights up Deactivating this function Press key LED goes out Refusing a Call You can refuse an incoming call If the number of the caller is transmitted it is stored in the Missed Calls list so you can call that person back at a later date Select Refuse call a...

Страница 23: ...he party is still on hold and the mes sage Still on Hold appears on the display Confirm this option to resume the held call You may now either initiate a consultation call or terminate the call Transferring a Call You can transfer your current call to another party with or without consultation Select and confirm see also page 30 o Enter the telephone number of the party to whom the call is to be t...

Страница 24: ...set up or Dial the number o Enter the phone number and Confirm If the telephone is expecting input you can also press a function key to which a dialing destination has been as signed such as the Redial Missed Calls key or a repdi al key Refer to page 31 for information about fea tures that simplify dialing If you have activated the function Busy when di aling see page 50 you cannot be interrupt ed...

Страница 25: ...o operate answering machines voice mailboxes and so on De pending on the dialing key pressed different key se quences are sent out The keys 0 9 the asterisk key and the hash key can be used Refer to the operating instructions for the answering machine voice mailbox or other device for the specific tones needed to operate it correctly Dial Loudspeaker If you are using a dial plan and have set Hot K...

Страница 26: ...he relevant list The following call details are stored Phone number The number of call attempts from each user max 99 The date and time of the last call attempt from each user To ensure that entries can be saved in the Missed Calls and Received Calls lists the Caller ID must be displayed as a name number or both This is not the case if No display is set for Call display page 43 The caller ID was n...

Страница 27: ...gh the lists using the and keys Select entry Select the entry you require from the relevant list For example select the third entry and confirm Display details You can display details for the selected party Select and confirm The display shows the date and time of the call If the same call has been entered repeatedly the date and time of the last call appear in the display 02 Call Log 1 Missed cal...

Страница 28: ...has been deleted and the numbering of subsequent entries moves up in the list Delete all parties from list You can delete the entire list for any entry To do this se lect the following option Select and confirm All entries in the current list are de leted Select next previous entry If you have selected a party you can use the following options to scroll to the next previous party Select and confir...

Страница 29: ...e 54 Press key to display the Missed Calls list immediately page 27 Redial Key You can also use the redial key to display a list of the last 20 numbers dialed The last 20 numbers dialed are automatically stored re gardless of which line was used to place the call If the dialed party was busy or did not answer you can redial the number without having to re enter the number for your next attempt The...

Страница 30: ... second party even if the latter has not yet answered see page 23 Introducing Consultation Prerequisite You are in the middle of a call Confirm Confirm and or o Enter the number of the second party to be called Confirm to dial the number The connection is set up and displayed Consultation Please dial Dial You can terminate the dialing process with the Cancel key during input of the number and then...

Страница 31: ...irm The sec ond connection is displayed Canceling consultation hold Select and confirm Dialing Aids The optiPoint 410 420 advance S V6 0 provides you with a number of dialing aids and memory functions to facilitate you in making calls and administering num bers Dialing with Selected Dialing Key You can assign frequently dialed numbers to function keys page 54 When you press one of the selected dia...

Страница 32: ...r has en tered the digits for a consultation call and the hand set is on hook Pressing the Loudspeaker key This is only applica ble after pre dialing when the phone is idle and the loudspeaker LED is off or if the user has entered the digits for a consultation call and the loudspeaker LED is off If an emergency number has been programmed by the administrator the delay time for this num ber is redu...

Страница 33: ...busy or if the called party has not picked up or if you wish to note down the num ber of the remote user then you can store the tele phone number electronically and call it again at a suit able time max 24 alphanumeric characters Both parties can store the number of the other party The notebook can also be used outside a call simply for recording a number to be recalled subsequently In this case t...

Страница 34: ...epertory Dialing function is similar to selected dialing However it can also incorporate dialing control functions at any point within the repertory dialing se quence Procedure for programming Repdial keys see page 56 Store Notebook Dial Control Function Action During Dialing OK OK Any characters following this control function are sent imme diately after the call has been answered and are sent as...

Страница 35: ...rb Another way of avoiding disruptive incoming calls is to activate the Do Not Disturb function When this func tion is activated your telephone will not ring for incom ing calls The caller will hear the busy tone Prerequisite Do Not Disturb must be permitted other wise the menu option will not be available see page 46 Activating Deactivating Do Not Disturb Select and confirm Confirm The new settin...

Страница 36: ... Press the Do Not Disturb key The LED is on If there is an incoming call the caller hears busy tone However calls for pickup groups will still be put through The Do Not Disturb LED blinks To deactivate the function press the Do Not Disturb key again The LED goes out Do Not Disturb This setting remains in effect as long as the LED is on Do Not Disturb Do Not Disturb ...

Страница 37: ...view of the options here from page 114 Select and confirm to quit the menu As soon as you lift the handset you exit the 05 Setup menu automatically The individual menus are described in the following sec tions Settings page 38 Configuration page 38 Local Function page 51 Assigning Function Keys page 54 Audio Settings page 61 05 Setup 2 Configuration 0 End All menus and menu items are preceded by a...

Страница 38: ...You are in the Setup menu page 37 Select and confirm You will find an overview of the options here from page 114 Country Options These settings adapt your telephone to country specific characteristics for example the display format for the date and time of day or transfer technical parameters Prerequisite You are in the Configuration menu page 38 Confirm Select and confirm to configure the require...

Страница 39: ...des for the date and manually set the time of day Selecting the Display Mode The currently configured format is shown on the display as the first option The following display modes are available Prerequisite You are in the Configuration menu page 38 Select and confirm Select required display format and confirm 02 Language 1 German You must manually set the date and time of day if your telephone is...

Страница 40: ... Call Duration You can use this menu option to activate and deactivate the Call duration function Prerequisite You are in the Configuration menu page 38 Select and confirm Confirm The call duration is displayed or Confirm Display is suppressed The new setting is displayed Day 02 Month 10 Year 03 Hour 08 Minute 22 If the date and time is invalid the phone beeps and the cursor returns to the first i...

Страница 41: ...ayed Call Join You can use this menu option to activate or deactivate the feature for joining an active and a held call Prerequisite You are in the Configuration menu page 38 Select and confirm Confirm Call parties can join the call or Confirm Call join not permitted The new setting is displayed This menu option is only available if it has been activated by the administrator 09 Call transfer Switc...

Страница 42: ...he value for the new setting for the display contrast for example is displayed Dialing Mode You can use this option to determine whether only a number or a number and a name can be entered when dialing a call destination Prerequisite You are in the Configuration menu page 38 Select and confirm Select and confirm Alphanumeric input or Select and confirm Numeric input or Select and confirm for both ...

Страница 43: ...ing is displayed Daylight Saving You can use this function to stipulate that the clock on your telephone switches to summertime and winter time automatically Prerequisite You are in the Configuration menu page 38 Select and confirm Confirm Daylight saving activated 2 Number In a HiPath 3000 HiPath 4000 environment the caller s number is displayed instead of the name If no number is transmitted the...

Страница 44: ...control keys on the telephone or the arrow keys or o e to m the keypad keys Confirm the setting The value for the new setting is dis played Hold Ringback Timer Use the option Hold Ringback Timer to change the time after which you are reminded that you still have a call on hold The minimum value is 3 which provides ringback after 3 minutes The maximum value is 15 which provides ringback after 15 mi...

Страница 45: ...Use this option to turn on or off the music played when you are placed on hold and no external music on hold is transmitted Prerequisite You are in the Configuration menu page 38 Select and confirm Confirm or Confirm The new setting is displayed This menu option is only available if it has been activated by the administrator 18 Music on hold Switch on Switch off ...

Страница 46: ...old Ringback function which reminds you that a call is still being held Prerequisite You are in the Configuration menu page 38 Select and confirm Confirm or Confirm The new setting is displayed Idle State Options System messages are displayed in the fourth line of the optiPoint 410 420 advance S V6 0 Prerequisite You are in the Configuration menu page 38 Select and confirm Confirm If multiple mess...

Страница 47: ...minus key Inactivity Timeout Use the timeout setting to specify the period of inactiv ity after which the telephone will automatically revert to the idle state Prerequisite You are in the Configuration menu page 38 Select and confirm Confirm or Select and confirm or Select and confirm or Select and confirm or Select and confirm or Select and confirm or Select and confirm 2 Static 38 Inactivity tim...

Страница 48: ... Confirm Call view appears on the DSM display or Confirm Call view appears on the telephone display The new setting is displayed USB Keyboard Type You can use this option to specify the language for an external USB keyboard The following languages are available 1 English 2 English US 3 German 4 Spanish 5 Italian 6 French Prerequisite You are in the Configuration menu page 38 Select and confirm The...

Страница 49: ...ction if you are using a dial plan programmed by administrator If the function is activated you have the choice of two settings Context Hot Keypad Context is the default setting When on hook dialing with this setting you must either confirm the option Di al press the loudspeaker key or wait until the Auto Dial Timer has timed out in order to set up the connection If Hot Keypad has been set dialing...

Страница 50: ...tion key This function does not apply to an optiPoint display module which is in use with your telephone Select and confirm Confirm in order to activate or Select and confirm in order to deactivate Rejecting a call during dialing If this function is activated any calls which you receive while dialing will be rejected The caller receives busy tone Select and confirm Confirm in order to activate or ...

Страница 51: ...ed dial entry is displayed to the left of the number itself Entries that are not currently configured are shown as Not pro grammed Scroll through the programmed entries Stop scrolling when the display indicates an entry that is not programmed and confirm Confirm or e to m Start entering digits immediately or Use the arrow keys to select a different dialing mode before entering digits If the abbrev...

Страница 52: ... this option to modify or enter your user password Your password will protect all your user spe cific settings including the language settings Prerequisite You are in the Local Functions menu page 51 Select and confirm Confirm o Enter a new password exactly 6 numbers and confirm o Enter the password again and confirm Correct entry ac knowledged with Password accepted To deactivate the password res...

Страница 53: ...viated dialing num bers or to reset the phone to the factory default Clearing Abbreviated Dialing Numbers You can use this option to clear all programmed abbre viated dialing numbers Prerequisite You are in the Local Functions menu page 51 Select and confirm Confirm Select and confirm All abbreviated dialing numbers have been cleared Resetting Memory to Factory Default Settings You can use this op...

Страница 54: ... of which are user pro grammable on two levels Five of these keys are preassigned on the first level These keys are listed and illustrated on page 17 Even these five preassigned keys can be repro grammed If possible do not change the Cancel and Shift keys These enable you to cancel procedures and or program shifted keys The optiPoint 420 advance S V6 0 or optiPoint self labeling key module provide...

Страница 55: ... electronic la beling function Label is displayed with the following prompt Select and confirm to retain the preset label or Confirm to adapt the electronic key labeling o Enter or modify key label and confirm The relevant key is labelled automatically The new function is assigned to the function key If you want to program another key or key level of the same key you can select the level again Fun...

Страница 56: ... of the following address forms Sequence of digits URL Dialing control functions can be selected and inserted The characters for representing the dialing control func tions can be combined in the same repertory dialing se quence However there are restrictions with certain characters When processing the dialing string for Repertory dia ling the data is interpreted in the same way as dialed digits T...

Страница 57: ...gits caus es a wait time of at least three seconds plus 0 2 sec onds for each digit sent in the previous block If a string concludes with OK the digits are sent without having to wait for the user to press OK or until a timeout occurs With the Repertory dialing function multiple function keys can each be programmed with a specific repertory dialing sequence Select and confirm Select and confirm Pr...

Страница 58: ...irm For programming the first level Confirm You are prompted to press a key Press the function key to be programmed the associat ed LED blinks Confirm Select and confirm o Enter the telephone number or name to be stored and confirm When programming function keys on an optiPoint 420 advance S V6 0 or optiPoint self labeling key module the electronic la beling function Label is displayed with the fo...

Страница 59: ...f labeling key module the electronic la beling function Label is displayed with the following prompt Confirm to adapt the electronic key labeling o Enter or modify name or number and confirm The rele vant key is labelled automatically or Select and confirm to keep the existing label The phone is now ready to dial with this function key in the programmed level If you want to program another key or ...

Страница 60: ...the Notebook function key o Enter the number to be stored and confirm or Confirm Storage of the number is confirmed with Entry stored Example 2 Switching off the ringer for incoming calls on the telephone Press the Ringer off function key The Ringer off LED lights up The ringer is deactivated In the event of an incoming call the LED blinks instead If you are using an optiPoint 410 advance S V6 0 w...

Страница 61: ...lowest loudspeaker volume is 1 and the highest volume is 8 Open the Audio Settings menu see above Prerequisite You are in the Audio Settings menu page 61 Confirm The current volume is displayed The value can be increased or reduced by using either uv the control keys on the telephone or the arrow keys or o etol the keypad keys Confirm the setting The new setting is displayed as a value During a Ca...

Страница 62: ...s on the telephone or the arrow keys or o etoI the keypad keys Confirm the setting The new setting is displayed as a value During an Incoming Call When your telephone rings at an incoming call you can vary the volume of the ringer tone by means of the keys u and v Then press the key to save the setting Otherwise the setting will only apply to the current tele phone call The Ringer volume menu disa...

Страница 63: ...Use these keys 1 5 on the keypad to change the values as required Confirm to change The new setting is displayed Handset Volume You can adjust the handset volume as follows Prerequisite You are in the Audio Settings page 61 Select and confirm The current setting is displayed The value can be increased or reduced by using either uv the control keys on the telephone or the arrow keys or o etol the k...

Страница 64: ...his setting Settings for normal echoing or muffled rooms are available for selection Prerequisite You are in the Audio Settings page 61 menu Select and confirm The current setting is displayed for example Normal Select and confirm another setting The new setting is displayed Setting Room Character During a Call If you are talking in handsfree mode you can only ad just the room character only if yo...

Страница 65: ... clicks are only audible when the phone is in a call state You do not hear key clicks when you configuring the telephone Prerequisite You are in the Audio Settings page 61 menu Select and confirm The current setting is displayed You can increase or decrease this value with uv the control keys on the telephone or the arrow keys or o etog the keypad keys Confirm the setting The new setting is displa...

Страница 66: ...ructions on page 94 Call View Start Display Prerequisite Use DSM is enabled page 48 and the telephone is not locked page 53 When you connect the telephone for the first time or re start it a message appears prompting you to press the display to start Call Control The idle display appears Press the Menu icon to see which menu options are available when the telephone is in the idle state Call Contro...

Страница 67: ...ontrol and vice versa page 54 Press this key to swap displays quickly Applications Display Press the Cancel icon in Call Control page 66 if you want to cancel Call Control and use other applications Press the Home icon in Call Control page 66 if you want to continue running Call Control in the back ground but want to use other applications as well To return to Call Control select the appropriate i...

Страница 68: ...ee the display change as shown below A Caller Box is then opened and if the caller s tele phone number is transferred it appears in the box If you are in the process of making settings on the phone during a call page 96 the display will change to Call Control Call Control Mon 07 03 05 11 34AM Incoming Call Call Control Mon 07 03 05 11 34AM Incoming Call Bill Smith 987654321 ...

Страница 69: ...caller s number is displayed as the caller ID page 43 In a HiPath 3000 HiPath 4000 environment the caller s name is replaced with the caller s number therefore the caller s number is displayed twice Press the Phone Book icon in the Caller Box to open the phone book Please refer to the operating instruc tions for the optiPoint display module module for in formation on how to create entries in the p...

Страница 70: ...you can deactivate the ringer If your telephone is in idle mode select the option Rin ger on or Ringer Off from the menu You can also as sign the on off function to a function key page 54 If you have assigned a name to a phone number in your Contacts this name is displayed in the name field when this party calls The number transmitted is overwritten with the name stored in your Contacts In the rem...

Страница 71: ...ll Press the Hold icon to place the call on hold The Caller Box now appears further from the Line Press the Reconnect icon to reconnect the call The Caller Box now appears closer to the Line Ending a Call During a call you can use the following options to end the call immediately Press the Clear icon or t Replace the handset Call Control Mon 07 03 05 11 34AM 00 24 On Hold Bill Smith 987654321 Cons...

Страница 72: ...d calls and the number of missed calls only appears if entries have been stored in the list of missed calls page 87 Press the Missed Calls icon to open the list page 87 Call Control Mon 07 03 05 11 34AM 44 123456 78910 4 Contacts The icon is only displayed if the Call view icons option is activated otherwise the appropriate text is displayed here The function is deactivated by default page 49 ...

Страница 73: ...ng the display keyboard The dis play keyboard is described in the operating instructions for the optiPoint display module If you have activated the function Busy when di aling see page 50 you cannot be interrupt ed by an incoming call The caller hears busy tone Loudspeaker Call Control Mon 07 03 05 11 34AM Please Dial 123 Contacts You can also use phone numbers that are stored in Contacts page 78 ...

Страница 74: ...4 Confirm dialing as soon as you have finished entering the number The number is dialed As soon as the party answers the Call Control switch es to display an active connection Call Control Mon 07 03 05 11 34AM 12345678 123 Call Control Mon 07 03 05 11 34AM 12345678 Calling ...

Страница 75: ...t the handset or Press I Press the Voice Dial key on the optiPoint display modu le The display switches to Voice Recognition mode s Speak the name of the person you want to call into the handset or the microphone Repeat if necessary If the name of the party is recognized the number is dialed Please refer to the operating instructions for the optiPoint display module for information on how to progr...

Страница 76: ... icon to dial the phone number or Press the Loudspeaker key to dial the phone number or Wait until the Auto Dial Timer has timed out Call Control Mon 07 03 05 11 34AM 12345678 Del 123 Contacts You can also use telephone numbers that are stored in Contacts page 78 in Redial Last No page 85 or in a Call Log page 86 Loudspeaker If you are using a dial plan and have set Hot Key pad see page 49 dialing...

Страница 77: ... To end a call simply t replace the handset or press the Loudspeaker key if you are in speakerphone mode or press the Replace Handset icon If another call is waiting the telephone rings as it would for a normal incoming call If the connection is in terrupted by another party you will be informed of this via the telephone display Call Control Mon 07 03 05 11 34AM 12345678 Calling Loudspeaker ...

Страница 78: ...page 73 To consult page 80 with a party from Contacts you can also press the Contacts display key In all cases a display similar to the one shown below ap pears Find and select the relevant party in the list and then press the display key Dial The phone number is used for this procedure Please refer to the operating instructions for the optiPoint display module for information on how to create ent...

Страница 79: ...at any point in the repertory dialing sequence HiPath 3000 HiPath 4000 automatically detects wheth er the digits represent an IP address a number or a URL For information on programming a repdial key see page 56 Frank Miller Control Function Action During Dialing OK Any characters following this control func tion are sent immediately after the call has been answered and are sent as DTMF Pause Wait...

Страница 80: ...sult Transfer and dial the second party The current call switches to On Hold status Enter the phone number using the display keyboard the display keyboard is described in the operating in structions for the optiPoint display module or o Enter a phone number using the keypad Call Control Mon 07 03 05 11 34AM 00 24 Bill Smith 987654321 Consult Transfer Call Control Mon 07 03 05 11 34AM 123456789 Del...

Страница 81: ... is not available You can also use phone numbers that are stored in Contacts page 78 in Redial Last No page 85 or in a Call Log page 86 You can terminate the dialing process with the Cancel key during input of the number and then return to the first party Call Control Mon 07 03 05 11 34AM 123456789 Calling 00 24 On Hold Bill Smith 987654321 Complete Transfer Call Control Mon 07 03 05 11 34AM 00 24...

Страница 82: ...ther Prerequisite You have set up a consultation call page 80 Press Complete Transfer in order to transfer the held call to the second party Call Control Mon 07 03 05 11 34AM 00 24 Jane Brown 123456789 00 24 On Hold Bill Smith 987654321 Complete Transfer Call Control Mon 07 03 05 11 34AM 00 24 00 24 Transferring Bill Smith 987654321 Jane Brown 123456789 OK ...

Страница 83: ...t display module 83 Step by Step Press the display key OK to terminate the process im mediately You can then replace the handset or redial Call Control Mon 07 03 05 11 34AM 00 24 00 24 Transfer done Bill Smith 987654321 Jane Brown 123456789 OK ...

Страница 84: ... call or in consulta tion mode Open the menu and select the option Alternate in or der to switch to the other party The active connection changes to the On Hold status Call Control Mon 07 03 05 11 34AM 00 24 Jane Brown 123456789 00 24 On Hold Bill Smith 987654321 Alternate Complete Transfer Call Control Mon 07 03 05 11 34AM 00 24 Jane Brown 123456789 On Hold 00 24 Bill Smith 987654321 Complete Tra...

Страница 85: ... option Redial Last No You can also select the menu option from the menu in idle mode Note that the active Caller Box is closer to the line and the Caller Box On Hold is further away from it The On Hold icon changes to the Recon nect icon and vice versa Call Control Mon 07 03 05 11 34AM Please Dial 123 Redial Last No Call Log Contacts Redial Last No is only available if the Dialed calls list conta...

Страница 86: ...ption of the Telephone menu page 26 Dialed Calls The last 20 numbers dialed are automatically stored If a line is busy or if there is no reply you can use the Di aled calls list to redial the number The numbers dialed are sorted in descending order ac cording to date and time The number dialed last ap pears first in the list To ensure that caller data for incoming calls is stored you must make sur...

Страница 87: ...to dial the number Missed Calls Open the menu in idle mode and select Call Log page 66 Select Missed calls This list contains the calls that were not answered on this telephone It is sorted chro nologically with the last call received appearing first or Press the Missed Call key to open the Missed calls list Redial Missed calls 10 8 new Dialed calls 8 45678990 Fred Bloggs Jill Hill Jane Brown Phil...

Страница 88: ...nt display key to display the caller s details page 88 clear the entry dial the number store the number in your phone book opens the phone book Details The following is displayed when you press Details The number of call attempts from each user max 99 The date and time of the last call attempt Missed calls 10 8 new 43216789 Bill Smith John Watson Harry Grey Ralph Delgado Isabella Ashley Jeanine Fo...

Страница 89: ... page 66 Select Received calls This list contains the calls that were not answered on this telephone It is sorted chro nologically with the last call answered appearing first Missed calls 10 8 new Dialed calls 8 Received calls 12 13579329 Bill Smith Frank Goodman Harry Grey Dorothy Silverr Kathrin Bauer Robert Miller Call Log Dial View ...

Страница 90: ...rerequisite Do Not Disturb must be configured page 46 Open the menu in idle mode and select Do not dis turb Press the DND Off display key to deactivate Do not dis turb Call Control Mon 07 03 05 11 34AM 44 123456 78910 Do Not Disturb Ringer on Setup Call Log Redial Last No Contacts Call Control Mon 07 03 05 11 34AM 44 123456 78910 Do not disturb DND Off ...

Страница 91: ...r Input Changing Character Mode Press this icon to switch keyboard input from numeric to alphanumeric lowercase and or alphanumeric up percase Numeric input Alphanumeric input lowercase Call Control Mon 07 03 05 11 34AM 12345678 123 Call Control Mon 07 03 05 11 34AM John m n o 6 abc ...

Страница 92: ...ite and Insert Mode Switching to Insert Mode If the icon appears in the bottom system display row you are currently in overwrite mode i e input characters overwrite existing characters Press this button to switch to insert mode Call Control Mon 07 03 05 11 34AM JOHN M N O 6 ABC Call Control Mon 07 03 05 11 34AM 12345678 Del 123 ...

Страница 93: ...in the bottom system display row you are currently in insert mode i e input charac ters are inserted in between existing characters Press this button to switch to overwrite mode Additional Keys Clears individual characters from right to left Confirms input e g for dialing Call Control Mon 07 03 05 11 34AM 12345678 Ins 123 ...

Страница 94: ...mplete Transfer Display keys Caller box with phone number name and status in formation if applicable All control elements that you can select using the stylus and or request input can also be selected using the C D E and F keys and activated using the key Selected control elements are highlighted with a bold frame Light frames are used for dark backgrounds Example The Hold icon is selected indicat...

Страница 95: ... with a control element from the edit field Insert mode Moves cursor one character to the right and after the last character jumps one control element forward C Overwrite mode clear key clears characters in re verse starting from the cursor position Insert mode moves cursor one character to the left and with the first character skips back one control element Confirms input e g for dialing E Procee...

Страница 96: ...his use the keypad on the tele phone In idle mode open Setup in the menu to call up the tele phone s Setup menu You will see the following view Use the keypad on the telephone to enter the letters e to m and the keys to scroll and con firm Call Control Mon 07 03 05 11 34AM 44 123456 78910 Call Log Redial Last No Do not disturb Ringer on Setup Contacts Setup Setup 2 Configuration ...

Страница 97: ...on to incorporate the changes into the cur rent form This transfers the changes to the optiPoint 410 420 advance S V6 0 Click this button to reset the changes in the current form to the former optiPoint 410 420 advance S V6 0 values Click this button to perform an action such as Save Download Invoke and Restart A message is dis played in the event of an error Select an option from the List field T...

Страница 98: ...rface open a web browser and enter the following URL http IP of the telephone Where IP of the telephone stands for the IP address of the optiPoint 410 420 advance S V6 0 that you want to map If applicable confirm the following advisory message with Yes The homepage appears ...

Страница 99: ...10 420 advance S V6 0 telephone and click Login If a user ID has not been specified enter the default value 000000 Menu Structure Change User Password For a description on how to change the user password in the Telephone menu see page 52 Click a field in one of the interface images to obtain more infor mation on the field ...

Страница 100: ...Interface 100 Function Keys For a description on how to change the user password in the Telephone menu see page 54 Phone Click a field in one of the interface images to obtain more infor mation on the field ...

Страница 101: ...Web Interface 101 Select Function Key Loudspeaker function key Selected dialing function key Phone lock function key Repertory dial function key ...

Страница 102: ...ings For a description of the country setting in the Telephone menu see page 38 Language Settings Setting the language page 39 Click a field in one of the interface images to obtain more infor mation about the field Click a field in one of the interface images to obtain more infor mation about the field ...

Страница 103: ...nu see page 61 Call Related Parameters For a description of the parameters in the Telephone menu see the follow ing pages Auto Dial Timer page 44 DND feature enabled on phone page 46 Options for on hook dialing page 49 Click a field in one of the interface images to obtain more infor mation about the field ...

Страница 104: ...es are control functions that are accepted at any position with in the repertory dialing sequence The following options are available for selection page 101 page 56 Auto Dial Timer Timeslot in seconds between the last digit input and the start of the dial ing procedure Minimum value 1 Maximum value 8 Default value 6 page 103 page 44 Function Status Indication OK Any characters following this funct...

Страница 105: ...United Kingdom Argentina Brazil Luxembourg Netherlands Portugal Poland Czech Republic page 102 page 38 DND feature enabled on phone Users are permitted to switch Do Not Disturb on and off on their tele phone page 103 page 46 Handset Volume Handset volume setting Minimum value 1 quiet Maximum value 8 loud Default value 4 page 103 page 63 Idle dialing mode You should only change this function if you...

Страница 106: ...ect your language setting German English French Italian Dutch Spanish Portuguese page 102 page 39 Loudspeaker Volume Setting the loudspeaker volume for optiPoint 410 420 advance S V6 0 Minimum value 1 quiet Maximum value 8 loud Default value 2 page 103 page 61 Melody Setting the ringer melody for incoming calls Minimum value 1 Melody 1 Maximum value 8 Melody 8 Default value 2 page 103 page 63 Para...

Страница 107: ...07 Parameters for Selected dialing Enter the phone number for direct inward dialing page 101 page 31 Ringer Volume Setting the ringer volume Minimum value 1 quiet Maximum value 5 loud Default value 3 page 103 page 62 ...

Страница 108: ...ff Hold Assign a function key for holding calls Alternate Define a function key for alternating between two callers Join Assign a function key for call connection Setup menu Assign a function key for evoking the Setup menu Room echoing Define a function key for setting the room acous tics to echoing Room muffled Define a function key for setting the room acous tics to muffled Shift Define a functi...

Страница 109: ...e user area Current password enter currently valid password here New password enter new password here Confirm new password confirm new password here Default value 123456 page 99 page 52 Swap screens Switches the telephone display from line display to Display Module DSM and vice versa Quit Function key for ending calls Confirm Represents the confirm key 1 Function keys are also available on the sec...

Страница 110: ...ish to generate or modify is shown in the first line of the display The position for entering modifying or deleting characters in the text the cursor is marked by an underscore _ The second line shows the characters that can be se lected using a particular key of the keypad In certain sit uations additional information is also shown here The currently selected character is marked by an arrow In th...

Страница 111: ...n the table The state of the Shift key overwrite or insert mode is shown on the right hand side of the fourth line Shift key not active Shift key active Key 1x 2x 3x 4x 5x 6x 7x 8x 9x 15x e 1 1 f a b c 2 g d e f 3 h g h I 4 I j k l 5 j m n o 6 k p q r s 7 l t u v 8 m w x y z 9 q d 1 0 r _ 1 Space Shift A short text _ DEL A short text _ INS ...

Страница 112: ...navigating switch between move cursor and delete character Terminate entry and accept changes Terminate entry and discard changes If the text is too long to be shown in the display arrows in the second line show the direction in which the text can be scrolled Long text extending past the end of the display to the right right pointing arrow Long text extending past the end of the display to the lef...

Страница 113: ...egory Description 1 Download The telephone s configuration or software is being updated 2 System Shows information pertaining to the lack of connec tion or registration failure with the server 3 Restart Reminder that the telephone needs to be restarted 5 Do not dis turb Indicates that with certain exceptions incoming callers will hear busy tone 7 Missed calls Indicates if any new missed calls have...

Страница 114: ...rted 1 New change target 1 Use keypad 2 Use editor 0 End 2 Switch on off 0 End 3 On busy Not supported 1 New change target 1 Use keypad 2 Use editor 0 End 0 End 0 End 04 Do Not Disturb Not activated Switch on off Continue 05 Setup 1 Settings 2 Configuration 01 Country options 1 US 2 DE 3 FR 4 IT 5 ES 6 AT 7 CH 8 BE 9 UK 0 End 02 Language 1 German 2 English 3 French 4 Italian 5 Dutch 6 Spanish 7 Po...

Страница 115: ...ge Waiting Not supported 21 Hold Ringback On 22 Conference Not supported 23 Local Conferencing Not supported 32 Auto answer Not supported 33 Beep on auto answer Not supported 34 Auto reconnect Not supported 35 Auto Reconnect Beep Not supported 36 Idle display static 1 Cycle Flash 2 Static 0 End 38 Inactivity timeout 1 No timeout 2 30 seconds 3 1 minute 4 2 minutes 5 5 minutes 6 10 minutes 7 15 min...

Страница 116: ...eat dialing 05 Missed Calls 06 Messages Not supported 07 Forwarding Not supported 08 Loudspeaker 09 Mute 10 Ringer Off 11 Hold 12 Alternate 13 Transfer call 14 Call join 15 Deflect Not supported 16 Setup menu 17 Room echoing 18 Room muffled 19 Shift key 20 Notebook 21 Settings 22 Lock Phone 23 Conference Not supported 24 Local Conferencing Not supported 25 Headset 26 Do not disturb 30 Group pickup...

Страница 117: ...led 0 End 7 Key click volume 0 8 Headset vol 2 0 End 09 Voice messages 1 Message Centre 0 End Menu Option Action Next Step Please dial Dial by number Dialing via the keypad Redial Redial last number dialed Dialing the stored number Menu Option Action Next Step Consultation Hold user 1 call user 2 Consultation call menu Hold Place call on hold Basic call menu Transfer Transfer call to user 2 and cl...

Страница 118: ...ation to the two parties in contact and withdraw from the conversation Idle menu Hold DFT only Place connected call on hold Disconnect and return Disconnect connected user and call up user on hold Basic call menu Menu Option Action Next Step Refuse call Do not accept incoming call Idle menu Answer call Answer incoming call Call join menu if first call Consultation menu if second call ...

Страница 119: ...an not be established Connection refused The remote terminal is alerting Busy The remote terminal is busy Rejected The remote user rejected the call Call join menu The call is connected Cleared The remote user cleared the call Cleared unknown The call was cleared for an unknown reason Still on Hold The call xxxxxxxxx is in the held state Cannot Be Held It was not possible to place the connected te...

Страница 120: ...eans that the connection between the original action and the error which has occurred is retained Example It is not possible to deflect the incoming call In special cases the third display line may also be used for display outputs so that the cause of the error can be clearly described Error messages can be cleared and confirmed manually either with the or the Cancel key 08972261485 Cannot Be Defl...

Страница 121: ...trips are delivered with your optiPoint Write the function or a name on the matching strips within the white field and attach them to your optiPoint With a computer via the Internet You will find the Online Key Labelling Tool along with the user inter face at http www siemens com hipath Downloads Software Place the strip next to the keys then place the transparent cover over it matte side facing u...

Страница 122: ...8 country options 38 D date time 39 daylight saving 43 dial after seizing a line 73 dial before seizing a line 76 dialed calls 86 dialing aids 19 31 dialing before line seizure 25 dialing following line seizure 24 dialing keypad 16 dialing mode 42 dialog keys 15 19 Display 14 display 15 do not disturb 46 90 DSM alternate 84 answer call 69 applicationsdisplay 67 call log 86 character mode 91 consul...

Страница 123: ...r operator prompting 39 letter inputs 16 lock phone 53 Loudspeaker 20 loudspeaker volume 61 M making calls 73 memory 53 memory clearing 53 messages and alarms 119 MF tone 25 Microphone 14 missed calls 72 87 muffled room acoustics 64 music on hold 45 N nameplate 9 notebook functions 33 O off hook dialing 24 73 on hook dialing 25 76 On hook dialing options 49 open listening 22 Operating instructions...

Страница 124: ...1 special characters 16 standard telephone functions 19 status 38 status messages 119 storing a number 33 T TCP IP protocol 12 Teilnehmer verbinden 82 telephone layout 14 U user password 52 user support 10 user programmable keys 54 using repdial keys 79 V Verbinden zweier Teilnehmer 82 volume 20 ...

Страница 125: ... between handset and speakerphone loudspeaker within a call Switch from handset to speakerphone loudspeaker Hold down t Switch from speakerphone loudspeaker to handset n Consulting with a second party second party o End consultation Alternating between two parties Transferring a call o s notify user of call transfer Dial Dial Repeat Dial 3 543219876 Redial 72261496 Dial Loudspeaker Consultation Di...

Страница 126: ...a function key o dial number Dialing using function keys Activating Do Not Disturb or Missed Calls 1 Missed calls 2 Dialled calls 3 Received calls 3 543219876 2 Details 1 Dial Dial 05 Setup 3 Local functions 1 Abbrev dialing 5 Not programmed Program destination 5 0451524486 Abbrev dialing 1 08972228596_ Dial Abbrev dialing 1 08972228596_ Dial 05 Setup 4 Function keys 1 Non shifted keys 02 Selected...

Страница 127: ... The information provided in this document contains merely general de scriptions or characteristics of performance which in case of actual use do not always apply as described or which may change as a result of fur ther development of the products An obligation to provide the respective characteristics shall only exist if expressly agreed in the terms of contract The trademarks used are owned by S...

Отзывы: