background image

Web Interface

209

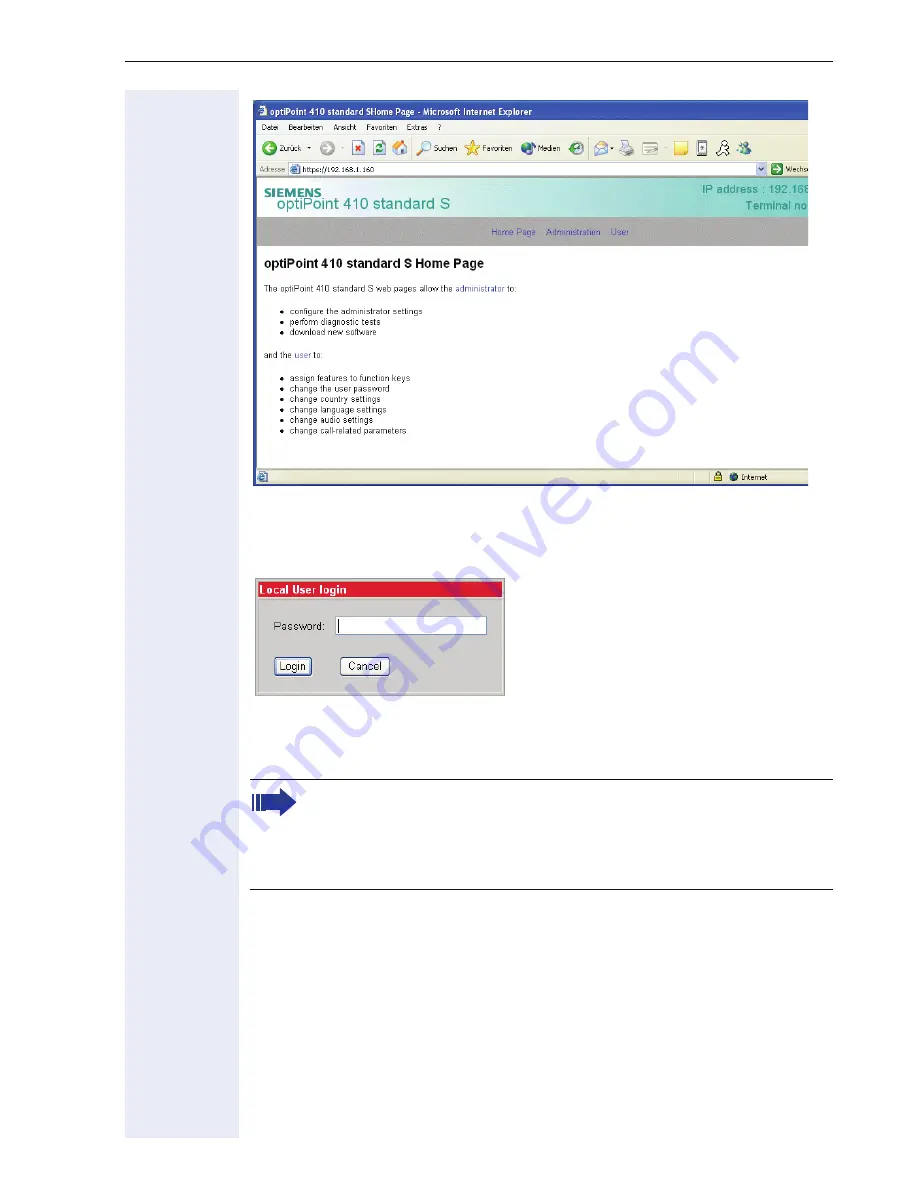
Call up the user interface

User

Click here to access the user area.

Enter the user ID for the optiPoint 410/420 economy/economy plus/

standard S V7.0 telephone (maximum length: 24) and click "Login". If a user 

ID has not been specified, enter the default value "000000".

The administrator can set a minimum length (between 6 and 24 char-

acters) for the user password. If the minimum length was changed 

in the meantime so that your password is too short now, you are 

asked to change your password (

page 210). Only after you have 

changed your password you can log on to the user interface.

Содержание HiPath 8000 optiPoint 410

Страница 1: ...www siemens com enterprise User Manual HiPath 8000 optiPoint 410 420 S V7 0 economy economy plus standard ...

Страница 2: ...one must not be used in bathrooms etc as it is not splash proof Before connecting or disconnecting the LAN cable pull the power plug out of the plug receptacle first The device must not come into contact with abrasive liquids or liquids which are liable to discolor it such as tea coffee fruit juices or soft drinks Location of the Telephone The telephone should be operated in a controlled environme...

Страница 3: ...actured in accordance with our certified environ mental management system ISO 14001 This process ensures that energy consumption and the use of primary raw materials are kept to a minimum thus reducing waste production All electrical and electronic products should be disposed of separately from the municipal waste stream via designated collection facilities appointed by the government or the local...

Страница 4: ...ese Operating Instructions 12 Intended Use 12 Product Identification 12 Echo Effect 13 Service 13 Notes and Symbols 13 Safety 13 Symbols in the Manual 14 Introduction 15 Overview 15 Secure Voice Transmission 16 Features 16 Telephone Types 16 Layout of optiPoint 410 420 economy economy plus standard 17 Display and Dialog Keys 18 Keypad 19 Programmable Keys 20 Control Keys 21 ...

Страница 5: ...g Call 29 Connecting a caller 29 Transfer a second call 30 Putting second call on hold 30 Answering a Call On Another Line 30 Holding a Call 31 Using the Menu 31 Using the Line Keys 32 Transferring a Call 32 Transferring without Consultation 32 Transferring with Consultation 33 Making Calls 34 Dialing Following Line Seizure 34 Dialing Before Line Seizure 35 Using DTMF Tone Dialing 35 Callback 36 R...

Страница 6: ...essage Details 57 Deactivating the Ringer 58 Activating Do Not Disturb 58 Activating Deactivating Do Not Disturb 58 Using a Key to Activate Deactivate Do Not Disturb 59 Using Group Features 60 Call Pickup Groups 60 Answering a Pickup Group Call 61 Ignoring a Pickup Group Call 61 Hunt Groups 61 Surviveability 62 Hot and Warmline Function 62 Multiline Telephone Introduction 63 Lines and Line Keys 63...

Страница 7: ...alls 80 Rejecting Anonymous Calls 80 Accepting Anonymous Calls 80 Using Speed Dialing 81 Single Digit Speed Dialing 81 Double Digit Speed Dialing 81 Using Last Number Redial 82 Using Callback 83 Tracing a Call 83 Functions in a Hunt Group 84 Make line busy 84 Mark a line as the End of a Hunt Group 85 DLS Mobility Funktion 86 Mobility Scenarios 86 Logging on and off at the same telephone 86 Logging...

Страница 8: ...ingback 103 Local Conferencing 103 Auto Answer 104 Beep on Auto Answer 104 Auto Reconnect 104 Beep on Auto Reconnect 105 Idle State Options 105 Inactivity Timeout 105 Display Module Call View 106 USB Keyboard Type 107 Programming Modifying the Deflect Address 107 Line Settings 108 Displaying Icons Instead of Text 109 Parking and Picking Up Parked Calls 109 The new setting is displayed 110 Options ...

Страница 9: ... 126 Ringer 127 Resetting Ringer Settings 128 Handset Volume 128 Headset Volume 129 Room Acoustics 129 Key Clicks 130 Rollover Volume 130 Restarting the Telephone 131 Operating the Telephone with the optiPoint display module 132 Using the Display 132 Call View Start Display 132 Mobility Display 133 Swap Display 133 Applications Display 134 Incoming call 135 Incoming Call in Idle Mode 135 Answering...

Страница 10: ...ived Calls 173 Forwarded Calls 174 Call Forwarding 175 Editing the Destination and Enabling Call Forwarding 175 Do Not Disturb 178 Using Group Features 179 Call Pickup Groups 179 Surviveability 181 Multiline Telephone Application 182 Call View for Multiline Telephones 182 Line Overview 184 Incoming Call Ringer or Call Waiting Tone 186 Initiating Calls via Line Overview 189 With An Active Call 191 ...

Страница 11: ...obile User Logoff 216 Alphabetic Reference 217 Using Editors 225 Entering Text 225 Entering Characters 225 Navigating During Text Entry 227 Appendix 228 Idle Mode Display 228 User Menu 229 Telephone Menu 233 Dialing 233 Connection Status 233 Consultation Call 234 Incoming Calls 234 Using Group Features 234 Messages and Alarms 235 Status Messages 235 Line Key Status Indication 236 Direct Station Se...

Страница 12: ...y step starting with a description of simple basic functions through configuration of all operating parameters to a de scription of the additional features Administrative tasks are described in a separate manual The quick reference guide is meant to give you quick and reliable explanations regarding frequently used functions Intended Use The optiPoint 410 420 economy economy plus standard S V7 0 t...

Страница 13: ...r damages is marked specially as they are important instructions for correct use of the unit The Siemens service department can only help you with encoun tered problems or defects on the unit itself Should you have any questions regarding the operation your spe cialist retailer or network administrator will gladly help you with the right answers For any questions regarding the telephone connection...

Страница 14: ...ook t Replace the handset s Conduct a call o Enter a telephone number or code dd Enter the code u or v Increase or reduce the value depending on the current operating mode Press key Press the illuminated key Press the blinking key The option appears on the display Use the key to confirm your selection Search for an option Press the keys until the option appears on the display Then press the key to...

Страница 15: ...y economy plus standard S V7 0 also sup ports other standard protocols which optimizes the data and voice trans mission and simplifies the administration of the unit For example the ad ministrator can download updates for equipment software or feature enhancements to the optiPoint 410 420 economy economy plus standard S V7 0 via the FTP server The optiPoint 410 420 advance S V7 0 features a two li...

Страница 16: ...ialing Menu texts in the national language 12 function keys which are all programmable on two levels 3 dialog keys for menu navigation Assignment of selected destination numbers to dialing keys Display of the caller s phone number or name Call Deflection Consultation Call Transfer Toggle Call Holding Call Forwarding Conferencing not with optiPoint 410 420 economy Password protected user settings V...

Страница 17: ...ypad Illuminated graphics display 2 lines of 24 characters each Key fields Programmable1 func tion keys Key fields Programmable1 function keys 1 With automatic key labelling 2 Not economy und economy plus Telephone Model Function keys interface module Display lines x characters Headset Mini Switch z B PC Interface Handsfree operation Automatic key labeling optiPoint 410 economy 4 8 2x24 optiPoint ...

Страница 18: ...enu The arrow icon on the right hand side of the second line indicates that additional functions are available Any status messages are displayed in this line if necessary several are displayed al ternately If you want to define settings use the three dialog keys and the function key Cancel to navigate within the hierarchically structured menu system The menu structure is nested into a maximum of f...

Страница 19: ...u can key in letters and special characters by press ing the relevant key as often as necessary until the required character ap pears on the display Examples of letter inputs are the password the user name or FTP down load files and file paths respectively For example if you want to enter the letter R press 7 three times as R is at the third position For the letter U press 8 twice ...

Страница 20: ...o have the option of as sig ning a name to the key which will then be displayed automatically Each feature key has a corresponding visual indicator LED to indicate the status of the feature Function Key Function 1 Switch loudspeaker of the base unit on off 2 Redial one of the last 20 numbers dialed 3 Displays the last 20 missed calls and permits selection editing and redial functions 11 Cancel the...

Страница 21: ...ume Increase ring tone vol ume Speakerphone not with economy economy plus Reduce loudspeaker volume on telephone Increase loudspeaker volume on telephone Handset controlled call Reduce loudspeaker volume on handset Increase loudspeaker volume on handset Setting using the con figuration menu and Audio Settings Adjust volume of loudspeaker handset key click and ring tone as well as ring tone sequenc...

Страница 22: ...u can choose to dial a normal phone number E 164 phone number or a URL The number of dig its in an E 164 number and the log on number for user mobility is restricted to 20 digits Other numbers such as phone numbers to be dialed are re stricted to 24 digits Dialing aids and enhanced functions can be activated using individually pro grammable function keys Examples of dialing aids and enhanced funct...

Страница 23: ...at another mobility enabled Remote telephone or back at your telephone basic phone If you are logged on to a Remote telephone your customized settings e g abbreviated dialing call lists are available As soon as you are logged on you can change the user set tings For more information about logging on off as a mobility user please see page 85 Multiline Functions Some functions and features are only ...

Страница 24: ...ncoming Calls The Telephone rings giving the set call signal page 126 If calling party information name number or both is transferred it appears in the display If no information is transmitted you will see Private or Unknown on the phone s display Answering a Call With the Handset The telephone rings The caller is displayed on the screen n Lift the handset u or v Set call volume To raise or lower ...

Страница 25: ...nd the tele phone set in speakerphone mode is about 50 cm approx 20 inches If the other party cannot hear you please check with your service personnel whether your microphone was deactivated via the configuration settings You can t use this function with optiPoint 410 420 economy economy plus Answer call Loudspeaker On multiline telephones the line being signalled is automatically selected when yo...

Страница 26: ...roceed with the call Country Options set to US In case you have set the country options to US you do not have to hold the loudspeaker key to switch to spea kerphone mode while replacing te handset Press key t Replace the handset and proceed with the call in spea kerphone mode Loudspeaker Cancel Rel Disconnect If the call has been terminated by the other party the message Cleared appears in the dis...

Страница 27: ...udspeaker Prerequisite You are conducting a call with the hand set Activating this function Press key LED lights up Deactivating this function Press key LED goes out Refusing a Call You can refuse an incoming call If the number of the caller is transmitted it is stored in the Missed Calls list so you can call that person back at a later date Select Refuse call and confirm The display returns to th...

Страница 28: ...tion is activated page 95 and your are currently making a call you can pick up an other call The caller hears the on hook signal you hear the call waiting signal Accepting a Waiting Call You are conducting a call A second call is indicated in the display and you hear a call waiting signal Confirm query You can talk with the second party The connection with the first party is held Confirm to end th...

Страница 29: ...rty is displayed Select Deflect call and confirm o Enter the destination telephone number Confirm your entry The first party connection is displayed again The de flected call is stored in the Missed Calls list Connecting a caller Prerequisite You have answered the second call page 28 Select and confirm The party on hold and the second caller are connected You can now replace the handset or redial ...

Страница 30: ...isite You have answered the second call page 28 Select and confirm The second call is held Confirm in order to return to the second call You can also terminate or transfer the second call now or speak to the other parties in turn Answering a Call On Another Line If you are making a call on a multiline telephone incom ing calls on other lines are signalled by a line key The administrator can config...

Страница 31: ...ds you that the party is still on hold and the mes sage Still on Hold appears on the display Confirm this option to resume the held call You may now either initiate a consultation call or terminate the call The Hold function must be activated by the ad ministrator If you have a multiline telephone and proceed as described in this section the held party can be picked up by any other multiline user ...

Страница 32: ...of the held line can press that line key and retrieve the call from hold Manual hold cannot be used with a consultation hold or after a waiting call has been answered Transferring a Call You can transfer your current call to another party with or without consultation Transferring without Consultation Select and confirm o Enter the telephone number of the party to whom the call is to be transferred...

Страница 33: ...dicates that the parties have been con nected Replace the handset or Transfer on hangup Prerequisite Transfer on hangup is activated page 112 Replace the handset or press the speakerphone key if in speakerphone mode A connection is established be tween the other two stations The other party still has not answered You do not need to wait until the second party has ans wered in order to transfer the...

Страница 34: ...d and the con nection is set up or Dial the number o Enter the phone number and Confirm or Select name Select and confirm o Enter the party s URL for entering text see page 225 Confirm If the telephone is expecting input you can also press a function key to which a dialing destination has been as signed such as the Redial Missed Calls key or a repdi al key Refer to page 52 for information about fe...

Страница 35: ...he dialing key pressed different key se quences are sent out The keys 0 9 the asterisk key and the hash key can be used Refer to the operating instructions for the answering machine voice mailbox or other device for the specific tones needed to operate it correctly Dial Loudspeaker If you are using a dial plan and have set Hot Key pad see page 109 dialing takes place auto matically as soon as the ...

Страница 36: ...The other party is busy Confirm The callback request is stored in the system Callback is activated You are called by the system as soon as the party beco mes free The number of the party who has become available is indicated on the display Confirm The connection to the callback party is set up Canceling callback requests If for any reason callback requests are no longer re quired you can cancel th...

Страница 37: ...ition The guest telephone is available and in ready mode Press the HostDesking key on the guest telephone must be set up page 213 You are asked to enter your user ID the user ID is usu ally the number of your main telephone o Enter and confirm the user ID to be used for registering You are asked to enter your PIN o Enter and confirm your PIN A tone signal confirms that HotDesking is activated for ...

Страница 38: ...r main telephone or any other telephone within the sys tem Proceed as follows Precondition The telephone is available and in ready mode n Lift the handset o Enter and confirm 61 user ID please check with your service personnel regarding the valid code for deactiva ting HotDesking You are asked to enter your PIN o Enter your PIN A tone signal confirms that HotDesking is deactivated for your user ID...

Страница 39: ...x 99 The date and time of the last call attempt from each user To ensure that entries can be saved in the Missed Calls and Received Calls lists the Caller ID must be displayed as a name number or both If this informati on is not available Caller ID unknown is entered in the list This is not the case if No display is set for Call display page 97 The caller ID was not transferred Entries are only sa...

Страница 40: ... the letter keys to jump to the first entry that begins with the relevant character Select entry Select the entry you require from the relevant list For example select the third entry and confirm Display details You can display details for the selected party Select and confirm The display shows the date and time of the call If the same call has been entered repeatedly the date and time of the last...

Страница 41: ...has been deleted and the numbering of subsequent entries moves up in the list Delete all parties from list You can delete the entire list for any entry To do this se lect the following option Select and confirm All entries in the current list are de leted Select next previous entry If you have selected a party you can use the following options to scroll to the next previous party Select and confir...

Страница 42: ... 117 Press key to display the Missed Calls list immediately page 40 Redial Key You can also use the redial key to display a list of the last 20 numbers dialed The last 20 numbers dialed are automatically stored re gardless of which line was used to place the call If the dialed party was busy or did not answer you can redial the number without having to re enter the number for your next attempt The...

Страница 43: ...rded are displayed in the status list page 91 Please note that a key which has been assigned the call forwarding function provides a shortcut to the number to which calls are currently being forwarded If the administrator has activated the function for log ging forwarded calls these calls will be listed in the Forwarded calls log page 40 The HiPath 8000 also provides switch based call forwarding f...

Страница 44: ...irm or Select and confirm or Select and confirm The following messages may appear Not set not programmed Not active programmed but deactivated page 45 Active programmed and activated page 45 Activating Deactivating Call Forwarding Prerequisite A forwarding destination is programmed page 45 Switch off call forwarding Select and confirm Active displayed Confirm or select and confirm 2 On no reply or...

Страница 45: ...rios are described below Note the Cancel function key can be used at any time to re vert to the previous level Specify and activate forwarding destination Select and confirm Not active is displayed Confirm or select and confirm 2 On no reply or 3 On busy Not set is displayed Confirm Confirm 1 Use keypad to enter numeric values only or select and confirm 2 Use editor to enter alphanu meric text o E...

Страница 46: ...example Confirm Confirm 1 Use keypad to enter numeric values only or select and confirm 2 Use editor to enter alphanu meric text o Change the destination number If necessary delete ex isting numbers beforehand using the key Confirm entry if correct The new destination is set and the current status of the forward is preserved 03 Forward 1 Unconditional 1 New change target 1 Use keypad Complete ...

Страница 47: ...nter the number of the second party to be called Confirm to dial the number The connection is set up and displayed If you have a multiline telephone you can also use the manual hold feature to place the call on the active line on hold while you perform other actions page 31 If you have placed a party on consultation hold you cannot initiate manual hold If you are in the manual hold state you can n...

Страница 48: ... to return to the first party You can alternate between the two parties page 48 or set up a conference call page 49 Alternating Between Two Parties Prerequisite You are conducting a consultation call page 47 Select and confirm You are reconnected with the first party If necessary choose Alternate and confirm The sec ond connection is displayed Canceling consultation hold Select and confirm Disconn...

Страница 49: ...parties connect the two other parties transfer re enter the conference call terminate the active call you are connected to the second party or End both calls using the menu Select and confirm Both calls are terminated and the display shows Cleared You can start a new call You can t use this function with optiPoint 410 420 economy economy plus Create local Conf If you were on a secure call and you ...

Страница 50: ...Connect the two other parties using the menu Prerequisite Allow Join in conference was activated by the service personnel Select and confirm The display shows Transferring and then Calls joined You can start a new call or Connect the two other parties by hanging up Prerequisite Allow Join in conference was activated by the service personnel t Replace the handset or press the loudspeaker key in in ...

Страница 51: ...her press the Record key that was set up or select and confirm The recording is started and the display shows Recording and the number of the other party The other party is notified via an audio note that the call is being recorded has to be set up by the ser vice personnel Stop Recording Press the Record key or select and confirm The recording is stopped The recording is also stopped if the call ...

Страница 52: ... administering numbers Dialing with Selected Dialing Key You can assign frequently dialed numbers to function keys page 117 When you press one of the select ed dialing keys the stored number is shown in the dis play and you can set up a connection Prerequisite The idle menu is displayed Press the assigned selected dialing key The stored number or name is displayed Confirm the number The connection...

Страница 53: ... has en tered the digits for a consultation call and the hand set is on hook Pressing the Loudspeaker key This is only applica ble after pre dialing when the phone is idle and the loudspeaker LED is off or if the user has entered the digits for a consultation call and the loudspeaker LED is off If an emergency number has been programmed by the administrator the delay time for this num ber is reduc...

Страница 54: ...ted Dialing to Make Calls Press the Abbreviated Dialing function key The number for the abbreviated dial number 1 is dis played Scroll to the desired abbreviated dialing number and confirm or o Enter the required single digit abbreviated dialing num ber Confirm Start the dialing process Abbrev dialing 1 08972228596_ 2 5618239758 Dial Storage locations for abbreviated dialing numbers that have not ...

Страница 55: ...ll simply for recording a number to be recalled subsequently In this case the currently stored number is displayed by default and can be edited using the cursor keys and keypad Storing a number Prerequisite You are conducting a call The current call is displayed Press the Notebook function key The other party s number is displayed Confirm Store to store the number or o Enter another number of your...

Страница 56: ...tects wheth er the digits represent an IP address a number or a URL Procedure for programming Repdial keys see page 119 Control Function Action During Dialing OK OK Any characters following this control function are sent imme diately after the call has been answered and are sent as DT MF Pause PA Waits 3 seconds before sending any characters following this control function Consultation CS Establis...

Страница 57: ...trieving Messages Select and confirm Confirm You are connected to the message center and can re trieve your messages Viewing Message Details You are in the Messages area Select and confirm This is displayed to indicate the number of new and old voice messages for instance This is displayed to indicate the number of new and old urgent messages for instance Use the and keys to toggle between Voice M...

Страница 58: ...e Do Not Disturb function When this func tion is activated your telephone will not ring for incom ing calls The caller will receive busy treatment tone or announcement depending on the system setup Prerequisite Do Not Disturb must be permitted other wise the menu option will not be available see page 101 Activating Deactivating Do Not Disturb Select and confirm Confirm The new setting is displayed...

Страница 59: ...ller will receive busy treatment tone or announcement depending on the system setup However calls for pickup groups will still be put through The Do Not Disturb LED blinks To deactivate the function press the Do Not Disturb key again The LED goes out Do Not Disturb This setting remains in effect as long as the LED is on Do Not Disturb Do Not Disturb Do Not Disturb can also be switched on or off by...

Страница 60: ...tops ringing and returns to idle state The administrator can set up a pickup group as follows Notification service calls for a pickup group are signaled in the same way as other calls The only difference is that the Pickup Call menu option is displayed instead of the Answer call option Apart from that the caller and the calling target are displayed Prompts for pickup group calls override forwardin...

Страница 61: ... this option Hunt Groups The administrator can merge several telephones to form a hunt group If your telephone belongs to a hunt group the HiPath 8000 routes calls for members of your group according to rules defined by the administra tor Hunt groups provide a simple way to distribute calls among a group of stations If you want another group member to handle a call you can also make your telephone...

Страница 62: ...page 37 Callback page 36 Using Group Features page 60 Multiline Telephone Introduction page 63 Call Display page 97 Transferring without Consultation page 32 L Lock Phone with Forward page 115 Delay for Call Forward on No Reply page 99 HiPath 8000 Functions page 71 Hot and Warmline Function Your service personnel can set up a hot or warm line for your or a specific telephone If you pick up the rec...

Страница 63: ...e call at a time can be connected to the handset or loud speaker several calls may be assigned to the multiline telephone These calls are either placed in a queue or signalled as incoming calls on the tele phone Line keys are used to select different lines Lines should not be assigned to the Cancel or Shift keys because these keys are required for other pur poses This means that each multiline tel...

Страница 64: ...can be either private or shared Prime line Every multiline telephone has one prime line This line gen erally uses your public number which means that you receive your in coming calls on this line A prime line can be private or shared Some features are only applicable to the prime line to ensure that con flicting feature settings between different multiline telephones on the same shared line cannot...

Страница 65: ...ine telephone line is seized if the line key LED is lit blinking or flick ering and information about the line appears in the display You can change the mode as follows Pressing a line key to seize the line A line is seized with an incoming call A line is free when it becomes idle or is put on hold manually The multiline telephone selects another suitable line for seizure If a suitable line is not...

Страница 66: ...ft the handset or use the speakerphone or Press the blinking line key before you lift the handset or before using the speakerphone Outgoing Calls Off hook dialing Initiate a call by Pressing a free line key on the multiline telephone Pressing the Loudspeaker key Lifting the handset On hook dialing You can start entering the number immediately The connection is established via the next available li...

Страница 67: ...r a call on a single line telephone Place the call on consultation hold and pick it up on another phone Deflect the call see page 28 Transfer the call see page 33 Consult with another party see page 47 Pick up a waiting call see page 28 Alternate between two calls see page 48 Join a conference call see page 49 Placing a call on hold manually You can put an active call on hold using the line key Pr...

Страница 68: ...cond line are displayed and you are prompted to answer this call When you have finished the call on the second line you can pick up the first call by pressing the appropriate line key Incoming call on another line while dialing o You are dialing a number Another line key rings or blinks to indicate an incoming call You now have the following options or Press the key or confirm Answer call to accep...

Страница 69: ...o par ties if one of the parties presses the Cancel key the connection is terminated and the line reverts to idle state on hook and the dial tone is heard off hook If a holding party whose call has been put on hold presses Cancel the call on hold is terminated and the line reverts to idle state on hook and the dial tone is heard off hook If a party that is calling another party presses Can cel dur...

Страница 70: ...ty The other party s telephone rings Pick up a call for a Direct Station Select User Press the blinking Direct Station Select key The call is forwarded to the main line of your telephone You are connected to the caller On the display a small arrow is displayed in front of the caller s number or name HostDesking HostDesking You cannot use the Direct Station Select key if the optiPoint display modul...

Страница 71: ...ou can only assign function keys on the first level be cause the LED associated with the key is used to indi cate the function s status as either On LED on or Off LED off The LED indicates the status of a function on the server It can therefore change regardless of wheth er a function key is pressed or not If a function key is pressed the display will indicate the resultant status of the function ...

Страница 72: ...ine CFBL allows you to enter a feature code to forward calls when your line is busy The administrator specifies the forwarding destination Switch on n Lift the handset o To activate forwarding enter the code e g 90 consult the administrator or the code and a number e g 901234567 You will hear a confirmation tone Switch off n Lift the handset o To deactivate forwarding enter the code e g 91 con sul...

Страница 73: ...set o To deactivate forwarding enter the code e g 93 con sult the administrator You will hear a confirmation tone Unconditional Call Forwarding The HiPath 8000 function unconditional call forwar ding allows you to enter a feature code to forward all in coming calls to another destination You also specify the forwarding destination Activating call forwarding You can activate unconditional call forw...

Страница 74: ...tion tone followed by dial tone The HiPath 8000 does not attempt to alert the party at the forwarding des tination that the feature has been reactivated While unconditional call forwarding is activated calls forwarded while the line is in idle state are signaled by a brief ring on the phone to which they are forwarded approx 0 5 seconds This serves as a reminder that this particular feature is act...

Страница 75: ...n be A different telephone or subscriber A voice mailbox An announcement service When the caller s number is not on the forwarding list the call rings at your telephone as usual Switch on call forwarding n Lift the handset o Enter the code e g 63 consult the administrator You are prompted to add members to the list and to switch on the feature accordingly The list can also be administered by the a...

Страница 76: ...lows n Lift the handset o Enter the code for transfering caller information e g 64 consult the administrator You will hear a con firmation tone Activating Caller ID Suppression If the administrator has permitted the transfer of your caller ID you can override this setting as follows n Lift the handset o To suppress caller ID enter the code e g 66 consult the administrator w Wait until you hear the...

Страница 77: ...o Dial the destination you want to call The transfer of your caller ID is permitted again after this call Deactivating Caller ID Suppression Tempo rarily for Next Call If the administrator has suppressed the transfer of your caller ID you can override this setting for the next call n Lift the handset o Enter the code e g 67 consult the administrator w Wait until you hear the confirmation tone o Di...

Страница 78: ...this number or the call is forwarded to an external phone number The administrator can tell you how your HiPath 8000 is configured at your location n Lift the handset o Enter the code e g 27 consult the administrator You hear announcements that provide the following in formation The name of the service selective call acceptance Its current status active or inactive The current size of your screeni...

Страница 79: ...s not accept calls from this number If the caller s number is not listed the call is transferred to you as nor mal n Lift the handset o Enter the code e g 60 consult the administrator You hear announcements that provide the following in formation The name of the service selective call rejection Its current status active or inactive The current size of your screening list After you hear those annou...

Страница 80: ...of their calling number When you do so you receive no alerting for a rejected call n Lift the handset o Enter the code e g 77 consult the administrator Accepting Anonymous Calls You can also choose to accept calls from parties who have a privacy feature active such as Caller ID blocking that prevents the delivery of their calling number n Lift the handset o Enter the code e g 87 consult the admini...

Страница 81: ...s list n Lift the handset o Enter the code e g 74 consult the administrator fol lowed by the digit between 2 and 9 for the phone num ber The number is automatically dialed Double Digit Speed Dialing This feature also lets you easily place calls to frequently dialed numbers Because the list uses a 2 digit speed dialing code it can contain up to 30 numbers The ad ministrator maintains this list n Li...

Страница 82: ...00 redials the number at regular inter vals As soon as HiPath 8000 establishes that both par ties are free it redials the number Tracing a Call You can generate an automatic call trace of the last call received This is useful in response to malicious harass ing or nuisance calls n Lift the handset o Enter access code e g 57 consult the administrator You hear a confirmation tone and the phone numbe...

Страница 83: ... line Busy n Lift the handset o Enter the access code e g 96 consult your administ rator to make the line busy for the hunt group w Wait for the confirmation tone Switch Busy off again Make the line free for the hunt group n Lift the handset o Enter the access code e g 96 consult your administ rator to make the line free again w Wait for the confirmation tone ...

Страница 84: ... defined for the Hunt Group Stop Hunt n Lift the handset o Enter the access code e g 97 consult your administ rator to mark this line as End of Hunt Group stop hunt w Wait for the confirmation tone Cancel Stop Hunt Unmarks this line as End of Hunt Group n Lift the handset o Enter the access code e g 97 consult your administ rator to unmark this line as End of Hunt Group stop hunt w Wait for the co...

Страница 85: ... Mobility User page 86 Logging off as a Mobility User page 87 Logging on and off at at different telephones The service personnel may have provided the following settings for these cases Logging on at another mobility enabled telephone without additional settings page 88 Logging on with forced logoff at a remote telephone if the user is still logged on there page 88 Logging on with immediate force...

Страница 86: ...r password default value 000000 The following messages appear on the display Mobility logon Validating request Mobility logon Registering Downloading user data When the logon procedure is completed the LED of the Mobility key is on and MOB is shown on the dis play If you press the Mobility key again you are logged off page 87 If an optiPoint display module is connected a tent like symbol is diplay...

Страница 87: ...e in the LAN or an incorrect server address was stored in the tele phone your logon request is rejected with the message DLS Server not available Please con tact your service personnel in this case 11 Mobility 2 Log off If you entered an incorrect User password the message Logoff failed is displayed until you entered the correct User password and thus logged off successfully or your service person...

Страница 88: ...d If however the service personnel has set Forced Logoff During Call without any delay time the logoff takes place regardless whether the remote telephone is busy or not Logging on using the key One of the function keays was set up as logon key for the mobility function Press the Mobility logon key You are asked to enter your Mobility ID or Logging on using the menu Select and confirm Confirm to s...

Страница 89: ... logon key You are asked to enter your Mobility ID or Logging on using the menu Select and confirm Confirm to start the logon procedure o Enter your Mobility ID in general this is the same as your official telephone number o Enter your User password default value 000000 The following messages appear on the display Mobility logon Validating request On the busy remote telephone the message Forced Lo...

Страница 90: ...w of the options here from page 229 Select and confirm to quit the menu As soon as you lift the handset you exit the 05 Setup menu automatically The individual menus are described in the following sec tions Settings page 91 Configuration page 91 Local Function page 113 Assigning Function Keys page 117 Audio Settings page 124 Restarting the Telephone 05 Setup 2 Configuration 0 End All menus and men...

Страница 91: ...d S V7 0 Prerequisite You are in the Setup menu page 90 Select and confirm You will find an overview of the options here from page 229 Country Options These settings adapt your telephone to country specific characteristics for example the display format for the date and time of day or transfer technical parameters Prerequisite You are in the Configuration menu page 91 Confirm Select and confirm to...

Страница 92: ...e Prerequisite You are in the Configuration menu page 91 Select and confirm Select required display format and confirm 02 Language 1 German If an optiPoint display module is connected you are asked to Restart the telephone after a change of language so that the change of lan guage setting can also be done for the optiPoint display module If the telephone goes back to idle mode without a confirmati...

Страница 93: ...ng Call Deflection This option permits you to configure call deflection to a destination You can also predefine a destination for the deflection see page 106 Prerequisite You are in the Configuration menu page 91 Select and confirm Confirm Calls can be deflected or Confirm Call deflection is not available in this menu The new setting is displayed Day 20 Month 09 Year 05 Hour 15 Minute 10 If the da...

Страница 94: ...n to activate and deactivate the Call duration function Prerequisite You are in the Configuration menu page 91 Select and confirm Confirm The call duration is displayed or Confirm Display is suppressed The new setting is displayed This function only affects phone based call for warding The administrator controls call forward ing from the HiPath 8000 This option is only available if it has been act...

Страница 95: ...er Use this menu option to activate deactivate the feature for deflecting a current call to another party Prerequisite You are in the Configuration menu page 91 Select and confirm Confirm Call can be transferred or Confirm Call transfer not permitted The new setting is displayed This menu option is only available if it has been activated by the administrator 08 Call waiting Switch on Switch off Th...

Страница 96: ... adjust the contrast of your display There is a scale of 1 low contrast through 4 high contrast Prerequisite You are in the Configuration menu page 91 Select and confirm Select and confirm or Select and confirm Configure the contrast using uv the control keys on the telephone or the arrow keys or o e to m the keypad keys Confirm the setting The value for the new setting for the display contrast fo...

Страница 97: ...ayed Call Display This function allows you to define what kind of caller in formation Calling Line Identification is displayed for in coming calls Possible options are 1 Name 2 Number 4 No display 5 Name and Number If the appropriate data is not available the next available ID is displayed Prerequisite You are in the Configuration menu page 91 Select and confirm Select the required option and conf...

Страница 98: ...e time delay following input of the phone number before the phone automatically dials the number without you having to press the key The valid range is 1 automatic dialing after 1 second to 9 automatic dialing after 9 seconds Prerequisite You are in the Configuration menu page 91 Select and confirm Configure the number of seconds using uv the control keys on the telephone or the arrow keys or o e ...

Страница 99: ...eaning forward after 1 sec ond The maximum value is 21 meaning forward after 21 seconds The default value is 15 Prerequisite You are in the Configuration menu page 91 Select and confirm The current value is displayed o e to m Enter new value For example confirm the input value of 11 The new set ting is displayed This function only affects phone based call for warding The administrator controls cal...

Страница 100: ... current time is displayed Configure the number of minutes using uv the control keys on the telephone or the arrow keys or o e to m the keypad keys Confirm the setting The value for the new setting is dis played Music On Hold You can use this option to activate and deactivate the music that a caller hears when put on hold Prerequisite You are in the Configuration menu page 91 Select and confirm Co...

Страница 101: ...nd confirm Confirm or Confirm The new setting is displayed Message Waiting You can use this option to activate and deactivate the Message Waiting function Prerequisite You are in the Configuration menu page 91 Select and confirm Confirm or Confirm The new setting is displayed This menu option is only available if it has been activated by the administrator 19 Do Not Disturb Switch on Switch off Thi...

Страница 102: ...ncing This option permits and or prohibits use of the Local Conferencing function The conference is initiated as a three party conference from a consultation call Prerequisite You are in the Configuration menu page 91 Select and confirm Confirm Local conferencing can be established or Confirm Local conferencing is not available The new setting is displayed 21 Hold Ring Back Switch on Switch off Th...

Страница 103: ...y whether you hear a beep when a call is automatically answered Prerequisite You are in the Configuration menu page 91 Select and confirm Confirm The new setting is displayed Auto Reconnect You can use this option to activate and deactivate the options for placing a call on hold and for retrieving it again using both a CTI application and the telephone Prerequisite You are in the Configuration men...

Страница 104: ...m Confirm If multiple messages are received they are displayed alternately or Select and confirm The message with the highest pri ority is displayed even if multiple messages have been received If there are several messages a plus sign is visible behind the current message You can switch be tween messages using the plus minus key Inactivity Timeout Use the timeout setting to specify the period of ...

Страница 105: ...nt 410 420 standard You can use this option to specify whether call view is on the telephone display or on the optiPoint display module following a system restart Prerequisite You are in the Configuration menu page 91 Select and confirm Confirm Call view appears on the optiPoint display module or Confirm Call view appears on the telephone display The new setting is displayed 3 1 minute 4 2 minutes...

Страница 106: ... the Deflect Address Specify a default destination here for calls that are to be deflected You will no longer need to enter a destination number when deflecting calls Prerequisite You are in the Configuration menu page 91 Select and confirm An existing destination is displayed Confirm Confirm o Enter a destination or modify an existing destination Clear target This is only available if a destinati...

Страница 107: ...ars in the overview or Confirm Line display is suppressed The new setting is displayed Position of Line in Multiline Overview Display Module Specify the position of the selected line in the multiline overview optiPoint display module page 184 only with optiPoint 410 420 standard S V7 0 Select and confirm o Enter the required value for the position and confirm your entry The set position is display...

Страница 108: ... Icons appear on the optiPoint display module or Confirm Text appears on the optiPoint display module The new setting is displayed Parking and Picking Up Parked Calls These functions allow users to park a call on a server that supports call parking and or pick up calls parked on this server These options are only available if they have been activated by the administrator Open the Configuration men...

Страница 109: ...e choice of two settings Context Hot Keypad Context is the default setting When on hook dialing with this setting you must either confirm the option Di al press the loudspeaker key or wait until the Auto Dial Timer has timed out in order to set up the connection If Hot Keypad has been set dialing takes place auto matically as soon as the character string entered mat ches an entry in the dial plan ...

Страница 110: ...ich have been missed are indicated on the display of the telephone in idle mode If the function has been deactivated new calls which have been missed are indicated only by the blinking of the relevant function key This function does not apply to an optiPoint display module which is in use with your telephone Select and confirm Confirm in order to activate or Select and confirm in order to deactiva...

Страница 111: ... is activated the LED of the mobility key is flashing during logon and while the telephone and the DLS server are exchanging data Select and confirm Confirm in order to activate or Confirm in order to deactivate Secure Call Ind If the function is activated you hear an acoustic signal if the voice connection is not secure Select and confirm Confirm to activate or confirm to deactivate 53 Hangup whi...

Страница 112: ...ction by the user Select and confirm Confirm in order to activate bzw Confirm in order to deactivate Transfer on hangup Prerequisite The function is released by service per sonnel Select and confirm Confirm in order to activate or Confirm in order to deactivate This function can currently only be used with non secure voice transmission 55 Call Recording Switch on Switch off 56 Transfer on hangup S...

Страница 113: ...ted dial entry is displayed to the left of the number itself Entries that are not currently configured are shown as Not pro grammed Scroll through the programmed entries Stop scrolling when the display indicates an entry that is not programmed and confirm Confirm or e to m Start entering digits immediately or Use the arrow keys to select a different dialing mode before entering digits If the abbre...

Страница 114: ...tion to modify or enter your user password Your password will protect all your user spe cific settings including the language settings Prerequisite You are in the Local Functions menu page 113 Select and confirm Confirm o Enter a new password exactly 6 numbers and confirm The new password should be different from the default 000000 o Enter the password again and confirm Correct entry ac knowledged...

Страница 115: ...one with Forward Set Change Target This must be programmed in order to use the 01 Lock with Forward function Select and confirm Select and confirm Confirm or Select and confirm o Enter a destination phone number or change the exist ing number Confirm your entry Lock Phone Select and confirm Select and confirm Fwd Phone Locked appears in the display Incoming calls are immediately forwarded to the c...

Страница 116: ...ed Dialing Numbers You can use this option to clear all programmed abbre viated dialing numbers Prerequisite You are in the Local Functions menu page 113 Select and confirm Confirm Select and confirm All abbreviated dialing numbers have been cleared Resetting Memory to Factory Default Settings You can use this option to reset the phone settings to the factory default values Open the Local Function...

Страница 117: ...keys are listed and illustrated on page 20 Even these five preassigned keys can be repro grammed If possible do not change the Cancel and Shift keys These enable you to cancel procedures and or program shifted keys The optiPoint 420 or optiPoint self labeling key module provide an electronic self labelling function for program ming keys The programming procedure using the telephone menu is describ...

Страница 118: ...e electronic labeling function Label is displayed with the following prompt Select and confirm to retain the preset label or Confirm to adapt the electronic key labeling o Enter or modify key label and confirm The relevant key is labelled automatically The new function is assigned to the function key If you want to program another key or key level of the same key you can select the level again Fun...

Страница 119: ...e of the following address forms Sequence of digits URL Dialing control functions can be selected and inserted The characters for representing the dialing control func tions can be combined in the same repertory dialing se quence However there are restrictions with certain characters When processing the dialing string for Repertory dia ling the data is interpreted in the same way as dialed digits ...

Страница 120: ...r DTMF digits caus es a wait time of at least three seconds plus 0 2 sec onds for each digit sent in the previous block If a string concludes with OK the digits are sent without having to wait for the user to press OK or until a timeout occurs With the Repertory dialing function multiple function keys can each be programmed with a specific repertory dialing sequence Select and confirm Select and c...

Страница 121: ...tion Select and confirm Select and confirm For programming the first level Confirm You are prompted to press a key Press the function key to be programmed the associat ed LED blinks Confirm Select and confirm or Select and confirm o Enter the telephone number or name to be stored and confirm When programming function keys on an optiPoint 420 or optiPoint self labeling key module the electronic lab...

Страница 122: ...irm o Enter the telephone number or name to be stored and confirm When programming function keys on an optiPoint 420 or optiPoint self labeling key module the electronic labeling function Label is displayed with the following prompt Confirm to adapt the electronic key labeling o Enter or modify name or number and confirm The rele vant key is labelled automatically or Select and confirm to keep the...

Страница 123: ...vating the Notebook function Prerequisite The Idle menu or an active call is dis played Press the Notebook function key o Enter the number to be stored and confirm or Confirm Storage of the number is confirmed with Entry stored Example 2 Switching off the ringer for incoming calls on the telephone Press the Ringer off function key The Ringer off LED lights up The ringer is deactivated In the event...

Страница 124: ...lowest loudspeaker volume is 1 and the highest volume is 8 Open the Audio Settings menu see above Prerequisite You are in the Audio Settings menu page 124 Confirm The current volume is displayed The value can be increased or reduced by using either uv the control keys on the telephone or the arrow keys or o etol the keypad keys Confirm the setting The new setting is displayed as a value During a C...

Страница 125: ...nger volume setting are displayed Setting The lowest ringer volume is 1 and the highest volume is 5 The value can be increased or reduced by using either uv the control keys on the telephone or the arrow keys or o ebisi the keypad keys Confirm the setting The value of the new setting is dis played During an Incoming Call When your telephone rings at an incoming call you can vary the volume of the ...

Страница 126: ...ne key The number or name of the line and the current ringer setting are displayed Select and confirm Setting The tone sequence can be varied in 3 steps the melody in 8 steps During programming you may switch bet ween the tone sequence and melody input fields using the arrow keys and Use the arrow keys to select the input field for melody or tone sequence o e to i Use the keys 1 5 on the keypad to...

Страница 127: ...om the factory default for this line Select and confirm Press the desired line key The number or name of the line and the current setting are displayed Select and confirm The setting is reset to the factory default Handset Volume You can adjust the handset volume as follows Prerequisite You are in the Audio Settings page 124 Select and confirm The current setting is displayed The value can be incr...

Страница 128: ...ions with this setting Settings for normal echoing or muffled rooms are available for selection Prerequisite You are in the Audio Settings page 124 menu Select and confirm The current setting is displayed for example Normal Select and confirm another setting The new setting is displayed Setting Room Character During a Call If you are talking in handsfree mode not with optiPoint 410 420 economy eco...

Страница 129: ...ease this value with uv the control keys on the telephone or the arrow keys or o etog the keypad keys Confirm the setting The new setting is displayed as a value Rollover Volume You can adapt the volume for rollover as follows Prerequisite You are in the Audio Settings menu page 124 Select and confirm The current setting is displayed You can increase or decrease this value with uv the control keys...

Страница 130: ...ay module is connected and you re quest a change of language either through the lan guage menu option or by changing from a mobility user to base user or vice versa you are asked to Restart the telephone v u q f Press the keys one after the other The Restart is exe cuted after a few seconds ...

Страница 131: ...115 When you connect the telephone for the first time or re start it a message appears prompting you to press the display to start Call Control The idle display appears Press the Menu icon to see which menu options are available when the telephone is in the idle state Product support for the optiPoint display module by Siemens Service was discontinued at the end of 2006 The optiPoint display modul...

Страница 132: ...ility Display As soon as a Mobility User is logged on this is shown by a tent like symbol in the top symbol bar Swap Display You should configure a key to enable you to quickly swap from the telephone display to the Display Module Call Control and vice versa page 117 Press the Swp Display key to swap displays quickly Call Control Mon 07 03 05 11 34AM 44 123456 78910 Redial Last No Group Pickup For...

Страница 133: ...ontrol and use other applications Press the Home icon in Call Control page 132 if you want to continue running Call Control in the back ground but want to use other applications as well To return to Call Control select the appropriate icon and then press the Select display key Applications Call Control Contacts Address Book Browser Call Log Programs Display Voice Select ...

Страница 134: ...ller Box is then opened and if the caller s tele phone number is transferred it appears in the box If no information is transmitted you will see Private or Unknown in the caller box If you are in the process of making settings on the phone during a call page 206 the display will change to Call Control Call Control Mon 07 03 05 11 34AM Incoming Call Call Control Mon 07 03 05 11 34AM Incoming Call B...

Страница 135: ...er to line Adding Callers to the Contacts Phone Book When you answer a call the caller ID is generally dis played page 97 The caller ID can consist of the fol lowing transferred values Phone number Name Phone number and name You can use any of these details to create a new entry in the phone book Call Control Mon 07 03 05 11 34AM 00 24 Bill Smith 987654321 Consult Transfer During secure voice tran...

Страница 136: ...tage To reject a call press the Refuse icon The caller hears an appropriate message The telephone reverts to idle mode If forwarding has been set up the call will be forwarded to the destination for Call forward on busy Ringer If you do not want to be disturbed by the ringing of an incoming call you can deactivate the ringer If your telephone is in idle mode select the option Rin ger on or Ringer ...

Страница 137: ... destina tion without answering it Press the Deflect icon o Enter the destination or modify an existing destination and then press the Deflect display key Call Control Mon 07 03 05 11 34AM Incoming Call Bill Smith 987654321 Call Control Mon 07 03 05 11 34AM 1234567 Incoming Call Deflect this call to Bill Smith 987654321 Deflect Cancel ...

Страница 138: ...iPoint display module 139 Step by Step The incoming call is saved in the Missed Calls list You can also predefine the deflect address page 106 Call Control Mon 07 03 05 11 34AM 1234567 Incoming Call Deflecting done Bill Smith 987654321 OK ...

Страница 139: ...call information box and obtain more information about the caller To answer the call press the Connect icon in the Caller Box You can also press the Loudspeaker key or lift the handset The first call is put on hold and the second call is answered Call Control Mon 07 03 05 11 34AM 00 24 Bill Smith 987654321 Jane Brown Consult Transfer If you are using speakerphone mode for the cur rent call press t...

Страница 140: ...rent party page 144 Refusing a Waiting Call If permitted by the administrator you can also refuse a waiting call During a call a call or while you are still dialing informa tion box is displayed to notify you of a second call Call Control Mon 07 03 05 11 34AM 00 24 Jane Brown 123456789 00 24 On Hold Alternate Bill Smith 987654321 Conference Join Call Control Mon 07 03 05 11 34AM 00 24 Bill Smith 9...

Страница 141: ...refuse the waiting call The caller hears an appropriate message Connecting a party Prerequisite You have answered the second call page 140 Press the display key Join in order to connect the two parties Call Control Mon 07 03 05 11 34AM 00 24 Jane Brown 123456789 00 24 On Hold Bill Smith 987654321 Conference Join Call Control Mon 07 03 05 11 34AM 00 24 00 24 Join Bill Smith 987654321 Jane Brown 123...

Страница 142: ...n replace the handset or redial or Transfer on hangup Prerequisite Transfer on hangup is activated page 112 or n Replace the handset or press the speakerphone key if in speakerphone mode A connection is established be tween the other two stations Call Control Mon 07 03 05 11 34AM 00 24 00 24 Joining done Bill Smith 987654321 Jane Brown 123456789 OK ...

Страница 143: ...e 140 Press the symbol for Blind transfer o Enter the destination number and press the display key Transfer You are informed when the transfer process has been completed Call Control Mon 07 03 05 11 34AM 00 24 Jane Brown 123456789 00 24 On Hold Bill Smith 987654321 Conference Join Call Control Mon 07 03 05 11 34AM 1234567 00 24 Blind transfer this call to On Hold Del 123 Jane Brown 123456789 Trans...

Страница 144: ...y are being placed on hold Prerequisite You are in the middle of a call Press the Hold icon to place the call on hold The Caller Box now appears further from the Line Press the Reconnect icon to reconnect the call The Caller Box now appears closer to the Line Call Control Mon 07 03 05 11 34AM 00 24 On Hold Bill Smith 987654321 Consult Transfer You can place two calls on hold at the same time ...

Страница 145: ... numbers and press the Transfer display key You will be notified when transfer is com plete You can then replace the handset or redial To cancel the procedure before transfer is complete press the Cancel display key Call Control Mon 07 03 05 11 34AM 00 24 On Hold Bill Smith 987654321 Consult Transfer Call Control Mon 07 03 05 11 34AM 1234567 00 24 Blind transfer this call to On Hold Del 123 Bill S...

Страница 146: ...the call data is logged to the Missed Calls list The icon for missed calls and the number of missed calls only appears if entries have been stored in the list of missed calls page 170 Press the Missed Calls icon to open the list page 170 Call Control Mon 07 03 05 11 34AM 44 123456 78910 4 Contacts The icon is only displayed if the Call view icons option is activated otherwise the appropriate text ...

Страница 147: ...splayed This function is only available if the administrator has configured a server address for voice messages Press the icon for voice messages to call up the mail system and to display the voice messages Call Control Mon 07 03 05 11 34AM 44 123456 78910 2 Contacts The icon is only displayed if the Call view icons option is activated otherwise the appropriate text is displayed here The function ...

Страница 148: ... number using the display keyboard The dis play keyboard is described in the operating instructions for the optiPoint display module If you have activated the function Busy when di aling see page 110 you cannot be interrupt ed by an incoming call The caller hears busy tone Loudspeaker Call Control Mon 07 03 05 11 34AM Please Dial 123 Contacts During secure voice transmission you will see a lock sy...

Страница 149: ...number The number is dialed As soon as the party answers the Call Control switch es to display an active connection You can also use phone numbers that are stored in Contacts page 156 in Redial Last No page 168 or in a Call Log page 169 Call Control Mon 07 03 05 11 34AM 12345678 123 Call Control Mon 07 03 05 11 34AM 12345678 Calling ...

Страница 150: ... n Lift the handset or Press I Press the Voice Dial key on the display module The display switches to Voice Recognition mode s Speak the name of the person you want to call into the handset or the microphone Repeat if necessary If the name of the party is recognized the number is dialed Please refer to the operating instructions for the optiPoint display module for information on how to program en...

Страница 151: ...icon to dial the phone number or Press the Loudspeaker key to dial the phone number or Wait until the Auto Dial Timer has timed out Call Control Mon 07 03 05 11 34AM 12345678 Del 123 Contacts You can also use telephone numbers that are stored in Contacts page 156 in Redial Last No page 168 or in a Call Log page 169 Loudspeaker If you are using a dial plan and have set Hot Key pad see page 109 dial...

Страница 152: ...rty is busy or does not answer you can place a request for callback Callback is a HiPath 8000 function and has to be programmed by the administra tor You are requested to confirm callback if Busy or No reply appears on the display Prerequisite The callback function must be activated see page 110 Call Control Mon 07 03 05 11 34AM 12345678 Calling Call Control Mon 07 03 05 11 34AM 12345678 Busy Call...

Страница 153: ... callback request is stored in the system Callback is activated You are called by the system as soon as the party beco mes free or has made another call The number of the party who has become available is indicated on the dis play Press the connection symbol in the Caller Box The connection to the callback party is set up Call Control Mon 07 03 05 11 34AM Incoming Call 12345678 ...

Страница 154: ...d Ending a Call To end a call simply t replace the handset or press the Loudspeaker key if you are in speakerphone mode or press the Replace Handset icon If another call is waiting the telephone rings as it would for a normal incoming call If the connection is in terrupted by another party you will be informed of this via the telephone display Call Control Mon 07 03 05 11 34AM 44 123456 78910 Canc...

Страница 155: ...Contacts you can also press the Contacts display key To transfer a call page 146 to a party in Contacts open the menu and select the option Contacts In all cases a display similar to the one shown below ap pears Find and select the relevant party in the list and then press the display key Dial The phone number is used for this procedure Please refer to the operating instructions for the optiPoint ...

Страница 156: ... tions at any point in the repertory dialing sequence HiPath 8000 automatically detects whether the digits represent an IP address a number or a URL For information on programming a repdial key see page 119 Frank Miller Control Function Action During Dialing OK Any characters following this control func tion are sent immediately after the call has been answered and are sent as DTMF Pause Waits 3 s...

Страница 157: ...y is On Hold Press Consult Transfer and dial the second party The current call switches to On Hold status Enter the phone number using the display keyboard the display keyboard is described in the operating in structions for the optiPoint display module Call Control Mon 07 03 05 11 34AM 00 24 Bill Smith 987654321 Consult Transfer Call Control Mon 07 03 05 11 34AM 123456789 Del 123 00 24 On Hold Bi...

Страница 158: ... a Call Log page 169 You can terminate the dialing process with the Cancel key during input of the number and then return to the first party Call Control Mon 07 03 05 11 34AM 123456789 Calling 00 24 On Hold Bill Smith 987654321 Complete Transfer Call Control Mon 07 03 05 11 34AM 00 24 Jane Brown 123456789 00 24 On Hold Bill Smith 987654321 Complete Transfer Call Control Mon 07 03 05 11 34AM 00 24 ...

Страница 159: ...ble Call transfer During consultation you can connect the other two par ties to each other Prerequisite You have set up a consultation call page 158 The other party has not answered yet The second party is called Press Complete Transfer in order to transfer the held call to the second party although the latter has not lifted the handset yet or The other party answers Call Control Mon 07 03 05 11 3...

Страница 160: ...lete Transfer in order to transfer the held call to the second party Call Control Mon 07 03 05 11 34AM 00 24 Jane Brown 123456789 00 24 On Hold Bill Smith 987654321 Complete Transfer Call Control Mon 07 03 05 11 34AM 00 24 00 24 Transferring Bill Smith 987654321 Jane Brown 123456789 OK ...

Страница 161: ...the optiPoint display module 162 Press the display key OK to terminate the process im mediately You can then replace the handset or redial Call Control Mon 07 03 05 11 34AM 00 24 00 24 Transfer done Bill Smith 987654321 Jane Brown 123456789 OK ...

Страница 162: ...t call switches to the On Hold status You are reconnected with the first party When you have finished the consultation call you can clear down the connection with the active party by pressing the Clear icon You can then return to the par ty who was On Hold Note that the active Caller Box is closer to the line and the Caller Box On Hold is further away from it The On Hold icon changes to the Recon ...

Страница 163: ...r der to switch to the other party The active connection changes to the On Hold status Call Control Mon 07 03 05 11 34AM 00 24 Jane Brown 123456789 00 24 On Hold Bill Smith 987654321 Alternate Conference Complete Transfer Call Control Mon 07 03 05 11 34AM 00 24 Jane Brown 123456789 On Hold 00 24 Bill Smith 987654321 Alternate Conference Complete Transfer ...

Страница 164: ... a secure call and receive a second call or you initiate a consultation call the current call is put on hold The new call can be secure or unsecure If call three parties then enter a confer ence call the initial connection remains secure As soon as the connection to one partner is not secure the entire conference is not secure see also page 23 Call Control Mon 07 03 05 11 34AM 00 24 On Hold Jane B...

Страница 165: ...Conference in or der to initiate the conference Hold the conference The conference call is set up and you are simultaneous ly connected with the two other parties Call Control Mon 07 03 05 11 34AM 00 24 Jane Brown 123456789 00 24 On Hold Bill Smith 987654321 Alternate Conference Complete Transfer Call Control Mon 07 03 05 11 34AM 00 24 Conference 00 24 Bill Smith 987654321 Jane Brown 123456789 End...

Страница 166: ...e disconnected from both parties or End both calls by hanging up Prerequisite Allow Join in conference was deactiva ted by the service personnel t Replace the handset or press the loudspeaker key in in speakerphone mode You are disconnected from both parties or Connect the other parties using the display key Prerequisite Allow Join in conference was activated by the service personnel Press the Joi...

Страница 167: ...edial the last number To redial the last number dialed open the menu and se lect the option Redial Last No You can also select the menu option from the menu in idle mode Call Control Mon 07 03 05 11 34AM Please Dial 123 Redial Last No Call Log Contacts Redial Last No is only available if the Dialed calls list contains entries page 169 ...

Страница 168: ...Telephone menu page 39 Dialed Calls The last 20 numbers dialed are automatically stored If a line is busy or if there is no reply you can use the Di aled calls list to redial the number The numbers dialed are sorted in descending order ac cording to date and time The number dialed last ap pears first in the list To ensure that caller data for incoming calls is stored you must make sure that the ca...

Страница 169: ...e number Missed Calls Open the menu in idle mode and select Call Log page 132 Select Missed calls This list contains the calls that were not answered on this telephone It is sorted chro nologically with the last call received appearing first or Press the Missed Call key to open the Missed calls list Redial Missed calls 10 8 new Dialed calls 8 45678990 Fred Bloggs Jill Hill Jane Brown Phil Jones Ma...

Страница 170: ...ist You can use the stylus to select the required entry Press the relevant display key to display the caller s details page 172 clear the entry dial the number store the number in your phone book opens the phone book Missed calls 10 8 new 43216789 Bill Smith John Watson Harry Grey Ralph Delgado Isabella Ashley Jeanine Fox Dialed calls 8 Received calls 12 Forwarded calls 10 Call Log Dial View Misse...

Страница 171: ...ule 172 Details The following is displayed when you press Details The number of call attempts from each user max 99 The date and time of the last call attempt Missed calls 1 of 10 987654321 Bill Smith 0101010202 03 03 03 6 28 Calls 68 Previous Next Call Log Dial Cancel ...

Страница 172: ... the calls that were not answered on this telephone It is sorted chro nologically with the last call answered appearing first If no caller information is transmitted Caller ID unknown is entered in the list Missed calls 10 8 new Dialed calls 8 Received calls 12 13579329 Bill Smith Frank Goodman Harry Grey Dorothy Silverr Kathrin Bauer Robert Miller Forwarded calls 10 Call Log Dial View ...

Страница 173: ...by this telephone This means that the calls forwarded to the voice mailbox are also listed The list is sorted chronologically whereby the last entry appears first If no caller information is transmit ted Caller ID unknown is entered in the list Missed calls 10 8 new Dialed calls 8 Received calls 12 Forwarded calls 10 19992005 Kathrin Bauer Robert Miller Harry Grey Dorothy Silver Peter Green Steven...

Страница 174: ...pen the menu in idle mode and select Forward Calls page 132 The HiPath 8000 also provides switch based call forwarding features page 72 You should not use the phone based call for warding features together with HiPath 8000 Call Forwarding The different kinds of call forwarding when no reply and when busy can only be pro grammed and activated using the Telephone menu page 45 Call Control Mon 07 03 ...

Страница 175: ...using the display keyboard the display keyboard is described in the operating in structions for the optiPoint display module or o Enter a phone number using the keypad You can also use telephone numbers from the Phone Book for the target Press the Save display key to store the target numbers for immediate call forwarding Forwarding is enabled Forward targets For all calls For when busy 08141356928...

Страница 176: ...pecified for immediate call forwarding Press the Calls forwarded to box to change the desti nation You can also use the and keys to se lect the box the border around the box expands For in put see page 176 Deactivating Call Forwarding To deactivate call forwarding press the Forward Off display key Call Control Mon 07 03 05 11 34AM 44 123456 78910 01773327160 Calls forwarded to Forward Off ...

Страница 177: ...ored in the Call Log so that they can be called back later on Prerequisite Do Not Disturb must be configured page 101 Open the menu in idle mode and select Do not disturb Press the DND Off display key to deactivate Do not dis turb Call Control Mon 07 03 05 11 34AM 44 123456 78910 Do Not Disturb Cancel Callbacks Ringer on Setup Call Log Redial Last No Group Pickup Forward Calls Contacts Call Contro...

Страница 178: ...f another group member You can only belong to one pickup group at a time The administrator can set up your pickup group as fol lows Notification service you are notified of pickup group calls in exactly the same way as other incoming calls User initiated service if there is a call for the pick up group you can answer it by pressing Group Pickup Answering Group Pickup Calls There is a call for a pi...

Страница 179: ...the group call The follo wing example shows that Bill Smith is calling Ralph Del gado Ignoring Group Pickup Calls Press the Clear icon if you would like an incoming call to be answered by another member of the group Your telephone stops ringing and returns to idle mode Call Control Mon 07 03 05 11 34AM 44 123456 78910 Bill Smith Ralph Delgado Group Pickup Contacts ...

Страница 180: ...to the HiPath 8000 it will automatically connect to the HiPath 3000 fallback system The message Temporary limited mode is dis played While you are using the fallback system the following functions are not available Call Forwarding page 175 Deflect Call page 138 Conferencing page 165 Voice Messages page 148 Callback page 153 Using Group Features page 179 Transferring a Call page 146 Multiline Telep...

Страница 181: ...ne is di aled in idle mode This is dependent on the line config uration set up by the administrator The following options are available when you press the Menu icon Call Control Mon 07 03 05 11 34AM Secretary company com Contacts Call Control Mon 07 03 05 11 34AM Secretary company com Redial Last No Group Pickup Forward Calls Do not disturb Cancel Callbacks Ringer on Setup Call Log Contacts ...

Страница 182: ...s the line with the highest priority in accor dance with the lines preferred by the administrator for outgoing calls If the line for outgoing calls with the highest priority is busy in use by another telephone the next avail able line for outgoing calls is displayed If all available lines for outgoing calls are busy the line overview is displayed If no preferences have been defined the line over v...

Страница 183: ...set line page 182 View Line Box button with prompt to display a line Line Box Button with user defined line name Status display icons Idle Ringing Icon blinking Call waiting mode Blinking rapidly On hold on another line Busy Active Out of order Call view Icon Press here to access the last call view displayed Multiline Mon 07 03 05 11 34AM View Line View Line View Line View Line View Line Secretary...

Страница 184: ...configured use the display keys Next and Previous to scroll through all of the hidden lines Multiline Mon 07 03 05 11 34AM View Line View Line View Line View Line View Line Secretary Store View Line Desk 1 Desk 2 Desk 3 Manager View Line Production Next Multiline Mon 07 03 05 11 34AM View Line Kitchen View Line Canteen View Line Gate Previous ...

Страница 185: ...ured so that a call is signalled with a ring or call waiting tone and there is an incoming call in View Line mode a display similar to the one be low appears An icon for the ring or call waiting tone blinks Multiline Mon 07 03 05 11 34AM View Line View Line View Line View Line View Line Store Secretary Desk 1 Desk 2 Desk 3 Bill Smith Manager ...

Страница 186: ...the prime line the display switches immediately to Call Control without you hav ing to press the View Line Box beforehand You now have the following options Answer the call Deflect the call Transfer the call If a call comes in on the selected line in idle mode e g Store with a ring or call waiting signal Call Control is displayed as illustrated above Manager Mon 07 03 05 11 34AM Incoming Call Bill...

Страница 187: ...ptiPoint display module 188 Line Box Press the Line Box page 184 You are connected with the caller immediately The display changes to Call Control as shown in the figure below Manager Mon 07 03 05 11 34AM 00 24 Bill Smith 987654321 Consult Transfer ...

Страница 188: ... The first available line is seized and Call Control appears as shown in the following figure On Hook Dialing You can dial a number by entering it without pressing a free line box beforehand pressing a line key beforehand pressing the Loudspeaker Headset key before hand lifting the handset beforehand The first available line in accordance with the line pref erences for outgoing calls and Call Cont...

Страница 189: ...al You can only perform functions such as Call Forwarding Do Not Disturb or Ringer On All other functions are deactivated Only Forward Calls and the options in the menu are available Multiline Mon 07 03 05 11 34AM View Line View Line Fred Bloggs Jill Hill Incoming Call Jane Brown Store Secretary Desk 2 Desk 3 Manager Chef Secretary Mon 07 03 05 11 34AM This line is busy Do Not Disturb Ringer on Se...

Страница 190: ... after a consultation call has been initiat ed or a call transferred you cannot hold the line manu ally page 192 or switch to line overview When you use this line as a single line telephone you have the following options Put the call on consultation hold and pick it up on an other phone Deflect the call page 138 Transfer the call see page 146 Place call on consultation hold page 158 Refuse a waiti...

Страница 191: ... is put on hold you have the following two op tions Transfer the call see Retrieve Your call is reactivated page 188 Switch to line overview See the following example Manager Mon 07 03 05 11 34AM 00 24 Bill Smith 987654321 Hold Line Exit Hold Line Consult Transfer Manager Mon 07 03 05 11 34AM 00 24 Line put on hold by Manager company com Retrieve Line Held Bill Smith 987654321 ...

Страница 192: ...oint display module 193 Step by Step You can now select a different line for an outgoing call for example Multiline Mon 07 03 05 11 34AM View Line View Line View Line View Line Bill Smith View Line Store Secretary Desk 2 Desk 3 Manager Chef ...

Страница 193: ...e with the most impor tant status in accordance with the following priorities Active and signalling for second incoming call dis played as Ringing or Call waiting Active Ringing incoming call hold ringback or hold ring back for pickup group in the order established by the rules for selecting the preferred terminal line see page 183 On Hold manual hold on your own telephone in the order last on hol...

Страница 194: ...107 An incoming call on another line in Call Control Ringer or Call Waiting signal is displayed in a line information box Consequently the line informatiton box has the same function as the line control keys in the line overview In this example an incoming call is ringing on a Manager line Secretary Mon 07 03 05 11 34AM 00 24 Bill Smith 987654321 Jill Hill Manager Consult Transfer ...

Страница 195: ...ed When you accept the call the Secretary line is put on hold and you are connected with the caller on the Ma nager line Manager Mon 07 03 05 11 34AM Incoming Call Jill Hill 918273645 Bill Smith Secretary Call information boxes page 140 for notifica tion of incoming calls on the same line always have priority over line status messages Manager Mon 07 03 05 11 34AM 00 24 Jill Hill 918273645 Bill Smi...

Страница 196: ... existing connection However the line information boxes can appear in all call views and all scenarios in which the line overview can be called up They do not appear in a Call Control in which a caller can be put on consultation hold page 158 or two calls are handled page 163 Multiline Mon 07 03 05 11 34AM Bill Smith View Line View Line View Line Jill Hill View Line Store Secretary Desk 2 Desk 3 M...

Страница 197: ...h status that applies to a line is represented sole ly by the status icon page 184 Each status that applies to more than one line is rep resented by both the appropriate status icon page 184 and the number of lines for this sta tus In the above example two lines are ringing including the one currently displayed lines with lower priority status are only displayed if the calls are answered by anothe...

Страница 198: ...ring a Call Prerequisite The Show interline state function must be activated see page 107 If a line was placed on manual hold by another tele phone while you are in Call Control it is displayed in a line information box Example Secretary Mon 07 03 05 11 34AM 00 24 Bill Smith 987654321 Line on hold Desk 2 Consult Transfer ...

Страница 199: ... similar to the one below appears You now have the following options Ignore the line that is ringing or on which a call is waiting and continue operation in call view Press the line view in the Ringing Call Waiting display to view the incoming call while dialing Press the line box in the Ringing Call Waiting display to answer the incoming call this automati cally interrupts dialing and the view sw...

Страница 200: ...er Input Changing Character Mode Press this icon to switch keyboard input from numeric to alphanumeric lowercase and or alphanumeric up percase Numeric input Alphanumeric input lowercase Call Control Mon 07 03 05 11 34AM 12345678 123 Call Control Mon 07 03 05 11 34AM John m n o 6 abc ...

Страница 201: ...ite and Insert Mode Switching to Insert Mode If the icon appears in the bottom system display row you are currently in overwrite mode i e input characters overwrite existing characters Press this button to switch to insert mode Call Control Mon 07 03 05 11 34AM JOHN M N O 6 ABC Call Control Mon 07 03 05 11 34AM 12345678 Del 123 ...

Страница 202: ... in the bottom system display row you are currently in insert mode i e input charac ters are inserted in between existing characters Press this button to switch to overwrite mode Additional Keys Clears individual characters from right to left Confirms input e g for dialing Call Control Mon 07 03 05 11 34AM 12345678 Ins 123 ...

Страница 203: ...onference or Join Display keys Caller box with phone number name and status in formation if applicable All control elements that you can select using the sty lus and or request input can also be selected using the C D E and F keys and activated using the key Selected control elements are highlighted with a bold frame Light frames are used for dark backgrounds Example The Hold icon is selected indi...

Страница 204: ...s with a control element from the edit field Insert mode Moves cursor one character to the right and after the last character jumps one control element forward C Overwrite mode clear key clears characters in re verse starting from the cursor position Insert mode moves cursor one character to the left and with the first character skips back one control element Confirms input e g for dialing E Proce...

Страница 205: ...pad on the telephone In idle mode open Setup in the menu to call up the tele phone s Setup menu You will see the following view Use the keypad on the telephone to enter the letters e to m and the keys to scroll and confirm Call Control Mon 07 03 05 11 34AM 44 123456 78910 Call Log Redial Last No Group Pickup Forward Calls Do not disturb Cancel Callbacks Ringer on Setup Contacts Setup Setup 2 Confi...

Страница 206: ...changes into the cur rent form This transfers the changes to the optiPoint 410 420 economy economy plus standard S V7 0 Click this button to reset the changes in the current form to the former optiPoint 410 420 economy econo my plus standard S V7 0 values Click this button to perform an action such as Save Download Invoke and Restart A message is dis played in the event of an error Select an optio...

Страница 207: ...ress of the optiPoint 410 420 economy economy plus standard S V7 0 that you want to map A host name has been assigned to your telephone you can evoke the web interface using this host name in the browser Please check the name with your service personnel You can then access the web interface for your telephone e g in the following format https hostname domainname If applicable confirm the following...

Страница 208: ...4 and click Login If a user ID has not been specified enter the default value 000000 The administrator can set a minimum length between 6 and 24 char acters for the user password If the minimum length was changed in the meantime so that your password is too short now you are asked to change your password page 210 Only after you have changed your password you can log on to the user interface ...

Страница 209: ...he dialog For a description on how to change the user password in the Telephone menu see page 114 Click a field in one of the interface images to obtain more infor mation on the field User menu Change user password Function keys Phone Key module 1 Key module 2 Key module SLK 1 Key module SLK 2 Country Settings Language Settings Audio Settings Call related parameters Mobile User Logoff Home ...

Страница 210: ... the user password in the Telephone menu see page 117 Phone Click a field in one of the interface images to obtain more infor mation on the field The possibility of programming a key may be blocked by your service personnel In this case the Edit button is deactivated ...

Страница 211: ...to a key is shown on page page 222 Loudspeaker function key Selected dialing function key Phone lock function key The possibility of programming a key may be blocked by your service personnel In this case you get the message Locked by administra tor if you try to assign a function to this key ...

Страница 212: ...rface 213 Repertory dial function key Feature toggle function key HotDesking function key This key can only be set up if your service personnel has set up the tele phone as a guest telephone in the HiPath 8000 ...

Страница 213: ...g the language page 92 Click a field in one of the interface images to obtain more infor mation about the field Click a field in one of the interface images to obtain more infor mation about the field If an optiPoint display module is connected you are asked to Re start the telephone after a change of language so that the change of language setting can also be done for the optiPoint display module...

Страница 214: ...e parameters in the Telephone menu see the follow ing pages Auto Dial Timer page 98 Call forwarding locked destination page 115 Default deflect address page 106 Call forwarding on no reply CFNR timer page 99 DND feature enabled on phone page 101 Options for on hook dialing page 109 Click a field in one of the interface images to obtain more infor mation about the field ...

Страница 215: ...g the Mo bility key You can also log off using the Mobility key or the telephone menu page 87 If a password is needed for logoff the following dialog is dis played If you entered an incorrect User password the message Logoff failed is displayed on the phone until you entered the correct User password and thus logged off suc cessfully or your service personnel cleared the message ...

Страница 216: ...ble for selection page 213 page 119 Audible secure call indicator If the function is activated you hear an acoustic signal if the voice connec tion is not secure page 216 page 112 Auto Dial Timer Timeslot in seconds between the last digit input and the start of the dial ing procedure Minimum value 1 Maximum value 8 Default value 6 page 215 page 98 Call Forwarding Locked Destination Enter the desti...

Страница 217: ...settings such as ringer or busy tone for example are performed with this option The following options are available for selection United States Germany France Italy Spain Austria Switzerland Belgium United Kingdom Argentina Brazil Luxembourg Netherlands Portugal Poland Czech Republic page 214 page 91 Default Deflect Address Enter a preset destination for call deflection page 215 page 106 Descripti...

Страница 218: ...g function is suppor ted HotDesking on Your main telephone s number is assigned to this guest telephone HotDesing is activated HotDesking off Your main telephone s number is no longer assigned to this guest telephone HotDesing is deactivated page 213 page 37 Feature URI Enter the fixed term HDLogonToggle for the HotDesking feature here page 213 page 37 Handset Volume Handset volume setting Minimum...

Страница 219: ...ect your language setting German English French Italian Dutch Spanish Portuguese Hungarian page 214 page 92 Loudspeaker Volume Setting the loudspeaker volume for optiPoint 410 420 economy economy plus standard S V7 0 Minimum value 1 quiet Maximum value 8 loud Default value 2 page 215 page 124 Melody Setting the ringer melody for incoming calls Minimum value 1 Melody 1 Maximum value 8 Melody 8 Defa...

Страница 220: ...9 Parameters for Selected dialing Enter the phone number for direct inward dialing page 212 page 52 Ringer Volume Setting the ringer volume Minimum value 1 quiet Maximum value 5 loud Default value 3 In case of a multiline telephone this setting can be set individually for each line Please note the message shown on the display page 215 page 125 Rollover Volume While you are busy on one line of a mu...

Страница 221: ...Configure a function key as a loudspeaker key Mute Assign a function key for muting the microphone Ringer off Define a function key to switch ringer on off Hold Assign a function key for holding calls Alternate Define a function key for alternating between two callers Transfer call Assign the Transfer function to a function key Join Assign a function key for call connection Deflect Define a functi...

Страница 222: ... deactivating the head set Do Not Disturb Define a function key for activating deactivating Do Not Disturb Group pickup Assign a function key for answering calls for your pickup group Repertory dial1 Assign the Repertory dial function to a function key Feature toggle Special functions HiPath 8000 Swap screens Switches the telephone display from line display to optiPoint display module DSM and vice...

Страница 223: ... web interface user area Current password enter currently valid password here New password enter new password here The new password should be different from the default 000000 Confirm new password confirm new password here Default 000000 page 210 page 114 ...

Страница 224: ... that you wish to generate or modify is shown in the first line of the display The position for entering modifying or deleting characters in the text the cursor is marked by an underscore _ The second line shows the characters that can be se lected using a particular key of the keypad In certain sit uations additional information is also shown here The currently selected character is marked by an ...

Страница 225: ...n the table The state of the Shift key overwrite or insert mode is shown on the right hand side of the fourth line Shift key not active Shift key active Key 1x 2x 3x 4x 5x 6x 7x 8x 9x 15x e 1 1 f a b c 2 g d e f 3 h g h I 4 I j k l 5 j m n o 6 k p q r s 7 l t u v 8 m w x y z 9 q d 1 0 r _ 1 Space Shift A short text _ DEL A short text _ INS ...

Страница 226: ...navigating switch between move cur sor and delete character Terminate entry and accept changes Quit key terminate entry and discard changes If the text is too long to be shown in the display arrows in the second line show the direction in which the text can be scrolled Long text extending past the end of the display to the right right pointing arrow Long text extending past the end of the display ...

Страница 227: ...re is being updated 2 System Shows information pertaining to the lack of connec tion or registration failure with the server 3 Restart Reminder that the telephone needs to be restarted 4 Call For warding Provides the destination of the active unconditional forwarding 5 Do not dis turb Indicates that with certain exceptions incoming callers will hear busy tone 6 MWI Indicates the number of voice me...

Страница 228: ...y 1 New change target 1 Use keypad 2 Use editor 0 End 2 Switch on off 0 End 3 On busy 1 New change target 1 Use keypad 2 Use editor 0 End 0 End 0 End 04 Do Not Disturb Not activated Switch on off Continue 05 Setup 1 Settings 2 Configuration 01 Country options 1 US 2 DE 3 FR 4 IT 5 ES 6 AT 7 CH 8 BE 9 UK 0 End 02 Language 1 German 2 English 3 French 4 Italian 5 Dutch 6 Spanish 7 Portuguese 0 End 03...

Страница 229: ...b Off 20 Message Waiting On 21 Hold Ringback On 22 Conference On 23 Local Conferencing On 32 Auto answer Off 33 Autoanswer beep On 34 Auto reconnect Off 35 Auto Reconnect beep On 36 Idle display static 1 Cycle Flash 2 Static 0 End 38 Inactivity timeout 1 No timeout 2 30 seconds 3 1 minute 4 2 minutes 5 5 minutes 6 10 minutes 7 15 minutes 0 End 39 DSM call view On 40 USB Keyboard type 1 English 2 E...

Страница 230: ... 4 Memory 1 Clear abbrv List 2 Delivery status 0 End 0 End 4 Function keys 1 Non shifted keys 01 Clear 02 Selected dialing Abbrev dialing 04 Repeat dialing 05 Missed Calls 06 Messages 07 Forwarding 08 Loudspeaker 09 Mute 10 Ringer Off 11 Hold 12 Alternate 13 Transfer call 14 Call join 15 Deflect 16 Setup menu 17 Room echoing 18 Room muffled 19 Shift key 20 Notebook 21 Settings 22 Lock Phone 23 Con...

Страница 231: ... 4 Park 5 Call Park Pickup 0 End 0 End 5 Audio settings 01 Loudspeaker vol 2 02 Ringer volume 3 03 Ringer 2 2 05 Handset volume 4 06 Room character 1 Normal 2 Echoing 3 Muffled 0 End 07 Key click volume 0 08 Headset vol 2 09 Rollover vol 2 10 Line Specific Ringer 0 0 1 Reset All 2 Change 0 End 09 Voice messages 1 Message Centre 0 End 11 Mobility 1 Logon 0 End Telephone Menu Default ...

Страница 232: ...a the text editor Dial editor Open the Address menu Dialing via the Address menu Redial Redial last number dialed Dialing the stored number Menu Option Action Next Step Consultation Hold user 1 call user 2 Consultation call menu Hold Place call on hold Basic call menu Transfer Transfer call to user 2 and clear connection without consultation Idle menu Disconnect Clear the current call Idle menu ...

Страница 233: ...he two parties in contact and withdraw from the conversation Idle menu Hold DFT only Place connected call on hold Disconnect and return Disconnect connected user and call up user on hold Basic call menu Menu Option Action Next Step Refuse call Do not accept incoming call Idle menu Answer call Answer incoming call Call join menu if first call Consultation menu if second call Deflect call Redirect i...

Страница 234: ...alerting Busy The remote terminal is busy Rejected The remote user rejected the call Call join menu The call is connected Cleared The remote user cleared the call Cleared unknown The call was cleared for an unknown reason Still on Hold The call xxxxxxxxx is in the held state Cannot Be Held It was not possible to place the connected ter minal on hold Cannot Be Transfered It was not possible to effe...

Страница 235: ...another multiline telephone FLICKERING WEAKLY All The line appears on the display i e it is busy 1 In the case of a line for which a call is waiting call waiting mode is maintained so that infor mation on the waiting call remains displayed 2 A call may already be connected to the line for which a new call is waiting This is referred to as Call Waiting The connection can be active or held 3 The LED...

Страница 236: ...eans that the connection between the original action and the error which has occurred is retained Example It is not possible to deflect the incoming call In special cases the third display line may also be used for display outputs so that the cause of the error can be clearly described Error messages can be cleared and confirmed manually either with the or the Cancel key 08972261485 Cannot Be Defl...

Страница 237: ... Labeling strips are delivered with your optiPoint Write the function or a name on the matching strips within the white field and attach them to your optiPoint With a computer via the Internet You will find the Online Key Labelling Tool along with the user inter face at http www siemens com enterprise Downloads Soft ware Place the strip next to the keys then place the transparent cover over it mat...

Страница 238: ...01 CNFR timer 100 conference 165 connecting paries 160 connection status menu 233 consultation 47 158 consultation call menu 234 context 219 contrast 97 control keys 21 country options 26 92 D date time 93 daylight saving 99 deactivate forwarding 177 deflecting a waiting call 29 dial after seizing a line 149 dial before seizing a line 152 dialed calls 169 dialing aids 22 52 dialing before line sei...

Страница 239: ...ror messages 237 ethernet interface 15 explanation of symbols 14 F fallback system 62 feature URI 219 features of the phone 16 forwarded calls 174 function keys programmable 17 table 118 G guest telephone 37 H handset volume 128 handsfree distance 2 hangup while ringing 112 HiPath tracing a call 83 HiPath 8000 functions 71 hold ringback 103 HotDesking 37 213 219 Hot Keypad 219 hotline 62 I incomin...

Страница 240: ...dialing 34 149 on hook dialing 35 152 options 110 open listening 27 operating instructions 3 operating steps 14 outgoing calls 34 P phantom line 64 picking up a call waiting 28 61 prime line 64 private line 64 programmable keys 20 programmable keys second level 20 R reachability 37 receive volume 24 received calls 173 redial 42 redial last number 168 refuse waiting call 141 refusing a waiting call...

Страница 241: ...ndex T TCP IP protocol 15 telephone layout 17 toggle key 71 transfer 146 U user password 115 user support 13 user programmable keys 118 using repdial keys 157 V voice messages 57 148 volume 24 W warmline 62 ...

Страница 242: ... per formance which in case of actual use do not always apply as described or which may change as the result of further development of the products An obligation to provide the respective characteris tics shall only exist if expressly agreed in the terms of the contract Availability and technical specifications are subject to change without notice All trademarks are the property of Siemens Enter p...

Отзывы: