-25-
Model W1836 (For Machines Mfd. Since 04/15)
O
PE
R
ATIO
NS
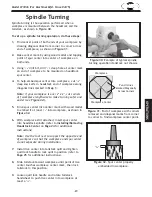
Figure
25
. Spindle lock knob in
Locked
position.
Spindle Lock
Knob
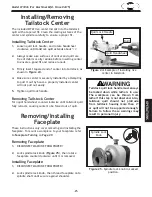
Figure 24. Example of installing live
center in tailstock.
Quill Handwheel
Quill Lock Handle
Quill
Installing/Removing.
Tailstock.Center
The included MT#2 live center installs into the tailstock
quill with a tapered fit. Clean the mating surfaces of the
center and spindle carefully to ensure a proper fit.
1. Loosen quill lock handle, and rotate handwheel
clockwise until tailstock quill extends about
3
/
4
''.
2. Always make sure surfaces of center and quill are
free of debris or oily residue before inserting center
to ensure a good fit and reduce runout.
3. Firmly insert tapered end of center into tailstock, as
shown in
Figure 24.
4. Make sure center is securely installed by attempting
to pull it out by hand—a properly installed center
will not pull out easily.
5. Tighten quill lock handle.
Installing.Tailstock.Center
Removing.Tailstock.Center
Turn quill handwheel counterclockwise until tailstock quill
fully retracts, causing center to be forced out of quill.
Removing/Installing.
Faceplate
These instructions only cover removing and installing the
faceplate. To mount a workpiece to your faceplate, refer
to
Faceplate Turning on Page 29.
Removing.Faceplate
1. DISCONNECT MACHINE FROM POWER!
2. Lock spindle lock knob (Figure 25), then rotate
faceplate counterclockwise until it is removed.
Installing.Faceplate
1. DISCONNECT MACHINE FROM POWER!
2. Lock spindle lock knob, then thread faceplate onto
spindle shaft until secure against shoulder.
Tailstock.quill.lock.handle.must.always.
be.locked.down.while.lathe.is.in.use..
The. workpiece. can. be. thrown. from.
lathe.if.this.step.is.not.observed..Also,.
tailstock. quill. should. not. protrude.
from. tailstock. housing. more. than. 2''.
or.quill.will.not.be.supported.enough..
Failure. to. follow. these. warnings. may.
result.in.personal.injury.
Содержание W1836
Страница 45: ...Model W1836 For Machines Mfd Since 04 15...


