58(65)
More details about replacing or maintaining the blades to see chapter 3.5.
Inject screw thread fixing glue (light blue LOCTITE 243 recommended) to
the fixing screw so to avoid slipping and tighten screws up.
Picture 6-1: Blades Maintenance
Caution!
To decrease the possibility of harm to other people, the replacement
action must be conducted by oneself.
To avoid self- rotation, block the rotating blades with a thick wood block.
Be careful with the sharp blades.
Each time to replace the blade, the screw and insulation ring must be
replaced also.
1) Remove the fixed blades
Caution!
To avoid self rotation, block the rotating blade with a thick wood block.
1. Remove the set screws.
2. Remove the fixed blades.
3. Clean the installation surface of the blades.
Содержание SG-24T
Страница 1: ...SG 24T Screenless Granulator Date Apr 2013 Version Ver B English...
Страница 2: ......
Страница 8: ...8 65...
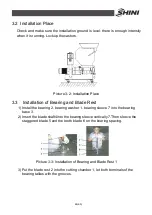
Страница 25: ...25 65 2 3 3 Cutting Chamber and Blade Rest Picture 2 5 Cutting Chamber and Blade Rest...
Страница 29: ...29 65 2 4 Electrical Diagram 2 4 1 Main Circuit 400V Picture 2 9 Main Circuit 400V...
Страница 30: ...30 65 2 4 2 Control Circuit 400V Picture 2 10 Control Circuit 400V...
Страница 31: ...31 65 2 4 3 Electrical Components Layout 400V Picture 2 11 Electrical Components Layout 400V...
Страница 34: ...34 65 2 4 5 Main Circuit 230V Picture 2 12 Main Circuit 230V...
Страница 35: ...35 65 2 4 6 Control Circuit 230V Picture 2 13 Control Circuit 230V...
Страница 36: ...36 65 2 4 7 Electrical Components Layout 230V Picture 2 14 Electrical Components Layout 230V...
Страница 40: ...40 65 2 5 4 Proportional Valves Picture 2 18 Control Cabinet and Valve...
Страница 55: ...55 65 2 seized up machine stops Notice Mount sensor and ensure its space with big wheel to about 2 4mm...

