background image

4

Assembly

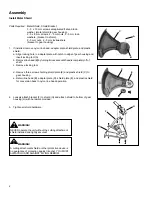
Install Metal Shield

Parts Required:

  Metal Shield, Shield Bracket, 


3 - 5  x 10 mm screws w/captivated flat and lock-   

washer, (metal shield to gear housing).


2 - 5 x 8 mm screws, 2 - 5 mm nuts, 2 - 5 mm lock-  

washers, (bracket to shield).


2 - 5 mm nuts, 2 - 5 mm lockwashers  

(bracket to gear housing)

1.   If installed, remove nylon line head, adapter plate, shield plate, and plastic 

shield: 


a. Align locking hole in  adapter plate with notch in edge of gear housing and  

  insert locking tool (A).


b.  Remove line head (B) by turning it clockwise until head is completely off of  

 shaft. 


c. Remove locking tool.   

A

B

C

C

G

F

H


d. Remove three screws holding shield plate (E) and plastic shield (C) to  

  gear housing. 


e. Retain line head (B), adapter plate (D), shield plate (E), and plastic shield  

  for conversion back to nylon line head operation. 

2.  Loosely attach bracket (F) to shield (G) and attach shield to bottom of gear 

housing (H) with hardware provided.  

3.  Tighten all shield hardware.

E

D

WARNING!

NEVER operate the unit without the cutting attachment 

shield installed and tightly secured!

WARNING!

A cutting attachment shield or other protective device is 

no guarantee of protection against ricochet. YOU MUST 

ALWAYS GUARD AGAINST FLYING DEBRIS!

Содержание BCK-11

Страница 1: ...Minimize the risk of injury to yourself and others Read the Owner s Opera tor s manual originally supplied with the unit that is being upgraded and familiarize yourself with the contents Always wear...

Страница 2: ...ace any safety rules and or laws that may be in force in your area If you have questions regarding your Shindaiwa power tool or if you do not understand something in these instructions your Shindaiwa...

Страница 3: ...new one and re check WARNING ALWAYS Shut off the engine immediately if a blade binds in a cut Push the branch or tree to ease the bind and free the blade Beware of a coasting blade when brushcutting...

Страница 4: ...turningitclockwiseuntilheadiscompletelyoffof shaft c Remove locking tool A B C C G F H d Remove three screws holding shield plate E and plastic shield C to gear housing e Retain line head B adapter pl...

Страница 5: ...m carburetor throttle swivel hole 3 Disconnect 2 ignition stop switch leads J 4 Unscrew throttle cable adjustment fixture K from carburetor bracket L I K L Remove Power Head 1 Loosen drive shaft clamp...

Страница 6: ...t tach with 5 mm x 12 mm screw Install Power Head 1 Slide outer drive shaft assembly into power head clamp and align power head with gear case 2 Secure drive shaft assembly with clamping bolt 1 Thread...

Страница 7: ...mm diameter pilot lower blade mounting plate 10 mm hex nut w L H thread 2 mm x 25 mm cotter pin blade w 25 mm arbor diameter 1 Install adapter plate X on splined PTO shaft pilot side down Blade insta...

Страница 8: ...p so the shoulder pad rests comfortably on the off side shoulder and the cutting path of the cutting attachment is parallel to the ground Tighten hanger screw balance and adjust unit 1 Loosen harness...

Страница 9: ...NSTANTLY ALERT FOR BLADE THRUST AND GUARD AGAINST ITS EFFECTS Handle Bar A brushcutter s handle bar helps prevent the operator from moving forward or the unit moving rearward thus preventing inadverte...

Страница 10: ...10 NOTES...

Страница 11: ...11 NOTES...

Страница 12: ...81 428 32 6145 Copyright 2010 By Echo Incorporated All Rights Reserved Consumer Product Support If you require assistance or have questions concerning the application operation or maintenance of this...

Отзывы: