7
IMPORTANT!
Discard blades that are bent, warped, cracked, broken or damaged in any
way.Use a sharp blade. A dull blade is more likely to snag and thrust.
The unit should now be completely assembled and ready for use with a
blade.
IMPORTANT!
Units with adjustable carburetors must be readjusted for blade use, otherwise
serious engine damage can occur.
WARNING!
A standard grass trimmer unit with loop handle should NEVER be operated with blade-type attachments. For blade use,
the trimmer must be fitted with a bicycle-type handlebar or barrier bar that is located in front of the operator to reduce the
risk of the operator coming in contact with the cutting attachment. (Per ANSI B175.3). When using a blade, the unit must
be equipped with a harness or strap.
Install Blade
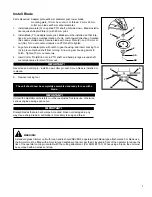
Parts Required: Adapter plate w/25 mm diameter pilot, lower blade
mounting plate, 10 mm hex nut w/L.H. thread, 2 mm x 25 mm
cotter pin, blade w/25 mm arbor diameter.
1. Install adapter plate (X) on splined PTO shaft, pilot side down. Blade installa-
tion requires Adapter Plate (X) with 25 mm pilot.
2. Install Blade (Y) on adapter plate pilot. Blades must be installed so that rota-
tion arrow on blade matches rotation of unit: teeth toward direction of rotation
(See debris shield decal). Secure blade with Lower Plate (Z), and 10 mm L.H.
nut (AA). Turn nut counter-clockwise on PTO shaft to tighten.
3. Align hole in adapter plate with notch in gear housing, and insert Locking Tool
(A) to prevent splined shaft from turning. Arrow on gear housing points to
notch. Tighten 10 mm nut securely.
4. Insert Cotter Pin (BB) in hole in PTO shaft, and bend pin legs around shaft
counterclockwise to retain 10 mm nut.
IMPORTANT!
Never reuse a cotter pin - install a new cotter pin each time a blade is installed or
replaced.
5. Remove locking tool.
X
25
A
Y
AA
BB
Z
X
Y
Z
AA
BB
A
Содержание BCK-11
Страница 10: ...10 NOTES...
Страница 11: ...11 NOTES...


