background image

6

F

F

F

F

GUIDE D’INSTALLATION ÉTAPE PAR ÉTAPE

POSITIONNEMENT DE LA PLAQUE DE  


MONTAGE

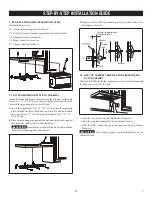
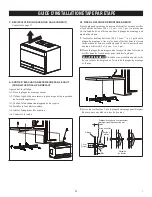
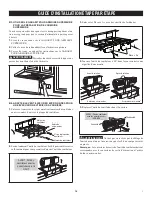
A. ENLEVER LE FOUR À MICRO-ONDES ET LA PLAQUE 

DE MONTAGE DE LA BOÎTE

1. 

Ouvrez la boîte et retirez la styromousse de protection supérieure 

de la boîte, mais conservez les accessoires.

2. 

Retirez le four de la boîte et enlevez le sac de plastique.

3. 

Retirez le support de montage de la styromousse de protection.

La styromousse supérieure

Four

Boîte

Sac de plastique

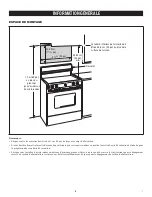
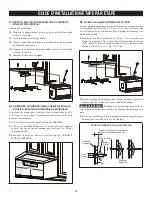
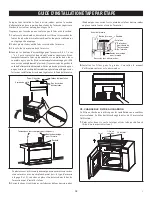
B.  TROUVER LES MONTANTS DE CLOISONS  

LE MICRO-ONDES DOIT ÊTRE INSTALLÉ SUR AU MOINS 

UN MONTANT DE CLOISON

1. 

Trouvez les montants de cloisons en utilisant l’une des méthodes 

suivantes : un détecteur de montant - appareil magnétique qui 

détecte les clous - ou utilisez un marteau pour frapper légèrement 

sur la surface de montage pour trouver un son plus solide. Ceci 

permet de trouver l’emplacement d’un montant de cloison.

Centre des 

montants de 

cloisons

Montants 

de cloisons

2. 

Après avoir localisé le(s) montant(s), trouvez le centre en pénétrant 

le mur avec un petit clou pour trouver les rebords du montant de 

cloison.

3. 

Placez ensuite une marque au milieu des rebords du montant. Le 

centre de tous les montants de cloisons adjacents devrait se trouver 

à 40,6 cm (16 po) ou 61 cm (24 po) de cette marque.

4. 

Tracez une ligne au centre des montants de cloisons. 

Содержание SMO1461GS

Страница 1: ...an electrical short circuit grounding reduces risk of electric shock by providing an escape wire for the electric current WARNING Improper use of the grounding plug can result in risk of electric shock The oven is equipped with a 3 prong grounding plug NEVER cut or remove the grounding pin from the plug The Power Supply Cord and plug must be connected to a separate 120 Volt AC 60 Hz 15 Amp or more...

Страница 2: ...enting performance with any vent hood IMPORTANT If a rectangular to round transition adapter is used the bottom corners of the damper will have to be cut to fit using the tin snips in order to allow free movement of the damper OUTSIDE REAR EXHAUST EXAMPLE ONLY The following chart describes an example of one possible ductwork installation DUCT PIECES EQUIVALENT LENGTH X NUMBER USED EQUIVALENT LENGT...

Страница 3: ...resis tance to air flow and are equivalent to a section of straight duct which is longer than their actual physical size When calculating the total length add the equivalent lengths of all transitions and adapters plus the length of all straight duct sections The chart on the right shows the approximate measurement of equivalent length of some typical ductwork parts Use the values in the chart for...

Страница 4: ...4 x 3 0 6 x 7 6 cm 2 Nylon Grommet for metal cabinets 1 Washer 2 Sheet Metal Screw 2 You will find the installation accessories contained in a packet with the unit Check to make sure you have all these parts Note Some extra parts are included TOOLS YOU WILL NEED 1 and 2 Phillips screwdrivers Pencil Ruler or tape measure straight edge Tin snips to cut damper if needed Scissors to cut template if ne...

Страница 5: ...top of the microwave Notes The space between the cabinets must be 24 61 cm wide and free of obstructions If you are going to vent your microwave oven to the outside see Hood Exhaust Section for exhaust duct preparation When installing the microwave oven beneath smooth flat cabinets be careful to follow the instruction for power cord clearance Make sure that you leave enough space for the power cor...

Страница 6: ...E WALL STUDS THE MICROWAVE MUST BE MOUNTED TO AT LEAST ONE WALL STUD 1 Find the wall studs using either a wall stud finder a magnetic device for locating nails or a hammer to tap lightly across the mounting surface to find a solid sound which indicates a wall stud location Wall studs Wall studs center 2 After locating the stud s find the center by probing the wall with a small nail to find the edg...

Страница 7: ... GUIDE C DETERMINE TOP LINE OF REAR WALL TEMPLATE LOCATION UNDER YOUR CABINET The bottom of the cabinet has three types BENEATH FLAT BOTTOM CABINET Front Rear TOP LINEOF REAR WALL TEMPLATE TOP LINE OF REAR WALL TEMPLATE At least 24 ...

Страница 8: ...8 E STEP BY STEP INSTALLATION GUIDE BENEATH FRAMED RECESSED CABINET TOP LINEOF REAR WALL TEMPLATE Front Rear TOP LINE OF REAR WALL TEMPLATE Must align with the back frame of cabinet bottom ...

Страница 9: ...9 E STEP BY STEP INSTALLATION GUIDE BENEATH FRAMED RECESS BOTTOM CABINET WITH FRONT OVERHANG TOP LINEOF REAR WALL TEMPLATE Front Rear TOP LINE OF REAR WALL TEMPLATE distance as the front overhang ...

Страница 10: ...he Rear Wall Template on the wall draw circles on the wall at hole A B C see illustration above actual plate marked with arrows THREE HOLES MUST BE USED FOR MOUNTING If there are 2 wall studs in right and left side based on center line four holes must be used for mounting 4 Remove the Rear Wall Template and check the marking based on the actual mounting plate center line holes A B C 5 Drill holes ...

Страница 11: ...6 x 3 0 5 x 7 6 cm At least one lag screw must be used to attach the mounting plate to a wall stud 1 Insert the toggle bolts 3 16 x 3 0 5 x 7 6 cm into the mounting plate through the holes designed to go into drywall and attach the wing nuts to 3 4 1 9 cm onto each toggle bolt 3 16 x 3 0 5 x 7 6 cm 2 Place the mounting plate against the wall and insert the wing nuts into the holes in the wall to m...

Страница 12: ...per alignment with your house exhaust duct after the microwave is installed A4 MOUNT THE MICROWAVE OVEN FOR EASIER INSTALLATION AND PERSONAL SAFETY WE RECOMMEND THAT TWO PEOPLE INSTALL THIS MICROWAVE OVEN IMPORTANT Do not grip or use handle during installation If filler blocks are not used outer case damage may occur from over tightening screws Note If your cabinet is metal use the nylon grommet ar...

Страница 13: ...ase filters See the Operation Manual packed with the microwave A5 ADJUST THE EXHAUST ADAPTER Open the top cabinet and adjust the exhaust adapter to connect to the house duct Damper Blower Plate Back of microwave For front to back or side to side adjustment slide the exhaust adapter as needed A6 CONNECT DUCTWORK 1 Extend the house duct down to connect to the exhaust adapter 2 Seal exhaust duct joint...

Страница 14: ... holes designed to go into drywall and attach the wing nuts to 3 4 1 9 cm onto each toggle bolt 3 16 x 3 0 5 x 7 6 cm 2 Place the mounting plate against the wall and insert the wing nuts into the holes in the wall to mount the plate CAUTION Be careful to avoid pinching fingers between the back of the mounting plate and the wall 3 Tighten all bolts Pull the mounting plate away from the wall to help ...

Страница 15: ...lower unit wiring Make sure the wires are not pinched Note The blower unit exhaust openings should match exhaust openings on rear of microwave oven 6 Replace the blower plate in the same position 7 Attach the exhaust adapter to the rear of the oven by sliding it into the guides at the top center of the back of the oven Push in securely until it is in the lower blower motor screw Take care to assur...

Страница 16: ...rowave oven to the top cabinet 4 Insert two cabinet mounting bolts 1 4 x 3 0 6 x 7 6 cm through outer top cabinet holes Temporarily secure the oven by turning the screw at least two full turns after the threads have engaged It will be completely tightened later Be sure to keep power cord tight Be careful not to pinch the cord especially when mounting flush to the bottom of cabinet Nylon grommet Met...

Страница 17: ...o 3 4 1 9 cm onto each toggle bolt 3 16 x 3 0 5 x 7 6 cm 2 Place the mounting plate against the wall and insert the wing nuts into the holes in the wall to mount the plate CAUTION Be careful to avoid pinching fingers between the back of the mounting plate and the wall 3 Tighten all bolts Pull the mounting plate away from the wall to help tighten the bolts 5 8 Wall Toggle Bolt Wing nut Bolt end Spac...

Страница 18: ... OVEN IMPORTANT Do not grip or use handle during installation If filler blocks are not used case damage may occur from over tightening screws Note If your cabinet is metal use the nylon grommet around the power cord hole to prevent cutting of the cord We recommend using filler blocks if the cabinet front hangs below the cabinet bottom shelf When mounting the microwave oven thread power cord through ...

Страница 19: ...recess Cabinet bottom Filler block Cabinet mounting bolt Microwave oven top Washer 6 Install grease filters See the Operation Manual included with the microwave C5 CHANGE THE CHARCOAL FILTER The charcoal filter is used for nonvented recirculated installation The filter should be changed every 6 to 12 months depending on use 1 Remove two screws of the louver on the top of the oven by using a 1 Phill...

Страница 20: ...20 E SHARP ELECTRONICS CORPORATION 100 Paragon Drive Montvale New Jersey 07645 USA SHARP ELECTRONICS OF CANADA LTD 335 Britannia Road East Mississauga Ontario L4Z 1W9 Canada ...

Страница 21: ... la mise à la terre permet de réduire le risque de décharge électrique en procurant un fil conducteur pour le courant électrique AVERTISSEMENT Une utilisation inappropriée de la prise de mise à la terre peut entraîner un risque de décharge électrique Le four est équipé d une fiche à trois broches avec mise à la terre EN AUCUN CAS VOUS NE DEVRIEZ PAS COUPER OU RETIRER LA BROCHE DE MISE À LA TERRE D...

Страница 22: ...importe quelle hotte d évacuation IMPORTANT Si vous utilisez un adaptateur de transition rectangle à rond les coins inférieurs du registre devront être coupés pour l installer en utilisant des cisailles de ferblantier de manière à permettre le mouvement du registre SORTIE D ÉVACUATION EXTÉRIEURE ARRIÈRE EXEMPLE UNIQUEMENT Le tableau suivant décrit un exemple d une installation possible des conduit...

Страница 23: ...sistance supplémentaire pour la circulation d air et ils sont équivalents à une section de conduit droit plus longue que leur taille physique réelle Lorsque vous calculez la longueur totale ajoutez les longueurs équivalentes de tous les transitions et adaptateurs en plus de la longueur de toutes les sections de conduits droits Le tableau à droite indique la longueur approximative en m pi de la lon...

Страница 24: ...n pour les armoires de métal 1 Rondelle 2 Vis à tôle 2 Vous trouverez les accessoires d installation dans un emballage avec l unité Vérifiez que vous avez toutes ces pièces en main Remarque Certaines pièces supplémentaires sont incluses OUTILS DONT VOUS AUREZ BESOIN Tournevis étoile no 1 et no 2 Crayon Ruban à mesurer ou règle Des cisailles de ferblantier pour couper le registre au besoin Ciseau p...

Страница 25: ...sseret 43 49 cm 171 8 po 83 82 cm 33 po min 61 cm 24 po Remarques L espace entre les armoires doit être de 61 cm 24 po de large et exempt d obstruction Si vous décidez de mettre la sortie d évacuation extérieure pour votre micro ondes consultez la section Sortie d évacuation de la hotte pour la préparation des conduits d évacuation Lorsque vous installez le micro ondes en dessous d armoires planes...

Страница 26: ...SON 1 Trouvez les montants de cloisons en utilisant l une des méthodes suivantes un détecteur de montant appareil magnétique qui détecte les clous ou utilisez un marteau pour frapper légèrement sur la surface de montage pour trouver un son plus solide Ceci permet de trouver l emplacement d un montant de cloison Centre des montants de cloisons Montants de cloisons 2 Après avoir localisé le s montan...

Страница 27: ...RE Le bas de l armoire est présenté de trois façons EN DESSOUS DU BAS PLAT DE L ARMOIRE Front Rear TOP LINEOF REAR WALL TEMPLATE TOP LINE OF REAR WALL TEMPLATE At least 24 LIGNE SUPÉRIEURE DU GABARIT MURAL ARRIÈRE Doit être alignée avec le bas de l armoire Arrière Avant Au moins 61 cm 24 po LIGNE SUPÉRIEURE DU GABARIT MURAL ARRIÈRE ...

Страница 28: ...nt Rear TOP LINE OF REAR WALL TEMPLATE Must align with the back frame of cabinet bottom LIGNE SUPÉRIEURE DU GABARIT MURAL ARRIÈRE Doit être alignée avec le cadre arrière du bas de l armoire Arrière Avant LIGNE SUPÉRIEURE DU GABARIT MURAL ARRIÈRE GUIDE D INSTALLATION ÉTAPE PAR ÉTAPE ...

Страница 29: ...e as the front overhang En dessous du bas de l armoire à la même distance que le surplomb avant du bas de l armoire Arrière Avant LIGNE SUPÉRIEURE DU GABARIT MURAL ARRIÈRE LIGNE SUPÉRIEURE DU GABARIT MURAL ARRIÈRE Doit être aligné avec le bas de l armoire à la même distance que le surplomb avant du bas de l armoire 9 F GUIDE D INSTALLATION ÉTAPE PAR ÉTAPE ...

Страница 30: ...it et l autre du côté gauche à partir de la ligne centrale quatre trous doivent être utilisés pour l installation 4 Enlevez le gabarit mural arrière et vérifiez les marques avec la plaque de montage réel ligne centrale trous A B C 5 Percez des trous sur les cercles marqués A B C Percez un trou 4 7 mm 3 16 po au trou C pour une vis tire fond et deux trous 15 88 mm 5 8 po A et B pour des boulons à a...

Страница 31: ...r la plaque de montage à un montant de cloison 1 Insérez les boulons à ailettes 0 5 x 7 6 cm 3 16 x 3 po dans la plaque de montage à travers les trous effectués dans la cloison sèche et fixez les écrous à oreilles jusqu à 1 9 cm 3 4 po sur chaque boulon à ailettes 0 5 x 7 6 cm 3 16 x 3 po 2 Placez la plaque de montage contre le mur et insérez les écrous à oreilles dans les trous du mur pour instal...

Страница 32: ...ntilateur 5 Vous devrez faire un ajustement pour assurer un alignement adéquat avec la gaine de votre conduit d évacuation une fois le micro ondes installé A4 INSTALLER LE FOUR À MICRO ONDES POUR FACILITER L INSTALLATION ET POUR LA SÉCURITÉ PERSONNELLE NOUS RECOMMANDONS D ÊTRE DEUX PERSONNES POUR INSTALLER CE FOUR À MICRO ONDES IMPORTANT Ne vous agrippez pas ou n utilisez pas la poignée pendant l ...

Страница 33: ...abinet bottom Filler block Cabinet mounting bolt Microwave oven top Washer Avant de l armoire Bas de l armoire Rondelle Entretoise Profondeur équivalente de l enfoncement de l armoire Boulon de montage pour l armoire Dessus du four à micro ondes 6 Installez les filtres pour la graisse Consultez le manuel d utilisation livré avec le micro ondes A5 AJUSTER L ADAPTATEUR D ÉVACUATION Ouvrez l armoire ...

Страница 34: ...IÈRE B2 FIXER LA PLAQUE DE MONTAGE AU MUR Fixez la plaque de montage au mur en utilisant les écrous à oreilles et les boulons à ailettes 0 5 x 7 6 cm 3 16 x 3 po Au moins une vis tire fond doit être utilisé pour fixer la plaque de montage à un montant de cloison 1 Insérez les boulons à ailettes 0 5 x 7 6 cm 3 16 x 3 po dans la plaque de montage à travers les trous effectués dans la cloison sèche e...

Страница 35: ...du micro ondes Vis de la plaque du ventilateur Moteur du ventilateur 2 Sortez lentement l unité du ventilateur Les fils pourront être sortis suffisamment pour vous permettre d ajuster l unité du ventilateur BEFORE Fan blade openings facing UP AVANT Pale du ventilateur avec les ouvertures vers le HAUT 3 Enlevez les Pièces A avec des cisailles de ferblantier Part A Pièce A 4 Tournez l unité du venti...

Страница 36: ...ez pas la poignée pendant l installation Si aucune entretoise n est utilisée l extérieur du boîtier de l appareil peut être endommagé en vissant les vis trop serrées Remarque Si votre armoire est en métal utilisez le passe fil de nylon autour du cordon d alimentation pour empêcher le cordon de se sectionner Nous recommandons l utilisation d entretoises si l avant de l armoire est suspendu sous la ...

Страница 37: ...aisse Consultez le manuel d utilisation livré avec le micro ondes C RECIRCULATION NON VENTILÉ SANS CONDUIT Aperçu de l installation C1 Fixer la plaque de montage au mur C2 Utiliser le gabarit pour armoire supérieure pour la préparation de l armoire supérieure C3 Adapter le ventilateur pour la recirculation C4 Installer le four à micro ondes C5 Changer le filtre au charbon C1 FIXER LA PLAQUE DE MON...

Страница 38: ...fils pourront être sortis suffisamment pour vous permettre d ajuster l unité du ventilateur BEFORE Fan blade openings facing UP AVANT Pale du ventilateur avec les ouvertures vers le HAUT 3 Tournez l unité du ventilateur à 90 Before rotation After rotation Back of microwave Back of microwave Avant la rotation Après la rotation Arrière du micro ondes Arrière du micro ondes 4 Replacez l unité du vent...

Страница 39: ...n d alimentation Trou du cordon d alimentation Turn two full turns on each screw Cabinet mounting bolt Washer Tournez deux tours complets pour chaque vis Rondelle Boulon de montage pour l armoire L entretoise est utilisée uniquement pour une armoire encastrée et une armoire avec un surplomb avant voir le type d armoire à la page 8 et 9 vous devez placer l entretoise dans le bas de l armoire avant ...

Страница 40: ...et enlevez le volet et sortez l ancien filtre au charbon Charcoal Filter Filtre au charbon GUIDE D INSTALLATION ÉTAPE PAR ÉTAPE 3 Installez le nouveau filtre au charbon Lorsque correctement installé le grillage métallique du filtre doit être visible à l avant 4 Replacez le volet et les vis TINSKB315MRR0 Oct 18 2021 ...

Отзывы: