24
PRINTER
BASIC PRINTING PROCEDURE
The following example explains how to print a document from "WordPad", which is a standard accessory program in
Windows.
1
Select [Print] from the [File] menu of
WordPad.
2
Open the printer driver properties
window.
3
Select print settings.
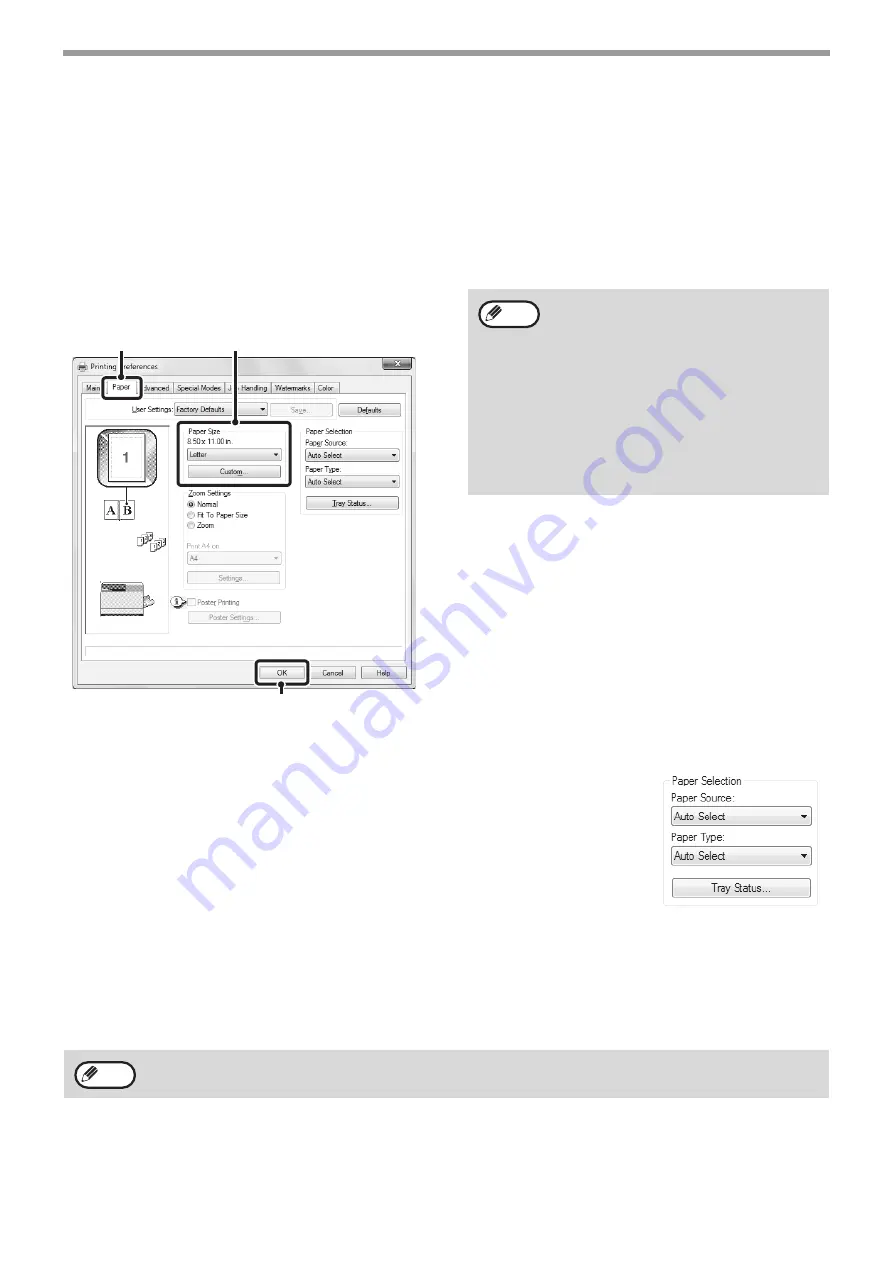
(1) Click the [Paper] tab.
(2) Select the paper size.
To select settings on other tabs, click the desired tab
and then select the settings.
(3) Click the [OK] button.
4
Click the [Print] button.
Printing begins.
SELECTING THE PAPER
This section explains how to configure the "Paper Selection" setting on the [Paper] tab
of the printer driver properties window.
Before printing, check the paper sizes, paper types, and paper remaining in the
machine's trays. To view the most recent tray information, click the [Tray Status] button.
• When [Auto Select] is selected in "Paper Source"
The tray that has the size and type of paper selected in "Paper Size" and "Paper
Type" on the [Paper] tab is automatically selected.
• When other than [Auto Select] is selected in "Paper Source"
The specified tray is used for printing regardless of the "Paper Size" setting.
• When [Bypass Tray] is selected
The "Paper Type" must also be selected. Check the bypass tray and make sure that the desired type of paper is
loaded, and then select the appropriate "Paper Type" setting.
• When [Auto Select] is selected in "Paper Type"
A tray with plain paper of the size specified in "Paper Size" is automatically selected.
• When other than [Auto Select] is selected in "Paper Type"
A tray with the specified type of paper and the size specified in "Paper Size" is used for printing.
(1)
(2)
(3)
• Make sure the paper size is the same as
the paper size set in the software
application.
• Up to eight custom paper sizes can be
stored. Storing a custom paper size
makes it easy to specify that size each
time you need to use it.
To store a paper size, select [Custom
Paper] or one of [User1] to [User7] from
the pull-down menu and click the
[Custom] button.
Note
Special media such as envelopes can also be placed in the bypass tray. For the procedure for loading paper and
other media in the bypass tray, see "Loading the bypass tray" (P.17) .
Note
Содержание MX-C300P
Страница 1: ...MODEL MX C300P MX C300PL DIGITAL FULL COLOR PRINTER OPERATION GUIDE ...
Страница 108: ...OPERATION GUIDE MXC300P US1 ...


