


3-60
E-MAIL PRINT
An e-mail account can be configured in the machine to have the machine periodically check your mail server and
automatically print received e-mail attachments without using the printer driver.
•
Configuring settings
To use E-mail Print, you must first configure an e-mail account in the machine. To configure an account, click
[Application Settings] and then [E-mail Print Settings] in the Web page menu. (Administrator rights are required.) For
the procedure for accessing the Web pages, see the Quick Start Guide.
•
Using E-mail Print
To print a file using E-mail Print, use your e-mail program on your computer to send the file as an attachment to the
machine's e-mail address.
Control commands can be entered in the message of the e-mail to specify the number of copies and print format.
Commands are entered in the format "command name = value".
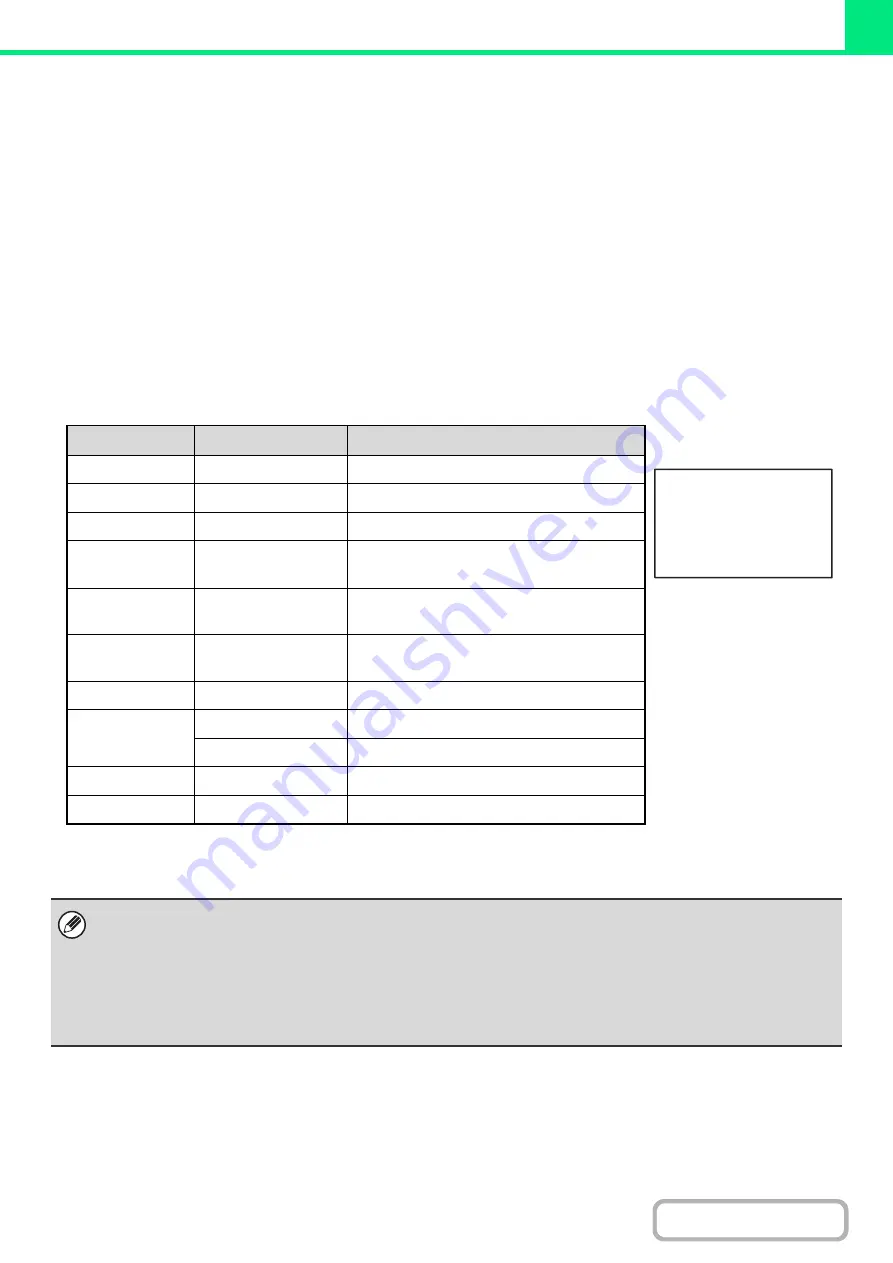
As an example, the control commands include the following:
*1 Only effective when a finisher is installed.
*2 Can be omitted except when authentication is by user number.
Function
Command name
Values
Example
Copies
COPIES
1-999
Staples*
1
STAPLEOPTION
NONE, ONE
Output
COLLATE
OFF, ON
2-sided print
DUPLEX
OFF, TOP, LEFT, RIGHT
Account
number*
2
ACCOUNTNUMBER
Number (5 to 8 digits)
File type
LANGUAGE
PCL, PCLXL, POSTSCRIPT, PDF, TIFF,
JPG, XPS
Paper
PAPER
Name of available paper (A4, LETTER, etc.)
Document Filing
FILE
OFF, ON
FOLDERNAME
Maximum of 28 characters
Quick File
QUICKFILE
OFF, ON
Fit to page
FITIMAGETOPAGE
OFF, ON
• Enter the commands in Plain Text format. If entered in Rich Text format (HTML), the commands will have no effect.
• To receive a list of the control commands, enter the command "Config" in the e-mail message.
• If nothing is entered in the body text (message) of the e-mail, printing will take place according to the "Printer Default
Settings" in the system settings. If you printed a file (PCL, PS, or XPS) that includes print settings, the settings will be
applied.
• Only enter a "File type" when you are specifying a page-description language. Normally there is no need to enter a file
type.
COPIES=2
DUPLEX=LEFT
ACCOUNTNUMBER=11111
PAPER=A4
Содержание MX-B381
Страница 4: ...Reduce copy mistakes Print one set of copies for proofing ...
Страница 6: ...Make a copy on this type of paper Envelopes and other special media Transparency film ...
Страница 8: ...Assemble output into a pamphlet Create a pamphlet Staple output Create a blank margin for punching ...
Страница 11: ...Conserve Print on both sides of the paper Print multiple pages on one side of the paper ...
Страница 34: ...Search for a file abc Search for a file using a keyword Search by checking the contents of files ...
Страница 35: ...Organize my files Delete a file Delete all files Periodically delete files Change the folder ...
Страница 202: ...3 18 PRINTER Contents 4 Click the Print button Printing begins ...
Страница 208: ...3 24 PRINTER Contents 1 Select Printer Features 2 Select Advanced 3 Select the Print Mode Macintosh 1 2 3 ...
Страница 682: ...MXB381 GB Z1 Operation Guide MX B381 MODEL ...


