background image

13

Menu operations

Black

For easier viewing, change the viewing depth by
selecting a level for automatically adjusting the dark
portion of an image.

3D-Y/C

Provide high quality images with minimal dot crawl and
cross colour noise by detecting changes in the image.

Off: 

No detecting

Standard:

 Normal adjustment

Fast:

 Set the optimum image quality for fast-moving

images.

Slow:

 Set the optimum image quality for slow-moving

images.

NOTE

• 3D-Y/C may not operate depending on the input signal

type or noisy input signal.

• 3D-Y/C has even more effect on composite video signals

(CVBS).

Monochrome

For viewing a video in monochrome.

Film Mode

Automatically detect a film-based source (originally
encoded at 24/25 frames/second, depending on the
vertical frequency), analyses it then recreates each
still film frame for high-definition picture quality.

I/P Setting

Adjust the image and input signal can give you a more
beautiful picture.

Interlace:

 Display finely detailed images for TV or video,

etc.

Progressive:

 Display smooth images for still images or

graphics, etc.

Audio menu

Audio adjustments

Menu Operation: B (page 11)

You can adjust the sound quality to your preference
with the following settings.
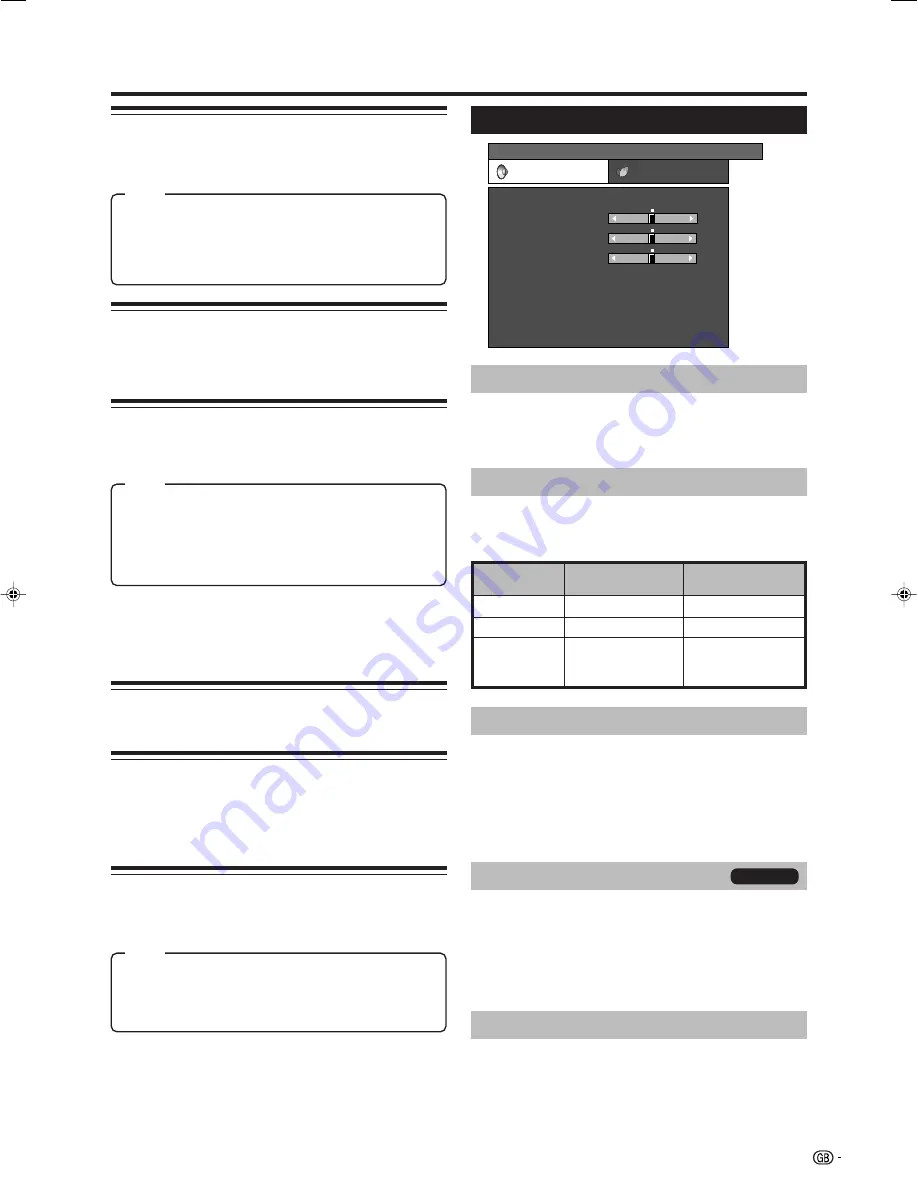
MENU    

[Audio]

Audio

Power Control

Treble

Bass

Balance

Surround

Reset

[Off]

Auto Vol.

[Off]

Clear Voice

[Off]

[0]

[0]

–15

L

+15

[0]

–15

+15

R

AV Mode

[STANDARD]

Surround

Menu Operation: A (page 11)

Surround function allows you to enjoy realistic “live”
sound.

NOTE

• You can also choose surround effects by pressing

SURROUND

 on the remote control unit.

AV Mode

Menu Operation: A (page 11)

This option links to AV Mode in the Picture menu. (See
page 12.)

Colour Temp.

Adjust the colour temperature to give the best white
image.

High:

 White with bluish tone

Mid-High:

 Intermediate tone between High and Middle

Middle:

 Natural tone

Mid-Low:

 Intermediate tone between Middle and Low

Low:

 White with reddish tone

Auto Vol.

Menu Operation: A (page 11)

Different sound sources, fairly often do not have the
same volume level, for example the changing from
movie to the advertisements. The Automatic Volume
Control (Auto Vol.) solves this problem and equalises
the volume levels.

Clear Voice

Menu Operation: A (page 11)

This function emphasises speech voice against the
background noise for more intelligibility. It is not
recommended for music sources.

TV/AV only

NOTE

• The I/P Setting is set to “Progressive” when Film Mode is

“On”.

Item

Item

Selectable
items

c

 button

d

 button

Treble

For weaker treble

For stronger treble

Bass

For weaker bass

For stronger bass

Balance

Decrease audio
from the right
speaker

Decrease audio
from the left
speaker

Item

LC-32SA1E_GB_b

06.7.25, 11:35 AM

13

Содержание LC-26SA1E

Страница 1: ...D OPERATION MANUAL BEDIENUNGSANLEITUNG MODE D EMPLOI MANUALE DI ISTRUZIONI GEBRUIKSAANWIJZING MANUAL DE MANEJO LC 26SA1E LC 26SV1E LC 32SA1E LC 32SV1E OPERATION MANUAL BEDIENUNGSANLEITUNG MODE D EMPLOI MANUALE DI ISTRUZIONI GEBRUIKSAANWIJZING MANUAL DE MANEJO LC 26SA1E LC 26SV1E LC 32SA1E LC 32SV1E C612WJZZ 1 ENGLISH FRANÇAIS DEUTSCH ITALIANO NEDERLANDS ESPAÑOL ...

Страница 2: ...a serious electric shock may occur To fit an appropriate plug to the mains lead follow the instructions below IMPORTANT The wires in the mains lead are coloured in accordance with the following code Blue Neutral Brown Live As the colours of the wires in the mains lead of this product may not correspond with the coloured markings identifying the terminals in your plug proceed as follows The wire wh...

Страница 3: ... Broadcasting system 15 Label 15 Skip 15 Decoder 15 Lock 15 Sort 15 Erase Programme 15 Child Lock 16 Input Label 16 Fine Sync 16 Position 17 WSS Wide Screen Signalling 17 4 3 Mode 17 Language 17 Option menu 17 Audio Only 17 DNR Digital Noise Reduction 18 HDMI Setup 18 Input Select 18 Colour System 18 Demo 18 Useful features 19 WIDE MODE 19 Still image 20 Teletext function 20 Appendix 21 Troublesho...

Страница 4: ... This product is not designed for built in installation do not place the product in an enclosed place such as a bookcase or rack unless proper ventilation is provided or the manufacturer s instructions are followed The LCD panel used in this product is made of glass Therefore it can break when the product is dropped or impact applied If the LCD panel is broken be careful not to be injured by broke...

Страница 5: ...69 2 75 ohm coaxial cable Setting the TV on the wall This TV should be mounted on the wall only with the wall mount bracket available from SHARP See page 23 The use of other wall mount brackets may result in an unstable installation and may cause serious injuries Installing the LCD Colour TV requires special skill that should only be performed by qualified service personnel Customers should not at...

Страница 6: ...ing to the e and f indications in the battery compartment 3 Insert the smaller tab of the battery cover into the opening 1 and press down on the cover until it clicks in place 2 Inserting the batteries Before using the TV for the first time insert two AA size batteries supplied When the batteries become depleted and the remote control unit fails to operate replace the batteries with new AA size ba...

Страница 7: ...SURROUND Switch the surround effects on and off 1 Subpage See page 20 SLEEP Set the sleep timer on in units of 30 min up to max 2 hr 30 min and off k Reveal hidden Teletext See page 20 p Display information See page 20 RETURN Return to the previous menu screen e Mute Switch the sound on and off b INPUT SOURCE Select an input source TV EXT1 EXT2 EXT3 EXT4 EXT5 See page 8 f WIDE MODE Select the wide...

Страница 8: ...or OPC indicator a Power button b Input button i l k Volume buttons P s r Programme channel buttons SLEEP indicator EXT 2 RGB terminal EXT 3 terminals Headphone jack EXT 1 RGB terminal EXT 5 HDMI AUDIO terminals Antenna input terminal OUTPUT Audio terminals EXT 4 terminals RS 232C terminal For LC 26SA1E LC 26SV1E ...

Страница 9: ...the auto search NOTE The initial auto installation functions only once If the initial auto installation is not completed ex When menu screen disappeared by not operating for a few minutes when the power shut down etc try Auto Installation from the Setup menu See page 14 The initial auto installation stops by pressing RETURN Standby mode Press B on the remote control unit The TV enters standby mode...

Страница 10: ...er Supplied VCR Decoder SCART cable SCART cable EXT 1 or 2 VIDEO S VIDEO L AUDIO R AV OUTPUT Connecting a DVD player You can use the EXT 2 3 4 or 5 HDMI terminals when connecting to a DVD player and other audiovisual equipment DVD player AUDIO cable EXT 3 Composite video cable DVD player HDMI cable When using an HDMI DVI conversion adapter cable input the Audio signal here EXT 5 or DVD player S vi...

Страница 11: ...he EXT 2 terminal NOTE Refer to operation manuals of each external equipment for the details Only works when the audiovisual equipment is connected to the EXT 2 terminal on the TV with AV Link via a fully wired SCART The use of the AV Link function is only possible if the TV set has enforced a complete auto installation with the connected audiovisual equipment page 7 Initial auto installation The ...

Страница 12: ...for various reasons NOTE Menu options differ in the selected input modes but the operating procedures are the same The screens in the operation manual are for explanation purposes some are enlarged others cropped and may vary slightly from the actual screens Menu operation buttons Use the following buttons on the remote control unit to operate the menu MENU Press to open or close the menu screen a...

Страница 13: ... 1 Press MENU and the MENU screen displays 2 Press c d to select the desired menu 3 Press a b to select the desired menu item and then press OK Example AV Mode OPC etc Select Reset to reset all adjustment items to the factory preset values 4 Press a b c d to select the desired item and then press OK Menu operations Common operations Menu Operation A Menu Operation C 1 Press MENU and the MENU scree...

Страница 14: ...ing high contrast for sports viewing AV Mode Menu Operation A page 11 AV Mode gives you five viewing options to choose from to best match the system environment which can vary due to factors like room brightness type of programme watched or the type of image input from external equipment Advanced Menu Operation C page 11 This TV provides various advanced functions for optimising the picture qualit...

Страница 15: ...ENU Audio Audio Power Control Treble Bass Balance Surround Reset Off Auto Vol Off Clear Voice Off 0 0 15 L 15 0 15 15 R AV Mode STANDARD Surround Menu Operation A page 11 Surround function allows you to enjoy realistic live sound NOTE You can also choose surround effects by pressing SURROUND on the remote control unit AV Mode Menu Operation A page 11 This option links to AV Mode in the Picture men...

Страница 16: ... Press a b to select Auto Search Manual Adjust Sort or Erase Programme and then press OK Auto Search Manual Adjust Sort Erase Programme No Yes Power Control menu No Signal Off Menu Operation A page 11 When set to Enable the TV will automatically enter the standby mode if there is no signal input for 15 minutes Five minutes before the TV enters standby mode the remaining time displays every minute ...

Страница 17: ...tching the image from the TV Decoder When connecting a decoder to the unit you need to select EXT1 NOTE Off is factory preset value Lock You can block the viewing of any channel NOTE See page 16 for setting PIN When Lock is set to On for a channel Child lock has been activated displays and the image and sound of the channel are blocked When pressing OK while Child lock has been activated displays ...

Страница 18: ...t reach See page 21 for resetting the current PIN to the factory preset 1234 if you lose or forget your PIN Menu operations Input Label You can assign each input source a label you like 1 Press b to select the desired input source 2 Press MENU and the MENU screen displays 3 Press c d to select Setup 4 Press a b to select Input Label and then press OK 5 Press a b c d to select each character of the...

Страница 19: ...lish Finnish French German Greek Italian Polish Portuguese Russian Spanish Swedish Turkish NOTE HDMI Setup is displayed only when EXT5 is selected from the INPUT SOURCE menu Off Both screen images and audio are output On Audio is output without screen image TV AV only Item Item WSS Wide Screen Signalling Menu Operation A Page 11 WSS allows a television to switch automatically among the different s...

Страница 20: ...age on the screen AUTO PAL SECAM NTSC3 58 NTSC4 43 PAL 60 NOTE Factory preset value is AUTO If AUTO is selected colour system for each channel is automatically set If an image does not display clearly select another colour system e g PAL SECAM NTSC3 58 NTSC4 43 and PAL 60 cannot be selected in TV tuner mode Input Select Menu Operation A page 11 For setting the signal type of external equipment NOT...

Страница 21: ...Selectable picture size may vary with input signal type EXAMPLE Normal Keeps the original aspect ratio in a full screen display Full An image fully fills the screen Normal Full TV AV only PC only 4 3 Mode set to Normal NOTE If the signal contains no WSS information Auto Selection will not function even when the WSS option is enabled 4 3 Mode set to Panorama Manual Selection 1 Press f The WIDE MODE...

Страница 22: ...hen you change the TV channel you can display the time information with steps 2 and 3 above NOTE The time display cannot be stored once the power is turned off When you turn on the power perform steps 1 to 4 again If acquired successfully the time information will appear in the upper right corner of the screen by pressing MENU Still image You can freeze a motion picture on the screen 1 Press 3 2 P...

Страница 23: ...put source selected See page 8 Is non compatible signal being input See page 23 Is picture adjustment correct See pages 12 and 13 Is the antenna connected properly See page 3 Is On selected in Audio Only See page 17 Is the volume too low See pages 5 and 6 Make sure that headphones are not connected See page 6 Check if you pressed e on the remote control unit See page 5 Troubleshooting Appendix IMP...

Страница 24: ...rmal response O K Stop bit 1 bit Flow control None Problem response communication error or incorrect command E R R Commands Return code 0DH Return code 0DH P I I I I D D C C I I I I I I I I I I I I I A A A A A A A V V H H V V C C P P W W W W W W W W W W M M M M A A A A A O O O O O O O T T T D D POWER OFF INPUT SWITCHING Toggle TV CHANNEL FIXED EXT1 5 1 5 1 to 5 ERR TV TV DIRECT CHANNEL 1 99 1 to 9...

Страница 25: ...x 26o LCD COLOUR TV Model LC 26SA1E LC 26SV1E 26o Advanced Super View BLACK TFT LCD 32o LCD COLOUR TV Model LC 32SA1E LC 32SV1E 32o Advanced Super View BLACK TFT LCD 13 0 kg Display only 15 2 kg Display with stand 17 9 kg Display only 20 1 kg Display with stand 102 W 0 9 W Standby Method IEC60107 125 W 0 9 W Standby Method IEC60107 OUTPUT RCA pin Audio Headphones Ø 3 5 mm jack Audio output EXT 1 S...

Страница 26: ...ich could otherwise arise due to inappropriate waste handling 2 In other Countries outside the EU If you wish to discard this product please contact your local authorities and ask for the correct method of disposal For Switzerland Used electrical or electronic equipment can be returned free of charge to the dealer even if you don t purchase a new product Further collection facilities are listed on...

Страница 27: ...577 0 560 0 636 0 560 0 636 0 325 3 394 6 325 3 394 6 200 0 200 0 115 0 115 0 100 0 100 0 100 0 100 0 522 2 522 2 59 0 59 0 200 0 200 0 75 5 75 5 194 3 194 3 LC 26SA1E LC 26SV1E LC 32SA1E LC 32SV1E LC 26SA1E LC 26SV1E LC 32SA1E LC 32SV1E LC 26SA1E LC 26SV1E LC 32SA1E LC 32SV1E LC 26SA1E LC 26SV1E LC 32SA1E LC 32SV1E ...

Страница 28: ...n Hungría TINS C612WJZZ OPERATION MANUAL BEDIENUNGSANLEITUNG MODE D EMPLOI MANUALE DI ISTRUZIONI GEBRUIKSAANWIJZING MANUAL DE MANEJO C612WJZZ 1 06P08 HU NG PIN Printed on environmentally friendly paper Auf ökologischem Papier gedruckt Imprimé sur papier écologique Stampato su carta ecologica Afgedrukt op ecologisch papier Impreso en papel ecológico ...

Отзывы: