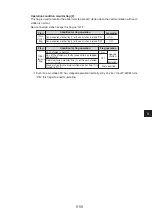
9
·
70
9
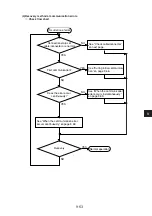
Start
Turn “OFF” the PC power
Remove the cables from the JW-20CM
Remove the JW-20CM from the rack panel
Set the switches of the new JW-20CM
Install the new JW-20CM
Connect the cables to the new JW-20CM
Turn “ON” the PC power
Load the parameters.
End
(5) Module replacement procedure
When you want to change the JW-20CM due to an operation fault (lighting FT lamp) etc., follow the
procedures below.
Make sure to store the set parameters onto a floppy diskette using a support tools.
(See the next page)
Operation procedure
Loosen one retention screw and
take out from the rack panel.
(See chapter 9·19)
Load the parameters stored in the
floppy diskette into the new JW-20CM
and write in the EEPROM, then start
operation. For details, see chapter 11.


