background image

- 14 -

EN

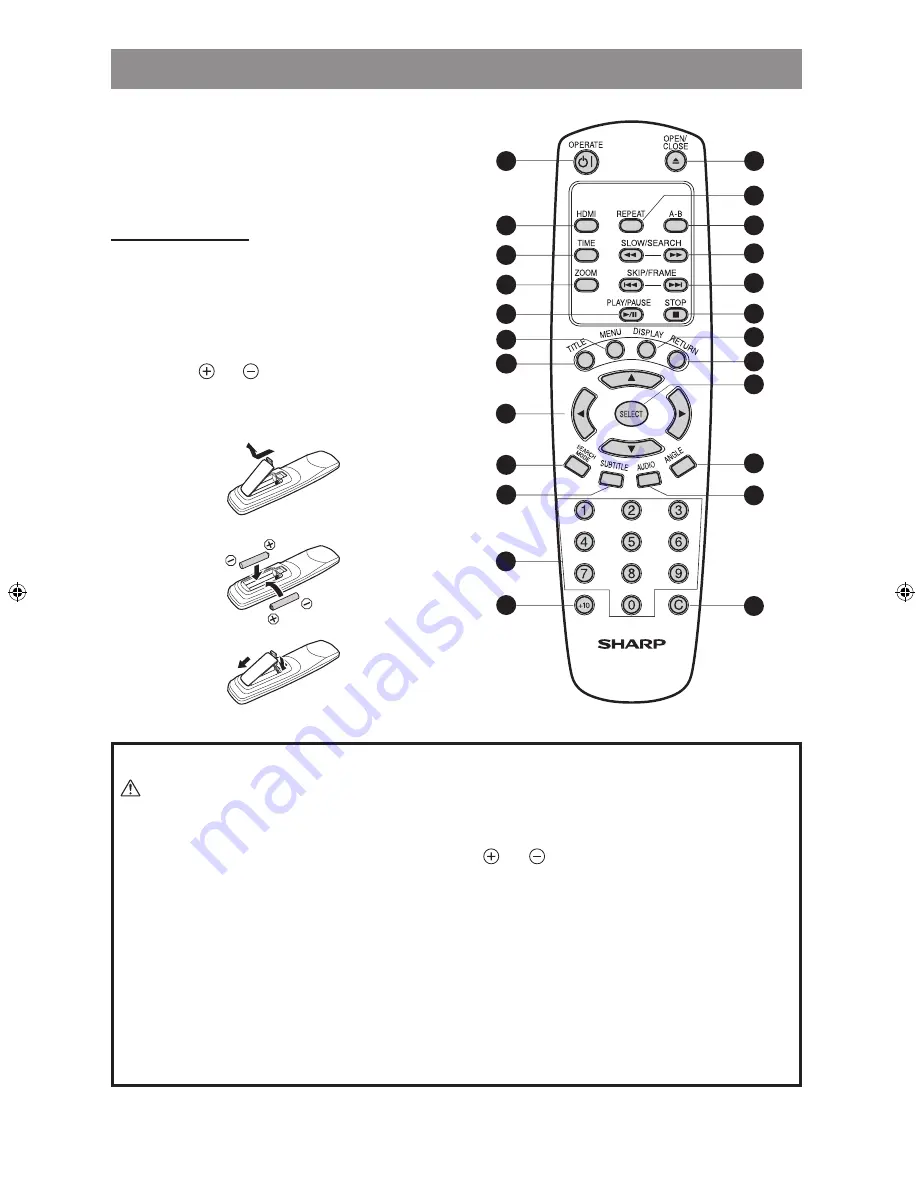
REMOTE CONTROL

When using the remote control, point it towards the front 

of the player. If the remote control does not work or the 

chosen function cannot be selected, the batteries are most 

probably exhausted and they should be replaced as soon 

as possible.

Inserting the Batteries

The batteries (two R-03 batteries (“AAA” size, UM/SUM-4, 

HP-16 or similar)) are included in the package.
1  Pull down the tab on the cover and remove the cover 

towards the direction of the arrow.

2  Insert the included batteries. 


Insert the batteries making sure the polarities correctly 

match the   and   marks inside the battery compart-

ment.

3  Insert the lower tab of the cover into the opening, and lower 

the cover until it clicks in place.

1

2
3
4
5
6
7

9

10

11

12

13

14

16
17

18
19
20
21

22

23

15

24

8

Incorrect use of the batteries may cause them to leak or explode. Please follow the precautions below.


Caution

 Danger of explosion if battery is incorrectly replaced.

Replace only with the same or equivalent type.

 Insert the batteries making sure the polarities correctly match   and   marks inside the battery compartment.

 Batteries of different types have different properties, therefore do not mix batteries of different types.

 Do not mix new and old batteries.

This may shorten the life of new batteries or may cause old batteries to leak.

 Remove the batteries from the remote control once they have run out, as leaving them can cause them to leak.

Battery fluid from leaked batteries is harmful to your skin, therefore ensure that you first wipe them and then remove 

them using a cloth.

 The batteries included with the player may exhaust over a short period, depending on how they are kept.

Be sure to replace them as soon as possible with new batteries.

 Remove the batteries from the remote control if you do not use the remote control for a long time.

 Comply with the rules (ordinance) of each local government when disposing of worn-out batteries.

DV-SV97H_ EN.indd   14

2/27/2006   3:24:25 PM

Содержание DV-SV97H

Страница 1: ...s Operation Manual carefully before using your DVD Video Player 2 If you require any advice or assistance regarding your Sharp product please visit our web site www sharp co uk customersupport Customers without Internet access may telephone 08705 274277 during office hours or 01 6760648 if telephoning from Ireland ...

Страница 2: ...serious electric shock may occur To fit an appropriate plug to the mains lead follow the instructions below IMPORTANT The wires in the mains lead are coloured in accordance with the following code Blue Neutral Brown Live As the colours of the wires in the mains lead of this product may not correspond with the coloured markings identifying the terminals in your plug proceed as follows The wire which...

Страница 3: ...S ONLY Laser Diode Properties Material GaAs Wavelength DVD 650 nm CD 790 nm Emission duration Continuous Laser output Max 0 4 mW Power Cord Protection To avoid any malfunctions of the player and to protect against electric shock fire or personal injury please observe the fol lowing Hold the plug firmly when connecting or disconnecting the AC power cord Keep the AC power cord away from heating applia...

Страница 4: ...sed SHARP supplier for details Do not attempt to clean the pickup lens yourself Location and Handling Do not cover or place the player in enclosed spaces to prevent excessive temperature build up Do not place the player in direct sunlight or near heat sources Keep the player away from strong magnetic objects Do not place any object containing water or other liquids on the player In the event that ...

Страница 5: ... THE PLAYER WITH AV AMPLIFIER 12 REMOTE CONTROL 14 REMOTE CONTROL FUNCTIONS 15 DVD PLAYBACK 16 Direct Selection of Scenes 17 Repeat Play 18 Convenient Functions 18 VIDEO CD PLAYBACK 21 Direct Selection of Scenes 22 Repeat Play 23 Convenient Functions 24 AUDIO CD PLAYBACK 24 Direct Selection of Tracks 25 Repeat Play 26 Convenient Functions 27 DISC MENU 28 USING SETUP MENU 30 LANGUAGE SETUP 31 VIDEO...

Страница 6: ...port 16 9 Wide screen 4 3 Letterbox 4 3 PAN SCAN 8 Multi Audio up to 8 support 9 Multi Subtitle up to 32 support 10 Multi Angle up to 9 support 11 8 level parental control 12 Fast forward and reverse at different speeds 13 Slow motion playback at different speeds 14 Frame by frame forward playback 15 Time Search 16 Repeat disc title chapter A B 17 Programme function for Audio CD MP3 and JPEG 18 Sc...

Страница 7: ... quality MP3 is recorded as a digital signal with better audio quality less distor tion and less deterioration of audio quality over time 8 cm PICTURE CD Video still picture 12 cm It depends on JPEG quality JPEG is recorded as a digital signal with better picture quality over time 8 cm DivX Audio Video 12 cm It depends on DivX quality DivX media files contain highly com pressed video with high visu...

Страница 8: ... disc clean handle the disc by its edge Do not touch the surface Do not stick paper or tape on the disc If the disc is contaminated with any substance such as glue remove it before using the disc Do not expose the disc to direct sunlight or heat sources such as hot air ducts or leave it in a car parked in direct sunlight as the temperature can rise quickly and damage the disc After playing store t...

Страница 9: ... a while When you find it damaged ask your closest service agent for help When the AC power cord needs to be changed it should be done at a qualified service shop only Choice of Location Please do not place the player in a place subject to direct sunlight excessive dust or mechanical shock or in a location near heat sources The player should be placed on a solid and safe base Do not place the player...

Страница 10: ...chapter track 6 Front panel display VFD Indicates the playing time title chapter track etc 7 OPERATE button Turns the player to Operate or Standby mode 8 Operation indicator Indicates the player s operational status 9 HDMI indicator Indicates whether the image output through HDMI can be viewed on the TV screen FRONT PANEL DISPLAY VFD 1 Play Pause 2 Disc loaded 3 Time or Title Chapter Track number ...

Страница 11: ...DIO OUT connectors Connects to the AV amplifier or audio input connector on the TV by using two cables Left Right 3 VIDEO OUT connector Connects to the TV using a video cable 4 HDMI connector Connects to the TV using the HDMI cable 5 SCART connector Connects to the TV using the SCART cable 6 COMPONENT OUT connectors Connects to the TV using a component video cable CONNECTORS ON THE REAR PANEL 6 5 4...

Страница 12: ...appropriate item from Video setup menu and use only one video connection method See page 32 HDMI Connector The HDMI connector can be used to connect the player to your TV set or AV amplifier via the HDMI cable For this con nection the TV set or AV amplifier must have an HDMI input connector NOTE The HDMI connector does not support the DVI output using an HDMI to DVI adaptor or cable The HDMI enables...

Страница 13: ...R Progressive to Y PB PR Interlace See page 32 1 Connect the COMPONENT OUT connectors on the player to the corresponding input connectors on the TV using a component video cable 2 Connect the L R AUDIO OUT connectors of the player to the audio Left Right input connectors on the TV using the audio cable Audio cable commercially available Component video cable commercially available Video Audio Outp...

Страница 14: ... each component before making the connections Analogue Audio Output Connectors To achieve better sound quality the player can be connected to an amplifier via AUDIO OUT connectors TV Audio cable commercially available AUDIO OUT L R VIDEO OUT Video cable commercially available Amplifier ...

Страница 15: ...aker Left Front speaker Right Centre speaker Rear speaker Left Rear speaker Right Subwoofer NOTE When the player is connected to a separate decoder box or amplifier through the DIGITAL AUDIO OUT connector you may sometimes hear a short noise when selecting the sound system in the DVD menu This is not a malfunction Playing Dolby Digital DTS or MPEG audio with a digital connection Set the applicable ...

Страница 16: ...w the precautions below Caution Danger of explosion if battery is incorrectly replaced Replace only with the same or equivalent type Insert the batteries making sure the polarities correctly match and marks inside the battery compartment Batteries of different types have different properties therefore do not mix batteries of different types Do not mix new and old batteries This may shorten the lif...

Страница 17: ...than 9 13 OPEN CLOSE button Opens or closes the disc tray 14 REPEAT button Executes repeat shuffle and programme functions 15 A B button Executes the A B repeat play 16 SLOW SEARCH buttons Press to adjust the forward and reverse playback at different speed during playback fast forward reverse and to adjust the forward playback at different speed during Pause mode slow motion 17 SKIP FRAME buttons G...

Страница 18: ...elections are to be played be sure to press STOP to clear the menu display For your reference If an action corresponding to a button is prohibited is displayed on the screen Stopping Play Press STOP twice When play is stopped the player records the point where STOP was pressed once Resume function Press PLAY PAUSE again and play will resume from this point When the tray is opened or the STOP is pr...

Страница 19: ...eld You can press RETURN to cancel Search mode Selecting Scenes using Bookmark Function You can bookmark up to three frames during playback The bookmarked frames will be quickly searched out and played back Press SEARCH MODE twice on the remote control during playback The Bookmark box is displayed on the screen To close the Bookmark box press RETURN Bookmarking Display the Bookmark box during play...

Страница 20: ...A B Repeat is disabled Convenient Functions Displaying the Time Information Press DISPLAY during playback Information is displayed on TV screen to indicate the cur rent status of the disc In the display screen you can find the following information lines Line 1 Elapsed time and remaining time of title Line 2 Title number chapter number and angle number Line 3 Audio language number audio format numb...

Страница 21: ...tings to a different language if available This operation works only with discs on which multiple audio soundtrack languages are recorded Press AUDIO during playback Press AUDIO consecutively until the preferred language is selected NOTE When the desired language cannot be found after press ing AUDIO several times it means that the language is not available on the disc When the player is restarted...

Страница 22: ...o disc the following explains basic operation when this feature is available Press TITLE or MENU The DVD menu available on the disc is now displayed NOTE If you press MENU the root menu of DVD is displayed If you press TITLE the menu of the current title is dis played MENU does not function in Stop mode Press to select the preferred item Press SELECT The selected item is now executed To resume pla...

Страница 23: ...creen Switching PBC On Off Press REPEAT when a Video CD with PBC is inserted The Play Mode box is displayed on the screen Select the Mode field in the Play Mode box and press SELECT Each time this button is pressed PBC switches On and Off alternately NOTE For Video CDs without PBC the Mode field in the Play Mode box cannot be changed For Video CDs with PBC you can also use MENU to switch PBC On and ...

Страница 24: ...by Time and Track Number You can view the Video CD starting from any desired time point or any track you want Track Search Press SEARCH MODE on the remote control during playback The Track Search box is displayed on the screen For setting time enter the desired time in the Time field using number buttons and press SELECT The player jumps to the entered time of the current track For setting a track ...

Страница 25: ...ed out and played back For Video CDs without PBC or when PBC mode is Off press SEARCH MODE three times during playback For Video CDs with PBC and when PBC mode is On press SEARCH MODE twice during playback The Bookmark box is displayed on the screen To close the Bookmark box press RETURN Bookmarking Display the Bookmark box during playback Press or to select a Bookmark field and when a desired fram...

Страница 26: ... picture is now at normal size AUDIO CD PLAYBACK Preparations If the player has been connected to an audio system turn it on Basic Play 1 Press OPERATE 2 Press OPEN CLOSE to open the disc tray 3 Place a disc onto the tray Hold the disc without touching either of its surfaces posi tion it with the printed title side facing up align it with the guides and place it in its proper position 4 Press OPEN...

Страница 27: ...ontrol during playback The Track Search box is displayed on the screen For setting time enter the desired time in the Time field using number buttons and press SELECT The player jumps to the entered time of the current track For setting a track press to select the Track field enter the track number using number buttons and press SELECT The disc is played beginning from the desired track If you ente...

Страница 28: ...The bookmark will be removed NOTE The bookmark is cancelled when The disc tray is opened The power is turned off Repeat Play Press REPEAT during playback The Play Mode box is displayed on the screen Press to select the Repeat field and choose one of the items by using SELECT If Single Track is selected the current track will be played again If All is selected the whole disc will be played again If ...

Страница 29: ...2 Press SELECT The programme list is displayed on the screen 3 Press to select a field in the programme list and enter the track number using number buttons 4 After entering the track number press to select Play Program and then press SELECT The screen is cleared and the player starts playing the programme list NOTE You can remove the track from the programme list by pressing C You can programme up...

Страница 30: ... the Disc menu of MP3 JPEG MPEG 4 or DivX files In the following explanations white letter signs indicating file types are shown The function mentioned there are only available for the files represented by the signs If no signs are shown the function works for any file Basic Play 1 Press OPERATE 2 Press OPEN CLOSE to open the disc tray 3 Place a CD R CD RW disc onto the tray Hold the disc without touc...

Страница 31: ... dis played in Slide show mode Repeating Sections between Two Specific Points A B Repeat MPEG 4 DivX Press A B during playback at the point where Repeat play is to start A A To B Set A is displayed on the screen Press A B again at the point where Repeat play is to end B ATo B Set B is displayed and Repeat play of the selection between points A and B starts To return to normal play Press A B again A...

Страница 32: ...T Its corresponding sub items are displayed on the right of the current settings Press or to select the sub item you want to change and press SELECT NOTE To close the sub items and return to the current settings press For some submenus no sub items will be displayed Rotating JPEG JEPG files can be rotated in clockwise direction by press ing ANGLE Subtitle Setting DivX Focus on a DivX file and press ...

Страница 33: ... Wide screen 16x9 Choose this setting if the player is connected to a wide screen TV VIDEO SETUP TV Type The aspect ratio of the picture provided by the player can be varied in line with the features available on the TV in use The items available are 4 3 PS 4x3 Pan Scan Allows you to see the movie in full screen on your TV but the right and left edges are obscured This feature is disc dependent 4 ...

Страница 34: ...ection method Progressive Scan Output See page 11 WARNING To be able to see the progressive video correctly you should have a progressive scan TV and should make the video connections correctly 1 Highlight Y PB PR Progressive in the Video output menu and press SELECT 2 A confirmation dialogue screen will be displayed 3 If you see the picture correctly select YES and press SELECT 4 If you cannot see...

Страница 35: ...t be used OTHERS SETUP Password The Parental Rating adjustment function can be disabled or enabled by entering a 4 digit password indicates the password protection is deactivated and so Parental Rating can be changed If you want to activate the password protection enter a new password indicates the password protection is activated and so Parental Rating cannot be changed and the correct password s...

Страница 36: ... page by enter ing Others from the setup menu of the player 2 You will get the DivX VOD registration code from the player The address for the DivX VOD website is www divx com vod 3 After entering the address above on the Internet go to the section where registration is to be made for DivX VOD membership 4 Use the DivX VOD registration Activation code you receive from the player to register and set...

Страница 37: ...f the player Allow the player one or two hours in Standby mode for it to dry Disc does not play No disc in the player Place a disc onto the tray Disc incorrectly loaded Make sure that the DVD is in the disc tray with the label facing up Wrong type of disc The player cannot play CD ROMs etc Use disc in supported formats described on page 5 The region code of the DVD must match that of the player Wr...

Страница 38: ...hange the batteries Operate the remote control within 30 angle on either side of the remote control sensor up to a distance of approximately 6 meters If nothing works If you have tried the above solutions and nothing seems to work try switching the player off and on again If you still encounter operational problems unplug the AC power cord and wait for a few minutes to allow the player to reset it...

Страница 39: ... and 60 Hz frame refresh rates PAL NTSC Digital bit stream processing rate up to 10 08 Mbits sec Line resolution more than 500 lines Video Output HDMI 480p in NTSC 576p in PAL 720p 1080i resolution Analogue With 4 x 10 bits 54 MHz video DACs CVBS PAL NTSC negative synchronised 1 Vpp 75 Ω loaded or RGB CVBS Through Full Euroscart Output Pin 8 Control Component Y Output 700 mVpp 75 Ω loaded PAL PB C...

Страница 40: ...ther Since the thinner the disc the higher the density at which the information can be recorded a DVD has a greater capacity than a single 1 2 mm thick disc HDMI The High Definition Multi media Interface HDMI is an industry supported uncompressed all digital audio video interface The HDMI provides an interface between any compatible digital audio video sources such as a set top box a DVD player and...

Страница 41: ... 39 EN Cut this information box out and keep it in a safe place If you forget the password Press 1 3 6 9 Password will be cleared ...

Страница 42: ... Sharp or its appointed Service Facility within one year from the date this product was purchased Proof of purchase must be provided 4 The guarantee does not cover carriage costs 5 In the unlikely event of this product requiring repair please contact the supplier from whom it was purchased Where this is not possible please contact the Sharp Customer Infomation Centre on the telephone number given ...

Страница 43: ...ich could otherwise arise due to inappropriate waste handling 2 In Other Countries outside the EU If you wish to discard this product please contact your local authorities and ask for the correct method of disposal For Switzerland Used electrical or electronic equipment can be returned free of charge to the dealer even if you don t purchase a new product Further collection facilities are listed on...

Страница 44: ...SHARP CORPORATION Printed on 100 post consumer recycled paper Printed in Turkey 9JB50074834 06P02 TR NV SHARP ELECTRONICS U K LTD Sharp House Thorp Road Newton Heath Manchester M40 5BE ...

Отзывы: