


2008/June/19
CD-DK890N_US_N
35
CD-DK890N
Tape Recording
To
s
to
p
recording:
Pre
ss
the (TAPE ) button.
The di
s
c and tape will
s
top.
To
p
erform
p
rogrammed recording:
To
s
to
p
recording:
Pre
ss
the (TAPE ) button.
The di
s
c and tape will
s
top.
Recording from the radio
To interru
p
t recording:
Pre
ss
the
button.
To re
s
ume recordin
g
, pre
ss
the / (TAPE ) button.
To
s
to
p
recording:
Pre
ss
the (TAPE ) button.
Note:
If you hear a whi
s
tlin
g
noi
s
e while recordin
g
an AM
s
tation, move the
AM loop antenna.
Du
bb
ing from ta
p
e to ta
p
e
You can record from TAPE 1 to TAPE 2.
To
s
to
p
du
bb
ing:
Pre
ss
the (TAPE ) button.
TAPE 1 and TAPE 2 will
s
top
s
imultaneou
s
ly.
Era
s
ing recorded ta
p
e
s
Note:
Make
s
ure that the TAPE 1 i
s
not in u
s
e.
6
Within 5
s
econd
s
,
p
re
ss
the /
b
utton to
s
tart recording.
Recordin
g
i
s
s
tarted from the
s
elected di
s
c. When the
playback of the la
s
t track i
s
fini
s
hed or the end of the tape i
s
reached, the di
s
c and the ca
ss
ette will
s
top automatically.
Playback of the di
s
c will
s
tart approximately 7
s
econd
s
after
the tape
s
tart
s
.
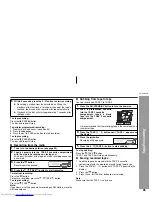
1 Pro
g
ram di
s
c
s
and track
s
(
s
ee pa
g
e 25).
2 Pre
ss
the
button.
3 Pre
ss
the
/
(TAPE ) button to
s
tart recordin
g
.
1
Tune in to the de
s
ired
s
tation (
s
ee
p
age 30).
2
Load a ca
ss
ette into the TAPE 2 ca
ss
ette com
p
artment
with the
s
ide to
b
e recorded on facing you.
Wind pa
s
t the leader of the tape, on which recordin
g
cannot be
performed.
3
Pre
ss
the
b
utton.
Recordin
g
will be pau
s
ed.
4
Pre
ss
the / (TAPE )
b
utton to
s
tart recording.
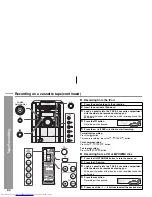
1
Pre
ss
the ON/STAND-BY
b
utton to turn the
p
ower on.
2
Load a
p
rerecorded ca
ss
ette
into the TAPE 1 ca
ss
ette
com
p
artment. In
s
ert a
b
lank
ta
p
e into the TAPE 2 ca
ss
ette
com
p
artment.
It i
s
recommended that the recordin
g
tape i
s
the
s
ame len
g
th a
s
the ma
s
ter tape.
3
Pre
ss
the TAPE (1 2)
b
utton until “TAPE 1” a
pp
ear
s
on
the di
sp
lay.
4
Pre
ss
the
b
utton.
Recordin
g
will be pau
s
ed.
5
Pre
ss
the / (TAPE )
b
utton to
s
tart du
bb
ing.
1
Load the tape to be era
s
ed into the TAPE 2 ca
ss
ette
compartment with the
s
ide to be era
s
ed facin
g
toward you.
2
Pre
ss
the TAPE (1 2) button until “TAPE 2” appear
s
on the
di
s
play.
3
Pre
ss
the
button.
4
Pre
ss
the
/
(TAPE ) button to
s
tart era
s
in
g
.
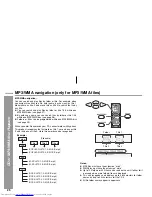
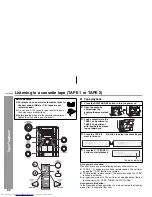
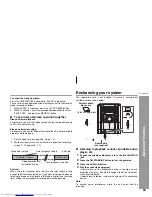
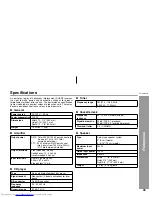
TAPE 1
TAPE 2
CD
4
3
2
1
5
PRE
S
ET
TUNING
PRE
S
ET
TUNING
— VOL.
VOL.
PHONE
S
RECORD/P
LAYBACK
PLAYBACK
(PLAY & S
TOP)


