7
BEFORE USING THE FAX FEATURE
1
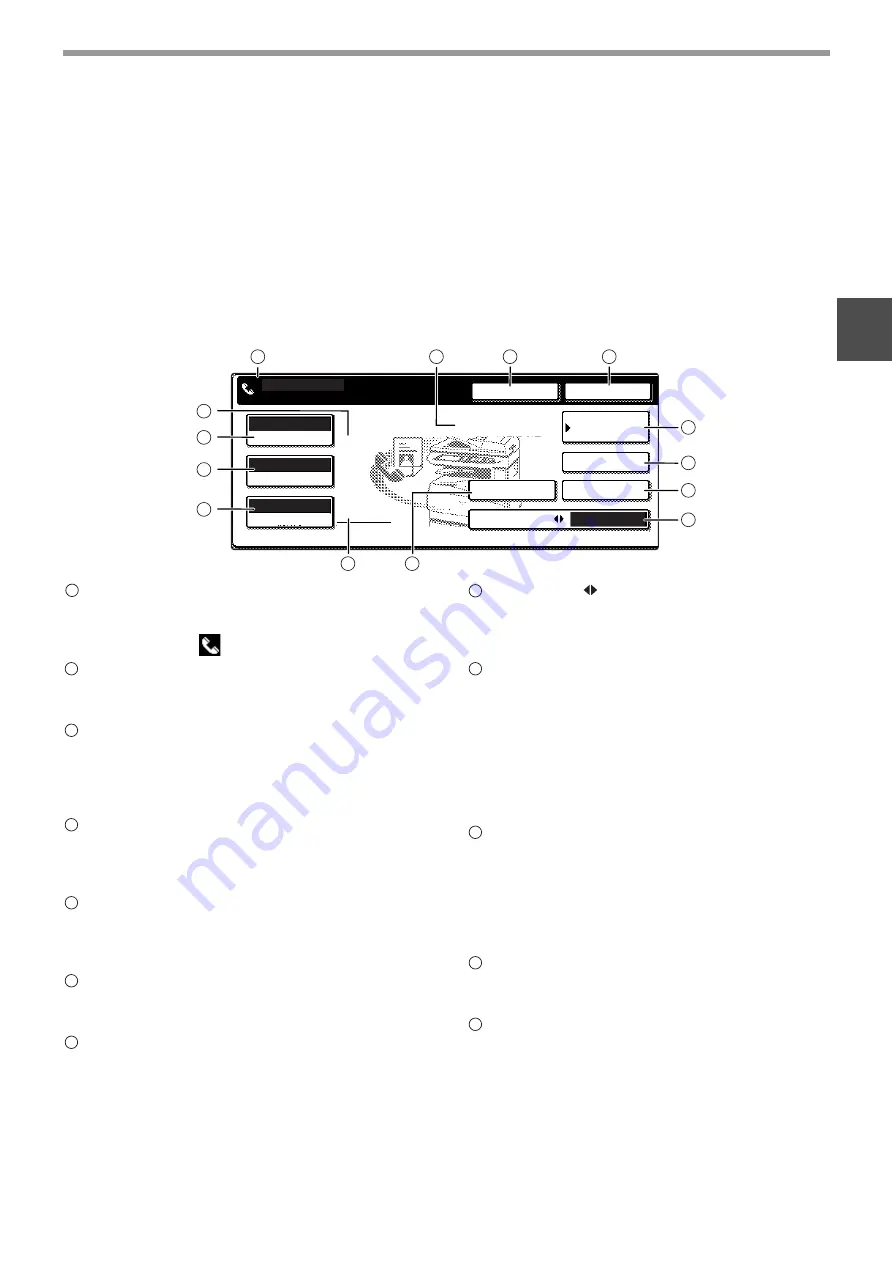
FAX MODE (CONDITION SETTING SCREEN)
The condition setting screen of fax mode is displayed by pressing the [FAX] key while the print mode, copy mode, or
job status screen appears in the touch panel. In the explanations that follow, it is assumed that the initial screen that
appears after pressing the [FAX] key is the condition setting screen (shown below). If you have set the display to
show the address directory (p.8) when the [FAX] key is pressed, touch the [CONDITION SETTINGS] key in the
address directory to display the condition setting screen.
A key operator program can be used to set the display to show either the condition setting screen (shown below) or
the address directory screen (p.8) when the [FAX] key is pressed ("DEFAULT DISPLAY SETTINGS" (p.96)).
Condition setting screen
The display is initially set (factory setting) to show the following screen when the [FAX] key is pressed.
Message display
Messages appear here to indicate the current
status of the machine. When the machine is ready
to send, an icon
appears to the left.
Memory and reception mode display
This shows the amount of fax memory that is free
and the currently selected reception mode.
[SPEAKER] key (p.11)
This key is used for dialing with the speaker.
During dialing it changes into the [PAUSE] key,
and after pressing the [SUB ADDRESS] key it
changes into the [SPACE] key.
[REDIAL] key (p.11)
Touch this key to redial the most recently dialed
number. After dialing, this key changes into the
[NEXT ADDRESS] key.
[ADDRESS BOOK] key (p.16)
This displays the Address Directory screen (p.8).
Touch this key when you want to use an auto-dial
number (rapid dialing or group dialing).
[SUB ADDRESS] key (p.53)
Touch this key to enter a sub-address or
passcode.
[ADDRESS REVIEW] key (p.27)
When performing a broadcast transmission, touch
this key to check your selected destinations. A list
of your selected destinations will appear, and
destinations can be deleted from the list.
[DIRECT TX
MEMORY TX] key (p.14)
Touch this key to switch from memory
transmission mode to direct transmission mode.
The selected mode is highlighted.
[SPECIAL MODES] key
Touch this key to select one of the following
special functions:
• Timer transmission (p.30) • Polling (p.33)
• Slow scan mode (p.39) • Dual page scan (p.40)
• Program (p.41) • Memory box (p.48)
• Cover sheet (p.42) • TX message (p.43)
• Sending options (p.47 and p.50)
• Own passcode select (p.45)
Original settings icon display
When two-sided scanning (p.17) or job build mode
(p.18) is selected (touch the [ORIGINAL] key to
select these functions), an icon will appear in this
display.
The icon can be touched to open the original
settings screen.
[ORIGINAL] key (p.20)
Touch this key to manually set the original size or
select two-sided scanning.
[RESOLUTION] key (p.21)
Touch this key to change the resolution setting
when scanning an original. The selected resolution
setting will be highlighted above the key. The initial
factory setting is [STANDARD].
ADDRESS
BOOK
AUTO
READY TO SEND.
ORIGINAL
STANDARD
RESOLUTION
AUTO
EXPOSURE
SUB ADDRESS
ADDRESS REVIEW
SPECIAL MODES
REDIAL
SPEAKER
FAX MEMORY:100%
AUTO RECEPTION
DIRECT TX
MEMORY TX
9
10
11
13
14
12
2
3
4
5
6
7
8
1
1
2
3
4
5
6
7
8
9
10
11
12


