background image

76

Useful adjustment settings

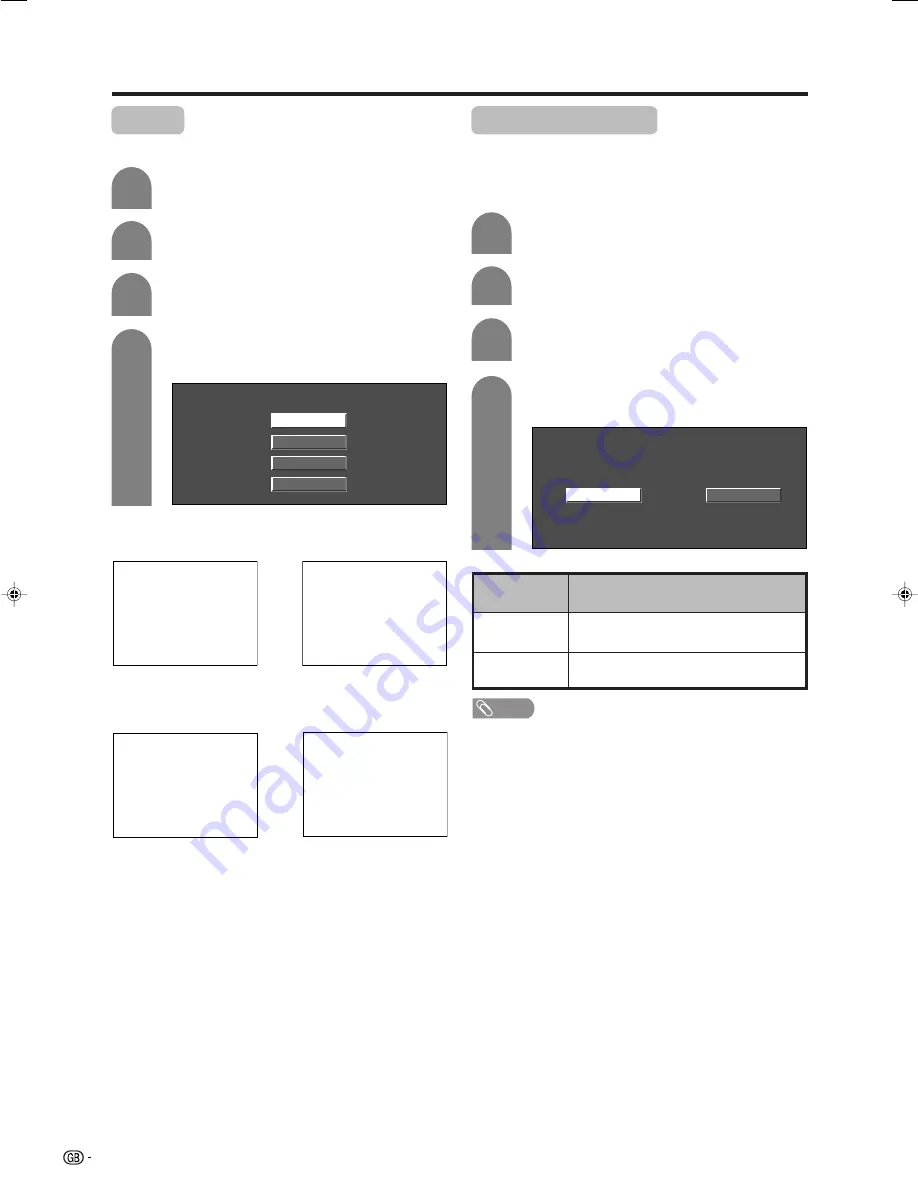
Rotate

You can set the orientation of the picture.

Press 

MENU

 and the MENU screen displays.

1

2

Press 

c

/

d

 to select “Setup”.

Press 

a

/

b

 to select “Rotate”, and then press

OK

.

3

[Normal]: normal image.

[Mirror]: mirror image.

ABC

ABC

4

Press 

a

/

b

 to select the desired mode, and

then press 

OK

.

Normal

Mirror

Upside Down

Rotate

[Upside Down]: upside

down image.

[Rotate]: rotated image.

ABC

ABC

Standby Recording

Even when the System is in the standby mode, you
can record to external recording equipment (VCR or
DVD player) connected to AV OUTPUT or SCART
terminals using this function.

Press 

MENU

 and the MENU screen displays.

1

2

Press 

c

/

d

 to select “Option”.

Press 

a

/

b

 to select “Standby Recording”,

and then press 

OK

.

3

4

Off

On

Press 

c

/

d

 to select “On”, and then press

OK

.

Description

AV signals output from the System even in
the standby mode.

No AV signals output from the System in the
standby mode.

Selected item

On

Off

NOTE

• Standby Recording is automatically set to “Off” when the

System is turned back on.

LC-32GD1E(E)-j

04.4.6, 1:54 PM

76

Содержание Aquos LC-32GD1E

Страница 1: ...MANUAL BEDIENUNGSANLEITUNG MODE D EMPLOI LC 32GD1E DISPLAY DISPLAY ECRAN TU 32GD1E AVC SYSTEM AVC GERÄT SYSTÈME AVC ENGLISH LC 37GD1E TU 37GD1E FRANÇAIS DEUTSCH OPERATION MANUAL MODE D EMPLOI BEDIENUNGSANLEITUNG LC 37GD1E DISPLAY DISPLAY ECRAN TU 37GD1E AVC SYSTEM AVC GERÄT SYSTÈME AVC LC 32GD1E TU 32GD1E ...

Страница 2: ...etting for each channel 26 Fine tuning 26 Colour system 27 Sound system Broadcasting system 27 Labelling channels 27 Skipping channels 28 Setting the decoder 28 Setting the child lock 28 PIN setting for child lock for TV DTV AV input mode See page 78 Setting the booster 28 Sort 29 Erase Programme 29 Basic adjustment settings Digital 30 DTV input mode menu items 30 Selecting DTV mode 30 About colou...

Страница 3: ...es 62 Format 62 Using external equipment 63 Displaying an external equipment image 63 Displaying a DVD image Example 63 Connecting a decoder 64 Connecting a VCR 64 Using AV Link function 65 Connecting a DVD player 66 Connecting a game console or camcorder 66 Connecting a PC 67 Using Digital Audio Output 67 Speaker Setup 68 Connecting external speakers 68 Selecting speakers 68 External Audio Bypass...

Страница 4: ...t internal parts For the same reason do not spill water or liquid on the product 10 Servicing Do not attempt to service the product yourself Removing covers can expose you to high voltage and other dangerous conditions Request a qualified service person to perform servicing 11 Repair If any of the following conditions occurs unplug the AC cord from the AC outlet and request a qualified service per...

Страница 5: ...ventilation openings This product is not designed for built in installation do not place the product in an enclosed place such as a bookcase or rack unless proper ventilation is provided or the manufacturer s instructions are followed The LCD panel used in this product is made of glass Therefore it can break when the product is dropped or impact applied If the LCD panel is broken be careful not to...

Страница 6: ...C System TU 37GD1E TU 32GD1E Remote control unit g1 Page 11 AAA size battery g2 Page 11 System cable g1 Page 7 Stand unit for AVC System g1 Stand g1 Stand cushion g4 Stand spacer g4 Stand screw g2 Page 10 LC 32GD1E TU 32GD1E LC 37GD1E TU 37GD1E Operation manual Antenna cable g1 Page 12 Product shape varies in some countries Page 7 AC cord g1 Display LC 37GD1E LC 32GD1E ...

Страница 7: ...ve the Display hold the portion of the Display not the speaker Handling the AVC System CAUTION Do not put a VCR or other device on the AVC System Keep enough space above and on the sides of the AVC System Do not block the ventilation openings on the top and left side and the exhaust fan on the right side Do not spread a thick cloth beneath the AVC System or cover it with one as this can cause over...

Страница 8: ...ystem cables and AC cords Use the cable clamps for bundling the cables Preparation Press down the two upper hooks to remove the cover toward you Connecting the system cable and the AC cord to the Display 1 2 3 Removing the terminal cover Connecting the system cable and the AC cord to the AVC System CAUTION TO PREVENT RISK OF ELECTRIC SHOCK DO NOT TOUCH UN INSULATED PARTS OF ANY CABLES WITH THE AC ...

Страница 9: ... 5 Attaching the clamp and bundling the cables with the clamp Closing the terminal cover Cable clamp Insert the cable clamp in the hole on the Display as shown Display rear view Cables come out from the small opening ...

Страница 10: ...ng work spread cushioning over the base area to lay the Display on This will prevent it from being damaged CAUTION The speaker terminals on the Display are only for the attached speaker Do not connect any third party plug or speaker to the terminal Insert the speaker plug completely into the terminal NOTE To attach the speaker and stand perform the above steps in reverse order 2 4 5 1 3 1 Unfasten...

Страница 11: ...en mounting the AVC System vertically always use the supplied stand Be careful not to block vent holes when standing up directly on the floor or a flat surface as this can result in equipment failure About setting the Display angle Angular mounting is not possible with the speaker attached You can set the Display on the wall up to 20 degrees forward when the speaker is not attached Do not set the ...

Страница 12: ...f you will not be using the remote control unit for an extended period of time remove the batteries from it Inserting the batteries Before using the System for the first time insert two AAA size batteries supplied When the batteries become depleted and the remote control fails to operate replace the batteries with new AAA size batteries Using the remote control unit Use the remote control unit by ...

Страница 13: ...nto the DIGITAL IN terminal at the rear of the AVC System Connecting to the power outlet Before connecting the AC cords make sure to connect the system cable first Product shape varies in some countries Product shape varies in some countries Antenna cable supplied For viewing only digital broadcasts you do not need to connect the antenna cable supplied ex For viewing both analogue and digital broa...

Страница 14: ...s provided the System only displays the channel number leaving the channel name blank Automatic channel searching Channel auto search finds all channels viewable in your area NOTE If no channel is found No programme found displays And the auto installation finishes Preset download When auto sorting finishes the System automatically downloads and stores each sorted channel from VCR When a VCR is co...

Страница 15: ...in Switzerland Turkey United Kingdom Search Search screen displays Press OK and Search finds all the digital broadcasting channels viewable in your area The Search menu disappears and you can watch the programme Country Service scan System software Press DTV to switch to the DTV mode 1 For viewing digital broadcasts please follow the procedure below to setup In DTV mode some menu items displayed i...

Страница 16: ...art names STANDBY ON indicator MAIN POWER button X OPC sensor Display STANDBY ON button B INPUT button VOLUME buttons il k CHANNEL buttons Ps r Remote control sensor OPC Optical Picture Control See page 47 ...

Страница 17: ...See page 78 for resetting the PIN when you know it See page 91 for initialising to the factory preset values when you forget your PIN ANTENNA INPUT Part names AVC System DISPLAY OUTPUT 2 Front view Rear view DC OUTPUT DIGITAL AUDIO OUTPUT SPEAKER B DIGITAL ANTENNA INPUT DIGITAL ANTENNA OUTPUT Connect a digital audio equipment Provided for command from PC see pages 85 and 86 COMMON INTERFACE slot R...

Страница 18: ...age to a card after freezing the image from analogue broadcasts or external equipment See page 56 Motion picture Press to start stop recording a motion picture to a card from analogue broadcasts or external equipment See page 60 7 0 9 TV DTV External input mode Set the channel TELETEXT mode Set the page 8 A Flashback Press to return to the previous image in normal viewing mode See page 20 9 SUBTIT...

Страница 19: ...e Switch to either TV or DTV input mode TELETEXT mode Select the page See page 81 25 b INPUT SOURCE Select an input source TV DTV INPUT 1 INPUT 2 INPUT 3 INPUT 4 INPUT 5 CARD See pages 63 70 71 and 80 26 LIST DTV input mode Display the favourite digital programme list 27 MENU Display the menu screen 28 a b c d Cursor Select a desired item on the setting screen Select the programme information area...

Страница 20: ...m the menu screen the new setting or channel information may not be memorised Watching TV Press MAIN POWER X X X X X on the Display STANDBY ON indicator Green The System is on After a few seconds programme information appears with sound STANDBY ON indicator Red The System is in standby Go to step 2 Use any of the methods below to power on Powering on changes the LED from red to green Press the STA...

Страница 21: ...the channel a 3 digit input underbar appears in digital TV mode and a 2 digit in analogue TV mode Once you input a channel it is set after a few moments if there are no other operations Or press OK to set immediately after input NOTE Complete this procedure within 3 seconds otherwise the selection will not be made on the 2 digit channel mode When viewing Teletext information View a page directly w...

Страница 22: ...C2 NICAM MONO 99 BBC2 MONO 99 BBC2 Stereo mode Bilingual mode Monaural mode 99 BBC2 MONO 99 BBC2 STEREO CH A 99 BBC2 CH B 99 BBC2 CH AB 99 BBC2 MONO 99 BBC2 When receiving a bilingual signal Each time you press SOUND the mode switches among NICAM CH A NICAM CH B NICAM CH AB and MONO When receiving a monaural signal Each time you press SOUND the mode switches between NICAM MONO and MONO When receiv...

Страница 23: ...sing e on the remote control unit e mutes the current sound output Press e e has been displayed on the screen for 30 minutes and the sound is silenced Mute 20 NOTE Within 30 minutes of pressing e mute can be cancelled by using the methods below Pressing if f f f f ie e e e e or e can also cancel the mute Mute will be cancelled after 30 minutes have elapsed However the System will not suddenly outp...

Страница 24: ...em in brackets This indicates the current setting for the item 3 Item displayed in white This indicates an item can be selected 4 Item displayed in grey This indicates the item cannot be selected There are various reasons why items cannot be selected but the main reasons are as follows 1 Nothing is connected to the selected input terminal 2 The function is not compatible with the current input sig...

Страница 25: ...alance Page 51 Dolby Virtual Page 51 Audio Only Page 69 DNR Page 75 Input Select Page 70 Audio Out Page 77 Quick Shoot Page 75 Colour System Page 71 Centre Channel Input Page 79 Standby Recording Page 76 Audio Power Control Setup Option PC input mode menu items List of PC menu items to help you with operations OPC Page 47 Backlight Page 48 Contrast Page 48 Brightness Page 48 Red Page 48 Green Page...

Страница 26: ...up Channels can be tuned automatically or manually Press MENU and the MENU screen displays Press c d to select Setup 1 2 3 4 Press a b to select Programme Setup and then press OK If you already set the PIN enter it here If not enter the factory preset PIN 1234 See page 78 for setting PIN NOTE See page 13 for details Do not turn off the System while the message Programme set up completed is display...

Страница 27: ...ey are Fine TV frequency Colour sys Sound sys Label Network name Skip Decoder Lock Child Lock and Booster Press a b to select Programme Setup and then press OK If you already set the PIN enter it here If not enter the factory preset PIN 1234 See page 78 for setting PIN 3 Press a b c d to select the channel you want to edit and then press OK The selected channel information displays Press a b to se...

Страница 28: ...is not right Press a b to select the optimum sound system and then press OK Sound system menu Fine Colour sys Sound sys Label Skip Decoder Lock B G D K I L L 179 25 AUTO B G Off SAT 1 Off Off Booster Off 3 2 Fine Colour sys Sound sys Label Skip Decoder Lock 179 25 AUTO B G Off SAT 1 Off Off Booster Off A BACK CLEAR END K U B L V C M W D N X E O Y F P Z G Q H R _ I S J T 0 1 2 3 4 5 6 7 8 9 Labelli...

Страница 29: ...power is turned off Setting the child lock You can block the viewing of any channel Fine Colour sys Sound sys Label Skip Decoder Lock 179 25 AUTO B G Off SAT 1 Off Off Booster Off Off On Lock menu Press a b to set Lock to On and then press OK NOTE Off is factory preset value INPUT1 is the recommended selection Channels with Skip set to On are passed over when using Pr Ps even if selected while wat...

Страница 30: ...ready set the PIN enter it here If not enter the factory preset PIN 1234 See page 78 for setting PIN Erase Programme The individual programme can be erased Erase programme menus 01 06 07 08 09 10 11 12 13 14 15 16 17 18 19 20 SAT 1 01 SAT 1 Pro7 02 KABEL 03 04 05 Next 02 Pro7 Next 01 SAT 1 03 KABEL Pro7 02 06 07 08 09 10 11 12 13 14 15 16 17 18 19 20 04 05 Next 01 SAT 1 02 KABEL 06 07 08 09 10 11 ...

Страница 31: ... 43 Access restrictions Maturity rating 36 TV services 37 Radio services 37 Audio lang 39 Subtitle lang 40 List of DTV menu items to help you with operations Numbers within brackets indicate the page where the topic is explained NOTE mark indicates in some cases PIN input may be required The illustrations and on screen displays in this manual are for explanation purposes and may vary slightly from...

Страница 32: ...nstallation and then press OK Press the GREEN button to display the Setup menu 4 Press a b to select Service scan and then press OK 5 Press a b to select Search and then press OK Guide Setup Preference Search 6 If you already set the PIN enter it here If not enter the factory preset PIN 1234 See page 78 for setting PIN 7 After Search is finished press OK and Store NOTE If you only perform Search y...

Страница 33: ...ess DTV MENU to display the DTV Menu screen 1 2 Press a b to select Installation and then press OK Press the GREEN button to display the Setup menu Found radio services The Found radio services function is used to see which new radio services were found after performing a search or after Reinstalling all services 4 Press a b to select Service scan and then press OK 5 Press a b to select Found radi...

Страница 34: ...K Press GREEN button to display the Setup menu Discard Discard all services stored NOTE This item can only be selected after performing Search or Reinstall all services 4 Press a b to select Service scan and then press OK 5 Press a b to select Discard and then press OK 3 Press DTV MENU to display the DTV Menu screen 1 2 Press a b to select System setting and then press OK Press the GREEN button to...

Страница 35: ... is displaying press p again to display the detailed programme information Press p to turn off the info banner and the detailed programme information 3 Press DTV MENU to display the DTV Menu screen 1 2 Press a b to select System setting and then press OK Press the GREEN button to display the Setup menu Audio Select the default audio language for all services 4 Press a b to select Languages and the...

Страница 36: ...itle English Español Euskara Français Galego 3 Press DTV MENU to display the DTV Menu screen 1 2 Press a b to select System setting and then press OK Press the GREEN button to display the Setup menu Teletext Select the default teletext language for all services 4 Press a b to select Languages and then press OK 5 Press a b to select Teletext and then press OK Press a b to select the desired languag...

Страница 37: ...tain services and protect certain settings from being accidentally changed 4 Press a b to select Maturity rating and then press OK If you already set the PIN enter it here If not enter the factory preset PIN 1234 See page 78 for setting PIN 5 Maturity rating This function allows TV and Radio services to be restricted It prevents children from watching violent or sexual scenes that may be harmful P...

Страница 38: ...Radio 3 6 BBC 6 Music 8 BBC Asian Network TV services 2 BBC TWO 1 BBC ONE 7 BBC CHOICE 10 BBC TEXT 11 BBC NEWS 24 Radio services To perform Radio services select Radio services instead of TV services in step 4 above and follow the same step 5 as explained in TV services Press LIST 1 2 Press a b to select the desired programme and then press OK Selecting programme You can select a programme from th...

Страница 39: ...1 2 Press a b to select the desired category then press c d to activate and then press OK You can select multiple categories Press RED button to display the Theme screen The categorised programmes are displayed in blue Now Next 999 ZDF Discovery Theme Mode 14 00 Heute Sport 999 ZDFdok National Geographic 14 00 Streit um Drei 997 ZDFinfo Gesun dheit Sport 14 00 Info aus den Landern 12 BBC Home Affa...

Страница 40: ...radio mode Now Next Theme Mode 999 BBC House of Commons 13 45 House of Lords Each time you press the GREEN button the mode will change between TV and radio When caution appears in radio mode screen press EXIT to turn it off 3 Press DTV MENU to display the DTV Menu screen 1 2 Press the BLUE button to display the Preference menu Audio language You can select the preferred audio language from the lis...

Страница 41: ...a Français Galego 3 Press DTV MENU to display the DTV Menu screen 1 2 Press a b to select Service lists and then press OK Press the GREEN button to display the Setup menu Service list type You can select the original service list or a user defined list 5 4 Press a b to select Service list type and then press OK Press a b to select Original list of services or User definable list of services and th...

Страница 42: ... a b to select TV service lists and then press OK Press a b to select the Rearrange TV services and then press OK Press a b to select the channel you want to move and press c d to select the item Move it to the desired position by pressing a b and then press c d Repeat the steps 6 and 7 until all desired channels are arranged 3 Repeat steps 1 to 3 in Rearrange TV Services 1 2 New TV services Displ...

Страница 43: ... and then press OK 4 Press a b to select TV service lists and then press OK Press a b to select the Installed TV services and then press OK Press a b to select the channel you want to delete from the list then press c d to select the item and then press OK The channel you deleted is moved to Uninstalled TV service list 4 Press a b to select the Uninstalled TV services and then press OK Installed T...

Страница 44: ... the GREEN button to display the Setup menu Country Select the country where you are located 4 Press a b to select Country and then press OK If you already set the PIN enter it here If not enter the factory preset PIN 1234 See page 78 for setting PIN 5 Press a b to select the country where you are located and then press OK Country Sweden Spain Switzerland Turkey United Kingdom NOTE The following i...

Страница 45: ...If the user would like to make use of this facility it is necessary to set the Software download function to Yes GREEN Press DTV MENU while the TV set is receiving a digital TV programme DTV MENU screen appears 2 Press the GREEN button to display the Setup menu 1 Enabling Software download 3 Press a b to select Installation and then press OK 4 5 Press a b to select Software download and then press...

Страница 46: ...on the remote control unit If Software Download starts while you are watching analogue TV broadcasts The screen alerts you and the update will start automatically To cancel the download switch to the DTV mode and follow the messages displayed on screen If Software Download starts while you are watching DTV broadcasts A confirmation message appears and the update will start by following the message...

Страница 47: ...hich needs the compatible CA card The caution screen appears 2 Insert the compatible CA card The caution screen disappears and you can view the programme CA system supported by Crypto Works MediaGuard VIAccess Conax Nagra Vision Irdeto NOTE To view paid TV broadcasting you need to make a contract with a service provider Please contact a service provider for details The Common Interface Module and ...

Страница 48: ...tness of the screen Press c d to select Picture 2 Using OPC on the menu screen Press MENU and the MENU screen displays 1 Press a b to select OPC Press c d to select On 3 4 Description The brightness is fixed at the value set in Backlight see page 48 Automatically adjusts Selected item Off On NOTE When set to On the System senses the surrounding light and automatically adjusts the backlight brightn...

Страница 49: ...in tones become purplish For less sharpness Selected item Backlight Contrast Brightness Colour Tint Sharpness MENU Picture Picture Audio Contrast OPC Brightness Reset 30 0 0 30 40 30 Backlight 8 8 8 Off On Red Green Blue Advanced 0 0 0 30 30 30 30 30 30 USER PC NOTE Select Advanced and then press OK to set C M S Hue C M S Saturation C M S Value Colour Temp Black 3D Y C Monochrome Film Mode or I P ...

Страница 50: ...ess a b to select the desired level and then press OK Black For easier viewing change the viewing depth by selecting a level for automatically adjusting the dark portion of an image Press a b to select Black and then press OK Press a b to select On and then press OK Repeat steps 1 to 3 in C M S Colour Management System 1 2 3 C M S Hue C M S Saturation C M S Value Colour Temp Black 3D Y C Monochrom...

Страница 51: ...e Automatically detects a film based source originally encoded at 24 25 frames second depending on the vertical frequency analyses it then recreates each still film frame for high definition picture quality Press a b to select Film Mode and then press OK Some items may be greyed out They are not selectable Press c d to select On and then press OK Repeat steps 1 to 3 in 3D Y C I P setting Adjusting...

Страница 52: ... Balance is greyed out when Dolby Virtual is set to On Press c d to select Audio 2 Press MENU and the MENU screen displays 1 Press c d to select On and then press OK 4 3 Press a b to select Dolby Virtual and then press OK NOTE Audio menu items are greyed out when Audio output is variable or when headphones are in use External Audio Bypass is greyed out when Dolby Virtual is set to On Balance is gr...

Страница 53: ...ower control Power control menu displays 2 Press MENU and the MENU screen displays 1 Power control Power control setting allows you to save energy Power control for AV source Power control for PC source Power control setting allows you to save energy Power management When set the power will automatically shut down Press a b to select Power Management and then press OK Press a b to select Mode1 or ...

Страница 54: ...rsions as this constitutes a violation of the copy right laws possible exposing the user to demands for compensation for damages Therefore be sure to strictly observe the existing copyright laws In addition when using image data that includes third parties since the use of such images without prior permis sion may constitute an intrusion on the privacy of third parties be sure to refrain from such...

Страница 55: ...he following when using memory cards and PC card adapters to avoid corruption of data or malfunction of the LCD TV set If you use memory cards other than those shown above recording or playing back pictures are not guaranteed Some PC card adapters have restrictions of memory card capacity Refer to the relevant operation manual for such restrictions Some pictures which have been created modified or...

Страница 56: ...s when playing back PC image data on the LCD TV Recording formats of image data When recording image data on the LCD TV the recording formats are as follows When recording motion pictures The SD_VIDEO folder is created and the data is stored in When playing the card the SD_VIDEO recording format is recognised When recording still pictures The DCIM folder is created and the data is stored in When p...

Страница 57: ...on EJECT button is popped up 1 2 Press EJECT button again PC card adapter itself pops up EJECT button 3 Take out the PC card adapter Inserting a PC card adapter Press in the EJECT button if it is popped out Insert a memory card to a PC card adapter beforehand See page 54 Insert the PC adapter card slowly CARD indicator lights up green when the card is inserted PC CARD slot CARD indicator NOTE When...

Страница 58: ...R NORMAL PREV SLIDE SHOW STOP NEXT REPEAT OFF NOTE See page 55 for operation panel function You cannot rotate the image during slide show Stop slide show to rotate the image Description Set the frame interval for a slideshow Set the frame order for a slideshow See My Programme for details If set to On the slideshow will play again after showing the last frame Selected item Interval Order Repeat Di...

Страница 59: ...n select up to thirty two pictures and specify the order for displaying in slide show Press a b to select My Programme and then press OK 5 6 7 Audio Select Setup Erase Slide Show Setup My Programme Edit Press c d to select Setup and then press OK Press a b c d to select the files and then press OK To cancel My Programme setting Select Erase at step 6 in My Programme and then press OK 1 2 Press c d...

Страница 60: ...e 1 File 2 File 3 File 4 File 5 File 6 File 7 File 8 File 9 8 Press c d to select Yes and then press OK Select Delete All instead of Delete File in step 6 in Deleting a still image file 1 Audio Select Protect Delete File Delete All Slide Show Setup My Programme Edit NOTE You cannot delete a protected file on the card Do not turn off the power or take out a card when deleting a file The card may ma...

Страница 61: ...c d to select the file you want to play and then press OK Video playback starts 4 Press CARD again to display the operation panel See page 55 for the operation panel information When viewing a motion picture by pressing f the picture size changes Small Medium Large NOTE Broadcasting types or input signals not available for recording 1 DTV broadcasting 2 COMPONENT input 3 RGB input 4 Copy guarded s...

Страница 62: ... Setup and then press OK Rec Mode On Off Pre recording Repeat Edit Press c d to select On and then press OK Press CARD and the card mode screen displays 1 Repeat You can specify one file or all files to replay repeatedly 2 3 Press a b to select Repeat and then press OK Rec Mode Off File All Pre recording Repeat Edit Repeat steps 1 to 4 in Pre recording 1 Press a b to select desired setting and the...

Страница 63: ... OK Press CARD and the card mode screen displays 1 Press a b c d to select the file you want to delete and then press OK Rec Mode Protect Delete File Delete All Pre recording Repeat Edit Press c d to select Yes and then press OK Rec Mode Protect Delete File Delete All Pre recording Repeat Edit Press CARD and the card mode screen displays 1 NOTE You cannot delete a protected file on the card Do not...

Страница 64: ... type Displaying an external equipment image Explanation here is for the setting when connecting DVD to INPUT3 terminal Displaying a DVD image Example To watch a DVD image select INPUT3 from INPUT SOURCE menu using b on the remote control unit or INPUT on the Display Select the desired signal type on Input Select in the Option menu See page 70 The setting is stored and can be selected on the INPUT...

Страница 65: ...f your VCR supports TV VCR advanced AV Link systems see page 65 you can connect the VCR to the INPUT 2 terminal on the AVC System using the fully wired SCART cable NOTE TV VCR advanced AV Link systems may not compatible with some external sources It is recommended to connect to the INPUT 2 terminal when using a decoder for ground wave signal input with a VCR If INPUT 2 signals preset in auto insta...

Страница 66: ...t automatically turns on and plays back the image from the audiovisual source e g VCR DVD System Standby When the connected audiovisual equipment e g VCR DVD enters standby mode so does the System WYSIWYR WhatYou See Is WhatYou Record When the remote control unit of the connected VCR has the WYSIWYR button you can automatically start recording by pressing the WYSIWYR button Preset Download Automat...

Страница 67: ...ailable S video cable commercially available Connecting a game console or camcorder A game console camcorder and some other audiovisual equipment are conveniently connected using the INPUT 4 terminals NOTE The S video terminal has priority over the video terminals You can also connect the game console to INPUT 1 or 3 terminals to enjoy clearer picture To watch an image from this input terminal you...

Страница 68: ...ble Refer to page 84 for a list of PC signals compatible with the System AVC System rear view ø 3 5 mm stereo minijack cable commercially available PC ø 3 5 mm stereo minijack cable commercially available RGB DVI conversion cable commercially available DVI cable commercially available To watch the image from this input terminal you need to select input source see page 63 and input signal type see ...

Страница 69: ...kers Repeat steps 1 to 3 in Selecting speakers above 1 2 Press c d to select Yes or No and then press OK 3 Press a b to select External Audio Bypass and then press OK NOTE External Audio Bypass is greyed out when Dolby Virtual is set to On External Audio Bypass is greyed out when Centre Channel Input is set to On When using external speakers SPEAKER B make sure to set External Audio Bypass to Yes ...

Страница 70: ...ress a b to select Audio Only and then press OK 1 2 3 Audio only When listening to music from a music programme you can set the Liquid Crystal display off and enjoy audio only Description Audio is output without screen image Both screen images and audio are output Selected item On Off 1 2 Auto Sync adjustment PC input mode only For automatically adjusting the PC image Press MENU and the MENU scree...

Страница 71: ... b to select the specific adjustment item Input Select Selecting input source Can use for selecting the input source Press MENU and the MENU screen displays 1 2 4 3 Press c d to select Option Press a b to select Input Select and then press OK Press a b c d to select a signal type you want to set and then press OK If the selected signal type is incorrect an image does not display or no colour image...

Страница 72: ... Example Colour system setting for TV AV input mode You can change the colour system to one that is compatible with the image on the screen Press MENU and the MENU screen displays 1 2 4 3 Press c d to select Option Press a b to select Colour System and then press OK Press a b to select a compatible video signal system of your equipment and then press OK Some items may be greyed out They are not se...

Страница 73: ...emphasising high contrast for sports viewing Selected item STANDARD MOVIE GAME USER DYNAMIC Wide screen signalling WSS for TV AV input mode WSS allows a television to switch automatically among the different screen formats Press MENU and the MENU screen displays 1 2 Press a b to select WSS and then press OK 3 Press c d to select Setup Press c d to select On or Off and then press OK 4 NOTE Try to s...

Страница 74: ... TV AV input mode Manual Selection Press f The WIDE MODE menu displays The menu lists the wide mode options selectable for the type of video signal currently received Auto Selection If you set WSS and 4 3 Mode in the Setup menu on page 72 the optimum WIDE mode is automatically chosen for every broadcast containing the WSS information WSS menu To enable Auto Selection set WSS in the Setup menu to O...

Страница 75: ...n display Keeps the original aspect ratio in a full screen display The top and bottom of the image is slightly cropped Detects the resolution of the signal and displays an image with the same number of pixels on the screen An image fully fills the screen 1024g768 NOTE Connect the PC before making adjustments See page 67 Selectable screen size may vary with input signal type a Screen size images Ke...

Страница 76: ...elect the Input Signal on the Setup menu when receiving one of the 6 input signals listed above 2 Press c d to select Setup Setup menu displays DNR Digital Noise Reduction Produces a clearer video image 1 2 3 Press MENU and the MENU screen displays Press c d to select Option Press a b to select DNR and then press OK Some items may be greyed out They are not selectable Press a b to select the desir...

Страница 77: ...andby Recording Even when the System is in the standby mode you can record to external recording equipment VCR or DVD player connected to AV OUTPUT or SCART terminals using this function Press MENU and the MENU screen displays 1 2 Press c d to select Option Press a b to select Standby Recording and then press OK 3 4 Off On Press c d to select On and then press OK Description AV signals output from...

Страница 78: ...erminal is adjusted with il k on the remote control unit or the Display Sound via speakers is muted Selected item Fixed Variable Press c d to select Option Variable Fixed Sleep timer Allows you to set a time when the TV automatically switches to standby 0 hr 30 min 1 hr 00 min 1 hr 30 min 2 hr 30 min 2 hr 00 min Off Each time you press SLEEP the remaining time switches as shown below When the time...

Страница 79: ...Press OK to display the PIN input window Press c d to select Setup Useful adjustment settings Resetting the PIN Allows you to reset your PIN Press a b to select Child Lock and then press OK Press a b to select Reset and then press OK Press c d to select Yes and then press OK Press MENU and the MENU screen displays Press c d to select Setup NOTE As a precautionary measure make a note of your PIN an...

Страница 80: ...rom the Centre Channel Input terminal is output from the speaker Press MENU and the MENU screen displays 1 2 Press c d to select Option and then press OK 3 Press a b to select Centre Channel Input and then press OK Off On Speaker Connect to external audio equipment that supports a 5 1ch surround system Refer to your external equipment operation manual for details AV amplifier DVD player etc ...

Страница 81: ...ayed on the right side screen Press SELECT to set either screen to be active z displays on the active screen which has sound output z Press b to select another input source on the active screen A selected image displays Press c to exit dual screen 4 z 1 FREEZE Press d A moving image displays on the left screen and a still image displays on the right screen The still image is one frame captured fro...

Страница 82: ...ress m the screen switches as shown upper right If you select a programme with no Teletext signal No Teletext available displays The same message displays during dual screen or other modes if no Teletext signal is available 1 TELETEXT TELETEXT 2 3 RED GREEN YELLOW BLUE TELETEXT May appear in DTV input mode When viewing the Teletext information Press Pr to increase the page number Press Ps to decre...

Страница 83: ...d when the service does not contain the subtitle information Time display You can display the time information included in the DTV and Teletext broadcasts Select a TV channel providing Teletext information The time information is automatically captured 1 2 3 4 Press p The channel display will appear on the Display Press p again within the three second interval the channel display is on the screen ...

Страница 84: ...k the colour system setting See pages 27 and 71 Check the input signal setting See page 70 The unit s internal temperature has increased Remove any objects blocking vent or clean Check the power control setting See page 52 Is sleep timer set See page 77 Is connection to other components correct See pages 63 to 67 Has input signal setup been done correctly after connection See page 70 Is the correc...

Страница 85: ...1 5 kHz 37 9 kHz 31 5 kHz 37 9 kHz 31 5 kHz 37 9 kHz 37 5 kHz 43 3 kHz 31 5 kHz 35 1 kHz 37 9 kHz 48 1 kHz 46 9 kHz 53 7 kHz 48 4 kHz 56 5 kHz 60 0 kHz 68 7 kHz 45 0 kHz 48 1 kHz 48 4 kHz 64 0 kHz 34 9 kHz 49 7 kHz 60 2 kHz 640 x 400 720 x 400 VGA 640 x 480 WVGA 848 x 480 SVGA 800 x 600 1024 x 768 XGA 1280 x 720 WXGA 1280 x 768 SXGA 1280 x 1024 VGA 640 x 480 MAC13 XGA 1024 x 768 MAC19 SVGA 832 x 6...

Страница 86: ...arity bit Data length Stop bit Flow control 9 600 bps 8 bits None 1 bit None Appendix Command format Communication procedure Send the control commands from the PC via the RS 232C connector The Display operates according to the received command and sends a response message to the PC Do not send multiple commands at the same time Wait until the PC receives the OK response before sending the next com...

Страница 87: ...OSITION AV ⳮ10 Ⳮ10 H POSITION PC 0 180 V POSITION AV ⳮ20 Ⳮ20 V POSITION PC 0 100 CLOCK 0 180 PHASE 0 40 TOGGLE AV NORMAL AV ZOOM 14 9 AV PANORAMA AV FULL AV CINEMA 16 9 AV CINEMA 14 9 AV NORMAL PC CINEMA PC FULL PC DOT BY DOT PC TOGGLE MUTE MUTE OFF TOGGLE ON OFF DUAL SCREEN OFF DUAL SCREEN ON TOGGLE OFF SLEEP TIMER 30 MIN SLEEP TIMER 1 HOUR SLEEP TIMER 1 HOUR 30 MIN SLEEP TIMER 2 HOUR SLEEP TIMER...

Страница 88: ...input 7 Not used 8 Audio video control 9 Earth 10 AV LINK control 11 Not used 12 Not used 13 Earth 14 Not used 15 Chroma S Video input 16 Not used 17 Earth for video 18 Earth 19 TV Monitor output 20 Video input S video input 21 Plug shield SCART INPUT 3 1 Audio right output 2 Audio right input 3 Audio left output 4 Common earth for audio 5 Earth 6 Audio left input 7 Blue input 8 Audio video contro...

Страница 89: ...8K OFDM Terminals SCART AV input RGB input TV output INPUT 2 UHF VHF 75 q Din type Digital INPUT 3 SCART AV input output Y C input RGB input RCA pin Component input ANTENNA OUT UHF VHF 75 q Din type INPUT 4 S VIDEO Y C input RCA pin AV input Rear INPUT 1 Front AVC System AV OUTPUT RCA pin AV output Audio Variable Fixed DC OUTPUT DC9V 7W MAX UHF VHF 75 q Din type Analogue ANTENNA IN SCART AV input ...

Страница 90: ...89 Dimensional drawings 671 307 795 917 70 5 700 4 822 6 200 307 638 706 400 434 395 1 463 8 110 200 Unit mm Display NOTE Figures within parentheses are unique to LC 37GD1E model ...

Страница 91: ...Unit mm AVC System 4 Rating 5 6 7 8 9 10 11 12 13 14 15 16 17 18 AGE Universal viewing Parental approval preferable X rated Rating Universal viewing Parental approval preferable X rated Universal viewing Parental approval preferable X rated Maturity rating ...

Страница 92: ... and see the website at http www nederlandict nl index php Please use the Belgian electronics recycling system called Recupel and see the website at http www recupel be Please use the Swiss electronics recycling system called SWICO and see the website at http www swico ch 2 For our customers in United Kingdom Germany France and Italy Please contact your local authorities for collection and recycli...

Страница 93: ... in Spain Gedruckt in Spanien Imprimé en Espagne TINS B360WJZZ 06 2004 OPERATION MANUAL MODE D EMPLOI BEDIENUNGSANLEITUNG LC 32GD1E TU 32GD1E Printed on environmentally friendly paper Auf ökologischem Papier gedruckt Imprímé sur papíer écologique ...

Отзывы: