24
SESAMO
DUALCORE
DANGER: to carry out the LS procedure correctly, all the sensor and processor inputs
must have correct NO and NC values. Check the default values of the processor inputs in
the table and those of the inputs of the sensor in the manual of the sensor. If they are
incompatible, reprogram the specific input in the processor by following the procedure
described in this manual. If not, the safety devices could fail to work and the automatic
movement of the doors could cause serious injury or damage to persons or objects with
the risk of fatal lesions.
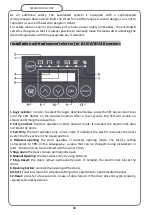
Activate the (LS) procedure as described below using the keys and display (fig
23.1):
1-
press the +/- keys on the display until the LS code appears then press ENT: the
display will show the code -- ;
2-
press again and hold the ENT key (about 5 seconds) until the counter displays
seconds from 60, 59, 58, ... to 0: the procedure has started correctly, release the
ENT key
3-
60 sec are available to: close the cover of the automated system, check that the
sensors are in the correct position, clear the detection area by removing any
obstacles under the sensors - note: it is possible to reset the count by pressing the
ESC key, and immediately passing to step 4
4-
after about 60 sec. the control unit acquires the sensors in about 10 sec - it is
possible to recognize the end of the LS procedure when the sensors remain in the
standby state
5-
open the cover and read the code on the display: if it is type S, proceed to point 6,
if it is type F flashing, proceed to point 7
6-
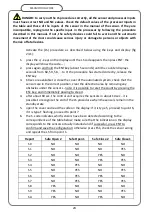
the S. code indicates which sensors have been detected according to the
correspondence of the table below; make sure that the indication on the display
corresponds to the sensors actually installed and if successful, press ENT to
confirm and save the configuration; otherwise press ESC, check the sensor wiring
and repeat the LS from point 1.
Report
Safe Open 2
Safe Open 1
Safe Close 2
Safe Close 1
S0
NO
NO
NO
NO
S1
NO
NO
NO
YES
S2
NO
NO
YES
NO
S3
NO
NO
YES
YES
S4
NO
YES
NO
NO
S5
NO
YES
NO
YES
S6
NO
YES
YES
NO
S7
NO
YES
YES
YES
S8
YES
NO
NO
NO
S9
YES
NO
NO
YES
SA
YES
NO
YES
NO
Содержание DUALCORE LH100
Страница 1: ...LH100 LH140 RD100 ENGLISH AUTOMATED SYSTEMS FOR SLIDING DOORS INSTALLATION MANUAL ...
Страница 44: ...44 SESAMO DUALCORE Fig A Fig B ...
Страница 45: ...45 SESAMO DUALCORE Fig 1 ...
Страница 46: ...46 SESAMO DUALCORE Fig 2 ...
Страница 47: ...47 SESAMO DUALCORE Fig 3 ...
Страница 48: ...48 SESAMO DUALCORE WARNING Exit way ONLY for RD100 Fig 4 ...
Страница 49: ...49 SESAMO DUALCORE Fig 5 ...
Страница 50: ...50 SESAMO DUALCORE Fig 5 A ...
Страница 51: ...51 SESAMO DUALCORE Fig 6 Fig 7 ...
Страница 52: ...52 SESAMO DUALCORE Fig 8 Fig 9 ...
Страница 53: ...53 SESAMO DUALCORE Fig 9a Fig 10 ...
Страница 54: ...54 SESAMO DUALCORE Fig 11 Fig 12 ...
Страница 55: ...55 SESAMO DUALCORE Fig 13 Fig 14 Fig 15 ...
Страница 56: ...56 SESAMO DUALCORE Fig 16 Fig 16a ...
Страница 57: ...57 SESAMO DUALCORE Fig 17 Fig 17a ...
Страница 58: ...58 SESAMO DUALCORE Fig 18 Fig 19 Fig 20 ...
Страница 59: ...59 SESAMO DUALCORE Fig 21 Fuses 6 3A T J ...
Страница 60: ...60 SESAMO DUALCORE Fig 22 ...
Страница 61: ...61 SESAMO DUALCORE Fig 23 1 Fig 23 2 ...
Страница 62: ...62 SESAMO DUALCORE Fig 24 PARAMETER 30 1 ...
Страница 63: ...63 SESAMO DUALCORE Fig 25 PARAMETER 30 1 Exit way ...
Страница 64: ...64 SESAMO DUALCORE Fig 25 A ...
Страница 65: ...65 SESAMO DUALCORE Fig 26 ...
Страница 66: ...66 SESAMO DUALCORE Fig 27 PARAMETER 31 1 ...
Страница 67: ...67 SESAMO DUALCORE Fig 28 PARAMETER 31 0 ...
Страница 68: ...68 SESAMO DUALCORE Fig 29 ...
Страница 69: ...69 SESAMO DUALCORE Fig 30 Fig 31 ...
Страница 71: ...71 SESAMO DUALCORE Fig 33 ...
Страница 72: ...72 SESAMO DUALCORE Fig 34 ...

