background image

3

English

Table of Contents

Registration:

www.sentrysafe.com/customercare/register_your_product

Reasons to register

By registering your SentrySafe product you can easily retrieve forgotten codes and combinations, 
which would otherwise require a notary letter and payment. 

By registering your SentrySafe product you can be sure that in the unfortunate circumstance of a 
fire you will be guaranteed your replacement safe (provided official paperwork). 

Français  .................................................................................................... 17 
Español ...................................................................................................... 33

English 

Warnings .............................................................................................................. 2 

Registration .......................................................................................................... 3 

Mechanical Combination Lock ............................................................................... 4-5 

Programmable Electronic Lock ............................................................................... 6-9 

Operating the Light ............................................................................................... 10 

Bolting Down Your Safe ......................................................................................... 11-12 

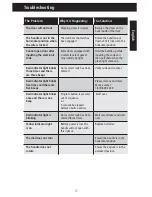
Troubleshooting .................................................................................................... 13 

Customer Service................................................................................................... 14 

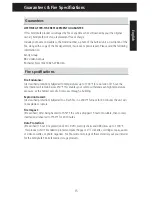
Guarantees & Fire Specifications ............................................................................ 15

IMPORTANT

If you experience any problems or challenges with your safe, please contact us.  
Many issues can be resolved quickly without the product being returned.

Содержание SFW123ES

Страница 1: ... Combinaison du cadran pas tous les modèles Combinación del disco No todos los modelos Key No Not All Models Clé Nº pas tous les modèles Llave No No todos los modelos Factory Code Not All Models Code d usine pas tous les modèles Código de fábrica No todos los modelos IMPORTANT If you experience any problems or challenges with your safe please contact us Many issues can be resolved quickly IMPORTAN...

Страница 2: ...Fire Safe Owner s Manual ...

Страница 3: ...tos in your safe we recommend putting them in an air tight container prior to placing them in the safe for storage NOTE Sentry Group will not be responsible for any damage or loss of items placed in the unit due to moisture WARNING DO NOT store pearls in this safe unit In the event of a fire potential damage to delicate pearls occurs at temperatures much lower than the 350 F interior performance me...

Страница 4: ...e that in the unfortunate circumstance of a fire you will be guaranteed your replacement safe provided official paperwork Français 17 Español 33 English Warnings 2 Registration 3 Mechanical Combination Lock 4 5 Programmable Electronic Lock 6 9 Operating the Light 10 Bolting Down Your Safe 11 12 Troubleshooting 13 Customer Service 14 Guarantees Fire Specifications 15 IMPORTANT If you experience any pr...

Страница 5: ...bination several times before putting valuables inside 1 FOR DUAL KEY COMBINATION LOCKS ONLY insert key into the lock turn to the unlocked position then remove the key This is a secondary locking feature not an override key Without the key you will not be able to open your safe 2 Rotate dial to 0 then rotate right clockwise passing 0 three times continue rotating until you reach the first number in...

Страница 6: ...ppens you will hear a click DO NOT be alarmed This feature is designed to protect the bolts from being over powered by force If this occurs simply exert force in the opposite direction lifting up until the handles clicks back into place and repeat steps 1 5 to open your safe 1 Close the door and pull the handle upward until the handle is horizontal For water resistant units additional pressure to ...

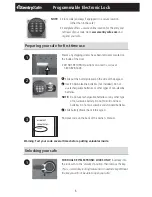
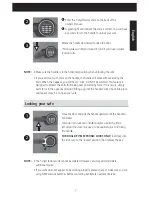
Страница 7: ...ies or other types of non alkaline batteries NOTE Do not use rechargeable batteries or any other type of non alkaline battery Do not mix old and new batteries Do not mix alkaline and standard batteries C Slide battery drawer back into keypad 3 Find your code on the back of this owner s manual Warning Test your code several times before putting valuables inside 1 FOR DUAL KEY ELECTRONIC LOCKS ONLY ...

Страница 8: ...olts from being over powered by force If this occurs simply exert force in the opposite direction lifting up until the handles clicks back into place and repeat steps 1 3 to open your safe 1 Close the door and pull the handle upward until the handle is horizontal For water resistant units additional pressure to the front left side of the door may need to be applied prior to rotating the handle 2 F...

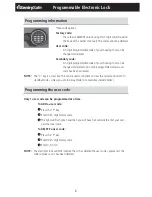
Страница 9: ...sed at anytime to clear the system and return to standby mode unless you are in delay mode 3 consecutive invalid entries Only 1 user code can be programmed at a time To ADD a user code 1 Press the P key 2 Enter the 5 digit factory code 3 The light will flash green and then you will have five seconds to enter your own personal user code To DELETE a user code 1 Press the P key 2 Enter the 5 digit fact...

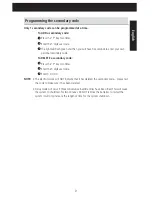
Страница 10: ...s the P key two times 2 Enter the 5 digit user code 3 Enter 0 0 0 0 0 4 s The electronic lock will NOT indicate that it has deleted the secondary code please test the code to make sure it has been deleted s Delay mode will occur if three consecutive invalid entries have been tried This will cause the system to shutdown for two minutes Do NOT remove the batteries to restart the system it will only ...

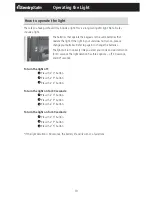
Страница 11: ...ry time you enter your code and will remain on for 30 seconds The light duration has three options off 30 seconds and 60 seconds To turn the light off 1 Press the 0 button 2 Press the P button 3 Press the 3 button To turn the light on for 30 seconds 1 Press the 0 button 2 Press the P button 3 Press the 4 button To turn the light on for 60 seconds 1 Press the 0 button 2 Press the P button 3 Press t...

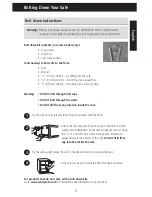
Страница 12: ...izontal with the floor 2 Unlock the safe and open the door Look to the bottom of the safe for two indentations on the feet in opposite corners Using the 7 16 11 mm bit drill a hole through each indentation perpendicular to the bottom of the safe Do NOT drill from any location inside the safe 3 Tip the safe upright place the safe in the desired location and open the door 4 Use a screw or pencil to m...

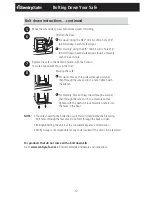
Страница 13: ...o a hole Tighten with the wrench B For masonry Pass each lag screw through a washer then through the safe and into a masonry anchor Tighten with the wrench Place masonry anchors into the holes in the floor 4 s The safe should not be bolted to a wall this will compromise the fire rating Drill holes through the feet only Do not drill through the back or sides s Bolting unbolting the unit is at the con...

Страница 14: ...s on Red indicator light blinks three times and there are three beeps An incorrect code has been entered Verify code and re enter Red indicator light blinks five times and there are five beeps Please call our Customer Service center 1 800 828 1438 Red indicator light blinks once and there is one beep Program button is pressed out of sequence or 5 seconds has lapsed between button entries Start over ...

Страница 15: ...l to Sentry Group Dept 200 882 Linden Avenue Rochester NY 14625 2784 USA OR Fax statement notary seal must be legible to 1 585 381 2940 Paying by credit card Payment may also be made using your VISA or Mastercard credit card by phone only Call 1 800 828 1438 to make credit card payment Do not fax credit card information NOTE Prices subject to change without prior notification NOTE Key and combinati...

Страница 16: ...This enables your safe to withstand even high temperature exposure as the hottest part of a fire moves through a building Explosion Hazard UL classified protection Subjected to a flash fire in a 2000 F furnace for 30 minutes the unit will not explode or rupture Fire Impact ETL verified After being heated to 1550 F the safe is dropped 15 feet onto rubble then cooled inverted and reheated to 1550 F for 3...

Страница 17: ...16 ...

Страница 18: ...Fire Safe Manuel Du Propriétaire ...

Страница 19: ...timbres ou des photographies dans ce coffre fort nous vous recommandons de les déposer d abord dans un contenant hermétique avant de les placer dans le coffre fort REMARQUE Sentry Group ne pourra pas être tenu responsable de tout dommage subi par les articles placés dans le coffre à cause de l humidité ni de la perte desdits articles AVERTISSEMENT NE placez PAS de perles dans le coffre Lors d un i...

Страница 20: ...e certain que dans le cas malheureux d un incendie votre coffre fort sera remplacé à condition de fournir les documents officiels Avertissements 18 Enregistrement 19 Serrure à Combinaison Mécanique 20 21 Serrure Électronique Programmable 22 25 Fonctionnement de l Éclairage 26 Fixation de Votre Coffre fort 27 28 Dépannage 29 Service à la Clientèle 30 Garanties et Normes D incendie 31 IMPORTANT Si vo...

Страница 21: ...ser des objets de valeur dans le coffre POUR LES SERRURES DOUBLES À COMBINAISON ET À CLÉ SEULEMENT insérez la clé dans la serrure tournez la en position déverrouillé puis retirez la La clé fait partie du mécanisme de verrouillage et n est pas une clé de surpassement Vous ne pouvez pas ouvrir votre coffre fort sans la clé Tournez le cadran jusqu à 0 et ensuite à droite dans le sens horaire pour pas...

Страница 22: ...étez PAS Cette caractéristique est conçue pour éviter que les pênes ne soient endommagés par une force excessive Si cela se produit utilisez simplement la même force en sens inverse sur la poignée en la levant jusqu à ce qu elle se remette en place en faisant un clic Répétez ensuite les étapes 1 à 5 1 Fermez la porte et levez la poignée jusqu à ce qu elle soit en position horizontale Dans le cas d...

Страница 23: ...E Ne pas utiliser des piles rechargeables ou a ucun autre type de piles non alcalines Ne pas mélanger des piles usagées avec des piles neuves Ne pas mélanger des piles alcalines avec des piles standard C Réinsérez le compartiment à piles dans le pavé numérique 3 Votre combinaison se trouve au dos du manuel du propriétaire Avertissement Vérifiez votre combinaison plusieurs fois avant de déposer des ...

Страница 24: ...cessive Si cela se produit utilisez simplement la même force en sens inverse sur la poignée en la levant jusqu à ce qu elle se remette en place en faisant un clic Répétez ensuite les étapes 1 à 3 1 Fermez la porte et levez la poignée jusqu à ce qu elle soit en position horizontale Dans le cas d un coffre étanche il peut être nécessaire d appliquer une pression supplémentaire sur la section avant g...

Страница 25: ...orte quand pour vider le système et revenir au mode de veille à moins que vous ne soyez en mode délai 3 saisies invalides consécutives Une seule combinaison d utilisateur peut être programmée à la fois Pour AJOUTER une combinaison d utilisateur 1 Appuyez sur la touche P 2 Saisissez la combinaison d usine à 5 chiffres 3 Le témoin lumineux clignote en vert et vous avez cinq secondes pour saisir votr...

Страница 26: ...r la touche P deux fois 2 Saisissez la combinaison d utilisateur à 5 chiffres 3 Saisissez 0 0 0 0 0 REMARQUE s A SERRURE ÏLECTRONIQUE N INDIQUE 0 3 QUE LA COMBINAISON SECONDAIRE A ÏTÏ EF facée veuillez tester la combinaison pour vous assurer qu elle a été effacée s E SYSTÒME PASSE EN MODE DÏLAI SI VOUS SAISISSEZ TROIS COMBINAISONS INVALIDES DE suite Cela occasionne l arrêt du système pendant deux ...

Страница 27: ... votre combinaison et reste allumé pendant 30 secondes Il y a trois options pour la durée d éclairage éteint 30 secondes et 60 secondes Pour désactiver l éclairage 1 Appuyez sur la touche 0 2 Appuyez sur la touche P 3 Appuyez sur la touche 3 Pour activer l éclairage pendant 30 secondes 1 Appuyez sur la touche 0 2 Appuyez sur la touche P 3 Appuyez sur la touche 4 Pour activer l éclairage pendant 60...

Страница 28: ...ort au plancher 2 Déverrouillez le coffre fort et ouvrez la porte Regardez le dessous du coffre fort pour trouver deux indentations sur les pieds dans des coins opposés Prenez le foret de 7 16 po 11 mm et percez un trou dans chaque indentation perpendiculairement au dessous du coffre fort NE percez PAS depuis l intérieur du coffre fort 3 Remettez le coffre fort en position droite placez le à l emp...

Страница 29: ...re fort puis dans un trou du plancher Serrez avec la clé B Pour un plancher de maçonnerie Passez chaque tirefond dans une rondelle dans un trou du coffre fort puis dans un ancrage de maçonnerie Serrez avec la clé Insérez des ancrages de maçonnerie dans les trous du plancher 2EMARQUE s Le coffre fort ne doit pas être fixé au mur car cela affecte la résistance au feu Ne percez des trous que dans les ...

Страница 30: ...nd trois signaux sonores Une combinaison invalide a été saisie Vérifiez la combinaison et saisissez la de nouveau Le témoin lumineux rouge clignote cinq fois et on entend cinq signaux sonores Veuillez communiquer avec le Service à la Clientèle au 1 800 828 1438 Le témoin lumineux rouge clignote une fois et on entend un signal sonore J ai appuyé sur les touches sans suivre la séquence ou 5 secondes...

Страница 31: ...00 882 Linden Avenue Rochester NY 14625 2784 USA OU envoyez une déclaration par télécopieur le sceau du notaire doit être lisible au 1 585 381 2940 Paiement avec une carte de crédit Le paiement peut également être fait avec une carte de crédit VISA ou Mastercard par téléphone seulement Téléphonez au 1 800 828 1438 pour payer avec une carte de crédit N envoyez pas les renseignements de votre carte ...

Страница 32: ...n à des températures élevées pendant que le foyer de l incendie se déplace dans un édifice Risque d explosion Protection selon la classification UL Lorsque soumis à un feu à inflammation instantanée dans un four chauffé à 1 093 C pendant 30 minutes le coffre fort n explose pas et ne se fissure pas Résistance au feu et aux impacts Homologation ETL Après avoir été chauffé à 843 C le coffre fort fait une...

Страница 33: ...32 ...

Страница 34: ...Fire Safe MANUAL DEL DUEÑO ...

Страница 35: ...onales relojes estampillas o fotografíalas dentro de su caja fuerte recomendamos colocarlos en un envase hermético antes de colocarlos dentro de la caja fuerte para almacenamiento NOTA Sentry Group no será responsable por daños o pérdida de artículos colocados dentro de la unidad debido a humedad ADVERTENCIA NO GUARDE perlas dentro de esta unidad de caja fuerte En caso de un incendio las perlas de...

Страница 36: ... lamentable circunstancia de un incendio se le garantizará su caja fuerte de reemplazo provista con documentación oficial Advertencias 34 Registración 35 Cerradura Mecánica de Esfera 36 37 Cerradura Electrónica Programable 38 41 Operación de la Luz 42 Apernado de su Caja Fuerte 43 44 Identificación y Resolución de Problemas 45 Servicio a Clientes 46 Garantías y Especificaciones 47 IMPORTANTE Si exper...

Страница 37: ...culos de valor adentro 1 PARA CERRADURAS DOBLES DE LLAVE COMBINACIÓN SOLAMENTE inserte la llave dentro de la cerradura gírela hasta la posición abierta luego quite la llave La cerradura es una característica de cierre secundaria no una llave de anulación Sin la llave no podrá abrir su caja fuerte 2 Gire la esfera hasta 0 luego gírela hacia la derecha en sentido del reloj pasando 0 tres veces siga ...

Страница 38: ...do NO se preocupe Esta característica está diseñada para proteger la anulación de los pernos por fuerza Si esto ocurre simplemente aplique fuerza en el sentido contrario levantando hasta que la manija se enganche de nuevo en posición y repita los pasos 1 5 1 Cierre la puerta y hale la manija hacia arriba hasta que esté en posición horizontal Para las unidades resistentes al agua puede ser necesari...

Страница 39: ... V cc NOTA No utilice pilas recargables o cualquier otro tipo de pila no alcalina No mezcle pilas viejas con nuevas No mezcle pilas alcalinas con pilas estándar C Deslice la bandeja de pilas de nuevo dentro del teclado 3 Busque su codigo en la contraportada de este manual del dueño Advertencia Pruebe su combinación varias veces antes de colocar artículos de valor adentro 1 PARA CERRADURAS DOBLES D...

Страница 40: ...ón de los pernos por fuerza Si esto ocurre simplemente aplique fuerza en el sentido contrario levantando hasta que la manija se enganche de nuevo en posición y repita los pasos 1 3 1 Cierre la puerta y hale la manija hacia arriba hasta que esté en posición horizontal Para las unidades resistentes al agua puede ser necesario apli car presión adicional al lado izquierdo delantero de la puerta antes ...

Страница 41: ...er momento para depurar el sistema y regresar al modo de espera salvo que se encuentre en el modo de demora 3 entradas inválidas consecutivas Sólo puede programarse 1 código de usuario a la vez Para AÑADIR un código de usuario 1 Oprima la tecla P 2 Entre el código de fábrica de 5 dígitos 3 La luz verde parpadeará y luego usted tendrá cinco segundos para entrar su propio código de usuario personal ...

Страница 42: ...dario 1 Oprima la tecla P dos veces 2 Entre el código de usuario de 5 dígitos 3 Entre 0 0 0 0 0 NOTA s A CERRADURA ELECTRØNICA INDICARÉ QUE HA BORRADO EL CØDIGO SECUNDARIO n PRUEBE EL código para asegurar que se haya borrado s CURRIRÉ EL MODO DE DEMORA SI SE HA INTENTADO TRES ENTRADAS INVÉLIDAS CONSECUTIVAS Esto ocasionará el paro del sistema durante dos minutos NO quite las pilas para rear rancar...

Страница 43: ...e su código y permanecerá encendida durante 30 segundos La duración de la luz tiene tres opciones apagada 30 segundos y 60 segundos Para apagar la luz 1 Oprima el botón 0 2 Oprima el botón P 3 Oprima el botón 3 Para encender la luz durante 30 segundos 1 Oprima el botón 0 2 Oprima el botón P 3 Oprima el botón 4 Para encender la luz durante 60 segundos 1 Oprima el botón 0 2 Oprima el botón P 3 Oprim...

Страница 44: ...rta horizontal al piso 2 Desbloquee la caja fuerte y abra la puerta Busque dos muescas en las patas del fondo de la caja fuerte en esquinas opuestas Usando la broca de 7 16 11 mm taladre un agujero a través de cada muesca perpendiculares al fondo de la caja fuerte TALADRE DESDE NINGÞN LUGAR DENTRO DE LA CAJA 3 Voltee la caja fuerte en posición parada colóquela en el lugar deseado y abra la puerta ...

Страница 45: ... del agujero Apriete con la llave inglesa B Para mampostería Pase cada tirafondos a través de una arandela luego a través de la caja fuerte y dentro de un anclaje de mampostería Apriete con la llave inglesa Coloque anclajes de mampostería en los agujeros en el piso 4 s La caja no debe apernarse a una pared esto comprometerá la clasificación de incen dios Taladre agujeros a través de las patas solam...

Страница 46: ... enciende la luz verde La luz indicadora roja parpadea tres veces y hay tres pitidos Se ha entrado un código incorrecto Verifique el código y éntrelo de nuevo La luz indicadora roja parpadea cinco veces y hay cinco pitidos Llame a nuestro centro de Servicio a Clientes al 1 800 828 1438 La luz indicadora roja parpadea una vez y hay un pitido Se oprime el botón de programación fuera de secuencia o H...

Страница 47: ... Rochester NY 14625 2784 USA O envíe la declaración por fax el sello del notario debe ser legible al 1 585 381 2940 Pago por tarjeta de crédito El pago también puede efectuarse usando su tarjeta de crédito VISA o MasterCard por teléfono solamente Llame al 1 800 828 1438 para hacer un pago por tarjeta de crédito No envíe por fax la información de tarjeta de crédito NOTA s 0RECIOS SUJETOS A CAMBIO S...

Страница 48: ...turas aún más altas a medida que la parte más caliente de un incendio atraviese un edificio Peligro de explosión protección clasificada por UL Al estar sujeta a un incendio instantánea en un horno a 1 093 C durante 30 minutos la unidad no explotará ni se reventará Impacto de incendios verificada por ETL Después de calentarse hasta 843 C la caja se deja caer 4 57 m sobre escom bros luego se enfría se ...

Отзывы: