MI001523-E
ENGLISH 4/8
Electrical Connections
POWER SUPPLY AND CAN/MODBUS INTERFACE
Power Supply and CAN/MODBUS interface are available by using the bus for the Seneca
DIN rail, by the rear IDC10 connector or by Z-PC-DINAL1-35 accessory.
Rear Connector (IDC10)
Z-PC-DINAL1-35 Accessory Use
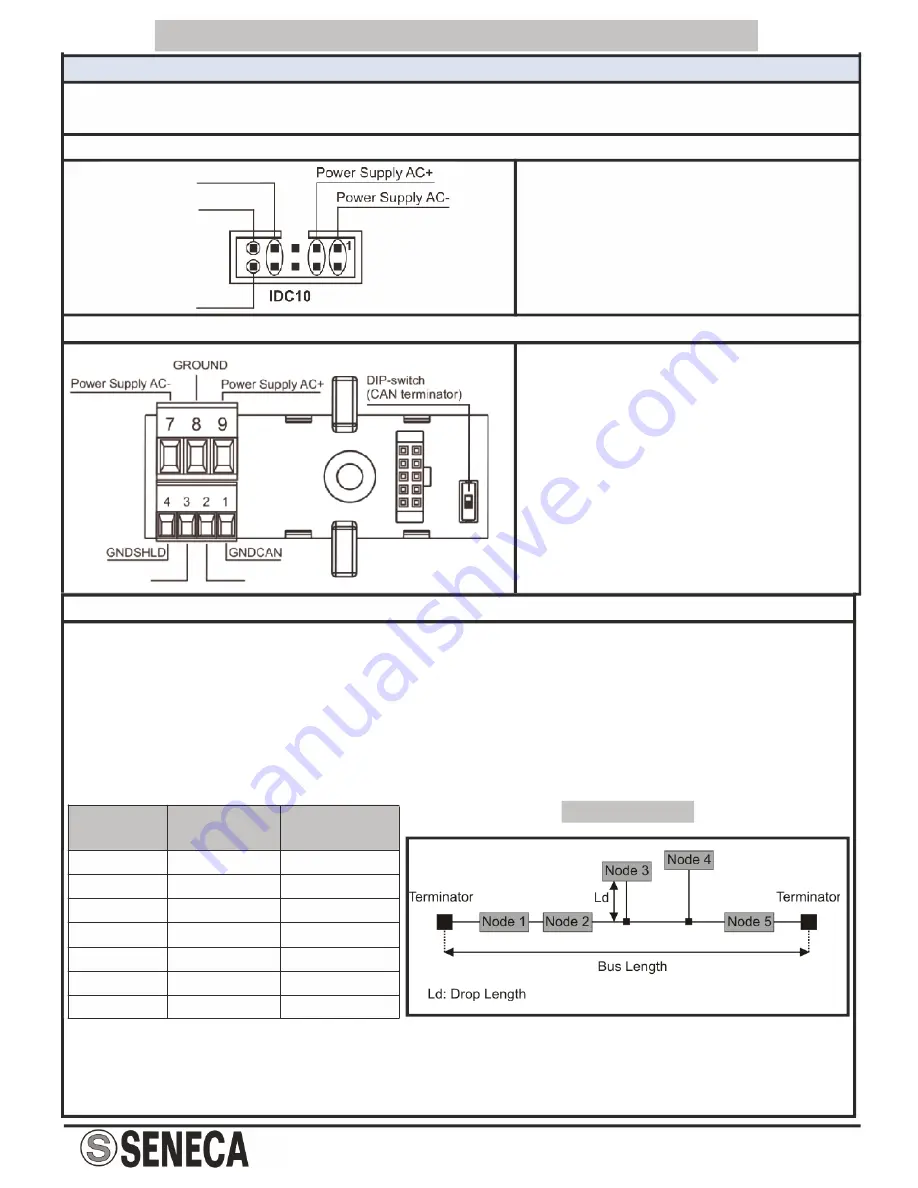
In the figure the meaning of the IDC10
connector pins is showed, in the case
the user decides to provide the signals
directly through it.
In case of Z-PC-DINAL-1-35
accessory use, the signals may be
provided by terminal blocks. The
figure shows the meaning of the
terminals and the position of the DIP-
switch (present on each DIN rail
supports listed on Accessories) for
CAN network termination.
GNDSHLD: Shield to protect the
connection cables (it is always
recommended).
GNDCAN / GNDMODBUS
CANH / A
CANL / B
CANH / A
CANL / B
CAN bus Connection Rules
1) Install the modules on the DIN rail (max 120).
2) Connect the remote modules using cables of proper length. On the table the following
data about the cables length are provided:
-Bus Length: CAN network maximum length as a function of the Baud rate. It is the lenght of
the cables which connect the two bus terminators modules (see Scheme 1).
-Drop Length: maximum length of a drop line (see Scheme 1) as a function of the Baud
Rate.
Scheme 1
Baud rate Bus
Lenght
Drop
Lenght
20 kbps
2500 m
150 m
60 m
5 m
5 m
5 m
3 m
0.3 m
1000 m
500 m
250 m
100 m
50 m
25 m
50 kbps
125 kbps
250 kbps
500 kbps
800 kbps
1000 kbps
For the best performances, the use of special shielded cables is recommended (BELDEN
9841 cable for example).
3) Terminate the two ends of the CANbus network by setting to ON the DIP-switch present
on the DIN rail connection supports (see Accessories) where the two ends are inserted.


