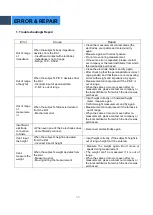
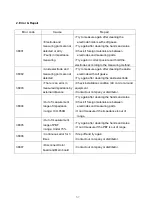
SELVAS Healthcare Accuniq BC380 Скачать руководство пользователя страница 69

69 


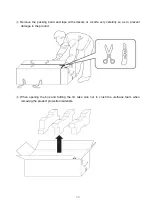
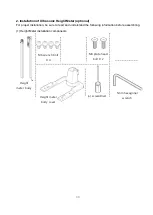
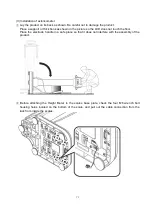
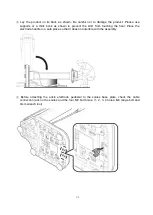
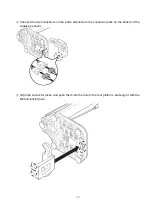
2. Installation of Ultrasonic Height Meter (optional) 

For proper installation, be sure to read and understand the following information before assembling. 
 
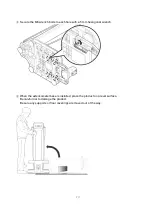
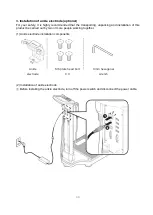
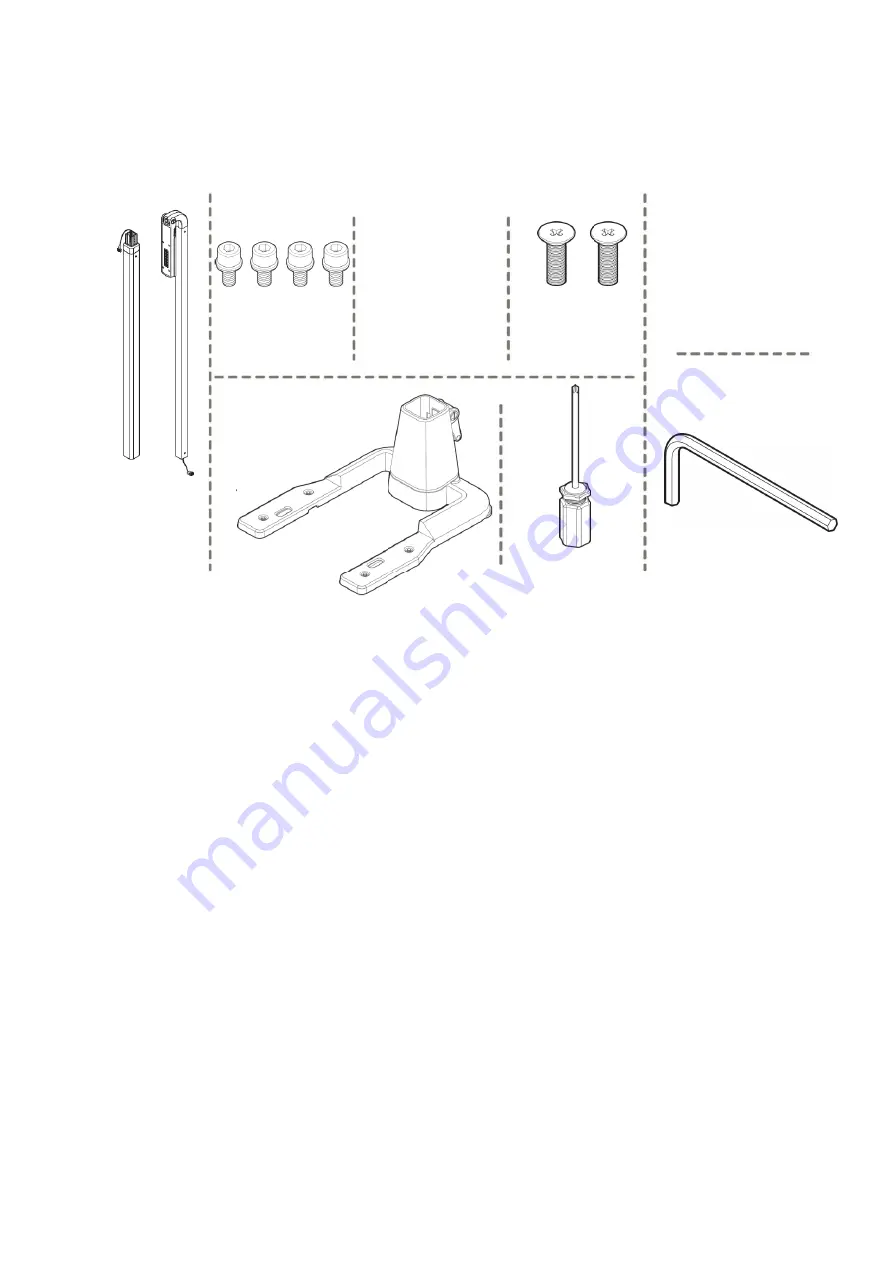
(1) Height Meter installation components 


Height 

meter body 


5mm hexagonal 

wrench 


M6 wrench bolt 

X 4


M4 plate head 

bolt X 2 


(+) screwdriver 


Height meter 

body cover 


Содержание Accuniq BC380

Страница 1: ......

Страница 2: ...93 42 EEC THE PERSONS RESPONSIBLE FOR PLACING DEVICES ON THE EC MARKET UNDER MDD 93 42 EEC SELVAS Healthcare Inc 155 Shinseong ro Yuseong gu Daejeon 34109 Republic of Korea TEL 82 42 879 3000 FAX 82...

Страница 3: ...Package 21 2 Options 22 3 Appearance of the device 24 INSTALLATION 27 1 Power Supply 27 2 Peripheral Device Installation 28 1 Connecting Computer 28 2 Connecting Printer 29 3 Connecting Blood Pressure...

Страница 4: ...SERVICE 58 1 AFTTER SERVICE 58 2 PACKING AND TRANSPORT 58 SPECIFICATION 59 WARRANTY 61 INSTRUCTIONS FOR ASSEMBLY 62 1 HOW TO INSTALL The DEVICE 62 2 ASSEMBLING The HEIGHT METER OPTIONAL 69 3 ASSEMBLI...

Страница 5: ...WORD DEFINITIONS To ensure safe operation and long term performance stability it is essential that you fully understand the functions operating and maintenance instructions by reading this manual befo...

Страница 6: ...nings precautions and notes must be observed for safety Warning During measurement of the body composition a microcurrent of 180 A flows through the body Individuals who have any kind of implanted act...

Страница 7: ...standard EN 60601 1 2006 A1 2013 If in doubt consult the A S department of local distributor Caution Avoid the following environments for storage Where the ambient temperature falls below 25 C or exce...

Страница 8: ...n of measurements This device is specified as Class 1 type BF unit under the standard EN 60601 1 2006 A1 2013 Basic safety and essential performance of Medical Electrical Equipment Therefore patients...

Страница 9: ...user is encouraged to try to correct the interference by one or more of the following measures Reorient or relocate the receiving device Increase the separation between the equipment Connect the equip...

Страница 10: ...onsult with your physician promptly Defective units or accessories must be packed in the replacement cartons to be shipped off from you to our company Shipping and insurance costs for return of defect...

Страница 11: ...our safety Degree of protection against electric shock TYPE BF Please observe operating instructions General warning sign General prohibition sign General mandatory action sign Caution Waste Electrica...

Страница 12: ...ground of the system is fastened to the chassis Do not open This is for factory only Alternating current Direct current Date of manufacture Manufacturer Non ionizing radiation CE mark Serial No Author...

Страница 13: ...13 Use no hooks For indoor use only RoHS2...

Страница 14: ...used in such an environment Emissions test Compliance Electromagnetic environment guidance RF emissions CISPR 11 Group 1 The ACCUNIQ BC380 uses RF energy only for its internal function Therefore its R...

Страница 15: ...ut output lines Mains power quality should be that of a typical commercial or hospital environment Surge IEC 61000 4 5 1 kV differential mode 2 kV common mode 1 kV differential mode 2 kV common mode M...

Страница 16: ...sure that it is used in such an environment Immunity test IEC 60601 test level Compliance level Electromagnetic environment guidance Conducted RF IEC 61000 4 6 Radiated RF IEC 61000 4 3 3 Vrms 150 kHz...

Страница 17: ...fixed transmitters such as base stations for radio cellular cordless telephones and land mobile radios amateur radio AM and FM radio broadcast and TV broadcast cannot be predicted theoretically with a...

Страница 18: ...tter W Separation distance according to frequency of transmitter m 150 kHz to 80 MHz d 1 2 80 MHz to 900 MHz d 1 2 900 MHz to 2 5 GHz d 1 2 0 01 0 12 0 12 0 23 0 1 0 38 0 38 0 73 1 1 2 1 2 2 3 10 3 8...

Страница 19: ...the key factor in obesity assessment is the amount of fat accumulated in the body In general obesity is defined as the state of not only excessive weight compared with height visible obesity but also...

Страница 20: ...fat increases after 30s in men and after Menopause in women It is more common in men than women and the old than the young Visceral fat tends to increase with aging Because the combustion rate per mi...

Страница 21: ...ccessories User manual CD or Paper 1EA Adapter DC 12V 5A 1EA USB Cable 3m 1EA Data management program ACCUNIQ Manager CD 1EA Bolts 6X20mm 2EA L wrench 4mm 1EA Body Cover 1EA Model or specification of...

Страница 22: ...ice is connected to our blood pressure monitor it also indicates the user s blood pressure 3 A4 result sheet for children It shows the children growth curve to help users easily understand the growth...

Страница 23: ...an instrument to measure subject s height more accurately and quickly It employs standoff determination method using ultrasonic sensor Note Height measurement in the morning averages 1 2cm higher tha...

Страница 24: ...panel as touch screen It displays the procedure and results Handle Electrode Handle Electrode measure the impedance by sending harmless electric current to the body Hold them with the hands during me...

Страница 25: ...a computer Height port Connect the external height meter OPTIONAL Wi Fi port Connect the Wi Fi Dongle OPTIONAL USB port Connect a USB drive OPTIONAL Bluetooth port Connect via Bluetooth OPTIONAL Print...

Страница 26: ...Base Weight scale Consists of four plate electrodes and measures weight Plate electrode Measures the impedance The user should step on it with bare feet Weight scale Applied Part Plate electrode Appl...

Страница 27: ...devices may be damaged by electric shock or malfunction 2 When the unit and the peripheral devices are connected the BC380 should be powered on first to preserve proper function and ensure safe operat...

Страница 28: ...e installed For more information please refer to the manual and software CD Note 1 In order to save search and retrieve the users data the user should connect the BCA to a computer with our free data...

Страница 29: ...29 2 Connecting a Printer Connecting the device and the printer directly Connect the A4 printer offered with this device to the PRINTER port located on the rear panel of this device via a USB cable...

Страница 30: ...mputer and the printer Connect a computer to the PC port located on the rear panel of the device using a USB cable Connect the printer to the computer with a printer cable The result sheet can be prin...

Страница 31: ...This device can be connected to the automatic blood pressure monitor from SELVAS Healthcare Optional Connect the blood pressure monitor to the BLOOD PRESSURE port located on the rear panel of the dev...

Страница 32: ...ockwise and open the cover as shown in the picture Insert the thermal paper in the direction as shown in the picture Insert the edge of the thermal paper into the printer slot just slightly Thermal pa...

Страница 33: ...and enter the password 5555 on the key pad Thermal paper will be printed CUT Function On the initial screen press the icon at the left bottom and enter the password 8888 on the key pad Paper will be...

Страница 34: ...rational parameters 1 Entering SYSTEM SETUP On the initial screen press the icon at the left bottom and enter the password 0 0 0 0 The entering password can be changed in Basic setting Password Note F...

Страница 35: ...e Automatic print settings and Number of auto prints Print Position 4 Result Sheet Result sheet setting Logo Adult Child result sheet setting Abdominal analysis result setting 5 Communication Internet...

Страница 36: ...me of the announcement voice from 1 to 10 Password Set password to be entered when entering user settings The factory default password is set to 0000 Please note that if you forget your password after...

Страница 37: ...Data Backup Restore export data to a USB drive or load data from a USB drive into the device 3 Printer Printer connection Connect a printer Select printer type Select the type of printer to connect t...

Страница 38: ...or A4 paper Logo Change the logo displayed at the top right of the result sheet Adult Child result sheet setting Select adult results or child result sheet optional Abdominal analysis result setting S...

Страница 39: ...ation Calibrate the weight value Height Calibration Calibrate the height value 7 Option Management Measurement electrode foot electrode ankle electrode You can select which electrode to use Optional e...

Страница 40: ...9 A S center Contact Us check or enter your contact information Trouble shooting See the cause of common problems and how to fix them Remote check The product can be remotely inspected by a SELVAS tec...

Страница 41: ...position etc Body fluid moves to the lower extremities and affects the results Thus subjects should be measured after maintaining a standing position for 5 minutes Clean both the electrodes and the s...

Страница 42: ...ctrodes When the ankle electrode is selected to measure body composition pull down the socks as shown in the picture and make sure the user s ankle is touching the electrode Caution When using the ank...

Страница 43: ...our arms until the measurement is complete The measurement will be stopped if contact with all eight electrodes is not securely maintained O Correct grip X Imbalanced touch X Grip with only palm Note...

Страница 44: ...peak until the measurement is complete The measured weight is displayed on the screen When the weight measurement is complete the measurement result is displayed Select member measurement or non membe...

Страница 45: ...ubject s age using the numbers buttons on the key pad Select gender Select either MALE or FEMALE on the touch pad or key pad Press the NEXT button on the touch pad Measurement posture 1 After inputtin...

Страница 46: ...e measurement the following screen appears Note 1 When the measurement produces an error An Error message appears on the screen To measure again hold the handle electrodes and press the start buttons...

Страница 47: ...anning the QR code you can check the measurement data with your mobile device and manage it at will from the server in which it is saved Note 1 Scan the QR code with a QR code reader on a smart phone...

Страница 48: ...rement is complete the height is displayed on the height and weight results on the LCD When you hear the chime you can start inputting the personal data The input order is ID age and gender the measur...

Страница 49: ...rn on the power of BPM and the computer Turn on the device Input personal data to create a new ID or input an ID which is already registered Measure blood pressure first Measure body composition The r...

Страница 50: ...ee masses such as muscle organs blood and water S L M Soft Lean Mass composed of body water and protein Minerals composed of bone and electrolytes Protein a major element composed of soft lean mass to...

Страница 51: ...ision Korea Japan China Outside Europe USA Male Less than 90cm Less than 85cm Less than 85cm Less than 102cm Less than 40inch Female Less than 80cm Less than 90cm Less than 80cm Less than 88cm Less th...

Страница 52: ...R is calculated by dividing waist girth by hip girth When W H R is below 0 9 male 0 85 female the risk of visceral obesity is low 6 Weight control 1 Muscle regulation This is the control target for a...

Страница 53: ...optimal body composition based on the gender and biological age of the subject with the actual analyzed body composition It can be used to evaluate the subject s health and body development 3 B M R B...

Страница 54: ...h the body The impedance value can be used to monitor the function of this device and to check body changes 13 Blood Pressure When the blood pressure monitor supplied from SELVAS Healthcare Inc is con...

Страница 55: ...pter and fuses provided by SELVAS Healthcare Please confirm the covering of the cable the state of the adapter connection and other safety checks as below RS 232C cable USB port Adapter 12 When discon...

Страница 56: ...ibutor from which the device was purchased Out of range of measureme nt When the subject s fatness is deviated from the limit Mechanical error Input height correctly or if installed height meter measu...

Страница 57: ...Try again after cleaning the ankle electrode 38003 There is an error in measured impedance by external influence Check installation condition AC cord or around equipment Contact our company or distrib...

Страница 58: ...re designated by our company as repairable How to contact our company Write us at SELVAS Healthcare Inc 155 shinseong ro Yuseong gu Daejeon 34109 Republic of Korea TEL 82 42 879 3000 FAX 82 42 864 446...

Страница 59: ...t for Child and Youth optional Body Composition Analysis Weight LBM Body fat SLM Protein Mineral TBW Muscle Fat analysis Weight SMM Fat mass Obesity analysis BMI PBF WHR Child growth curve height weig...

Страница 60: ...ent temperature range 25 to 70 C Relative humidity range lower than 93 RH Atmospheric pressure range 70 kPa 700 mbar to 106 kPa 1060 mbar Software name and version Name BC380 Version BC380 K 1 0 00 Fo...

Страница 61: ...f warranty Within 1 year from the date of purchase Date of purchase Customer Add Name Tel Dealer market Add Name Tel Note When you receive this warranty make sure that the name of the dealer and the m...

Страница 62: ...this product be carried out by two or more people working together 1 Product installation components 2 Unpacking Place the box on the floor so that the direction of the arrow on the product box faces...

Страница 63: ...band and tape with scissors or a knife very carefully so as to prevent damage to the product When opening the box and folding the lid take care not to crush the urethane foam when removing the product...

Страница 64: ...from the box centering their efforts on the scale Place the main frame of the product on a flat surface with an average slope of less than 10 degrees as shown in the figure When erecting the main fram...

Страница 65: ...he sides of the vertical column of the frame are aligned at right angles so that they match with the bottom platform Make sure that the screw holes on the bottom of the vertical column and the main pl...

Страница 66: ...lling while the other person removes the packing vinyl from the product While one person holds the main frame the other person should use a 4mm hexagonal wrench to insert two M6 bolts into the left an...

Страница 67: ...rection of the arrow as shown in the figure Attach the body hinge cover to the lower part of the vertical column of the body fat analyzer as shown in the figure then press on both sides of the body hi...

Страница 68: ...n Check the level of the installed product If the product is not level use the 5 disks on the underside of the platform to adjust the level Once the product is level connect the supplied adapter and p...

Страница 69: ...For proper installation be sure to read and understand the following information before assembling 1 Height Meter installation components Height meter body 5mm hexagonal wrench M6 wrench bolt X 4 M4 p...

Страница 70: ...uring the floor is clean lay vinyl or paper on the floor in order to protect the product when laying it down Make sure that there are no foreign or sharp objects on the floor as these may cause damage...

Страница 71: ...cture so the LCD does not touch the floor Place the electrode handle in a safe place so that it does not interfere with the assembly of the product Before attaching the Height Meter to the scales base...

Страница 72: ...72 Connect the cable connector to the connector of the height meter Turn the height meter base upside down and secure it in the open holes of the scale base plate...

Страница 73: ...olts to each hole with a 5 mm hexagonal wrench When the extensometer base is installed place the product on a level surface Be careful not to damage the product Be sure any supports or floor coverings...

Страница 74: ...74 The Height meter body consists of 2 parts in total Take out two extension parts and remove the packing vinyl Place the two extension parts side by side on the floor...

Страница 75: ...sition the D SUB connector in the same direction as the figure Remove the connector cables from both the upper and lower parts and connect the cables together Insert the connected cable into the exten...

Страница 76: ...s to the left and right holes as shown in the figure using a plus screwdriver Connection of upper and lower parts of the height meter body is completed Raise the locking lever of the body cover as ind...

Страница 77: ...rubber pad inside the body cover to move the height meter body easily Insert the height meter body into the body cover The RS 232C connector at the bottom of the height meter body must be connected to...

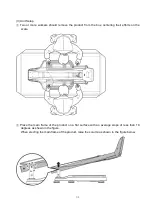
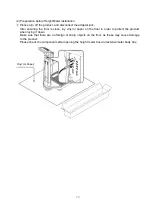
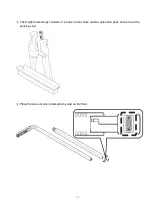
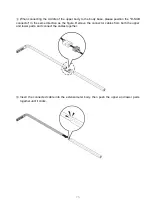
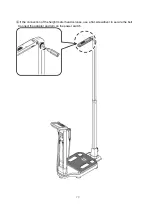
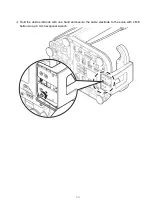
Страница 78: ...78 Secure the body cover locking lever in the direction of the arrow Slide the height meter head up to level...

Страница 79: ...79 If the connection of the height meter head is loose use a flat screwdriver to secure the bolt Connect the adapter and turn on the power switch...

Страница 80: ...and installation of this product be carried out by two or more people working together 1 Ankle electrode installation components 2 Installation of ankle electrode Before installing the ankle electrod...

Страница 81: ...prevent the LCD from touching the floor Place the electrode handle in a safe place so that it does not interfere with the assembly Before attaching the ankle electrode pedestal to the scales base pla...

Страница 82: ...two connectors on the ankle electrode to the connector jacks on the bottom of the scales as shown Align the connector jacks and push them into the hole in the foot platform and align it with the M6 bo...

Страница 83: ...83 Hold the ankle electrode with one hand and secure the ankle electrode to the scale with 4 M6 bolts using a 4 mm hexagonal wrench...

Страница 84: ...trode to the scales and place the product on a level surface Be careful not to damage the product Be sure any supports or floor coverings are moved out of the way Jiggle your ankle electrode to check...

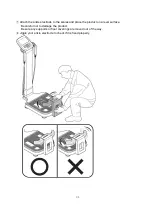
Страница 85: ...85 Power connection After assembling the ankle electrode connect the supplied power cable and the power supply...

Страница 86: ...installation of this product be carried out by two or more people working together 1 Thermal printer installation components 2 Installation of thermal printer Remove the cover surrounding the LCD of...

Страница 87: ...e connection jack of the thermal printer to the connector on the rear side so that it clicks Align the thermal printer with the groove on the back of the body fat measurement device and push it horizo...

Страница 88: ...d and insert the M3 plate head bolts into the three holes with a plus shape screwdriver Thermal printer installation is completed To replace the thermal printer s paper please refer to the Replacing t...

Страница 89: ...Keys Smooth operation Pass Fail 2 Recorder Smooth operation with no abnormal sound Pass Fail 3 Touch Screen Smooth operation Pass Fail Accessories 1 Power cord Smooth operation and removal Pass Fail E...

Страница 90: ...en Smooth operation Pass Fail 2 Recorder Smooth operation with no abnormal sound Pass Fail Accessories 1 Power cord Smooth operation and removal Pass Fail Electrical Check Performance 1 Power supply S...

Отзывы: