background image

MANUAL DE INSTRUCCIONES  

CODIGO 80386 REV A     


FEBRERO 2020             

        Pag.: 17

J

.P.  SELECTA s.a.u. 


Autovía A-2 Km 585.1 Abrera  08630  (Barcelona) España 

Tel 34 937 700 877   Fax 34 937 702 362

 e-mail: [email protected] - website:  http://www.jpselecta.es

5. Equipment Description

Ovens are used in sample thermal treatments, for its desiccation, cured and 

culture incubation. 

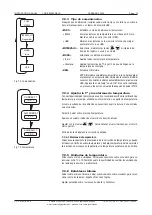
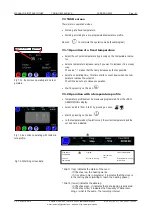
Giving the heat treatment possibility by following a “temperature profile” allows 

avoiding cracks, breaks, color changes, etc.

A temperature profile is a succession of “ramps” and “dells.”

A ramp is specified by a slope of ºC/minute or ºC/hour.

A dell is specified by a temperature and a time.

The device has a temperature log in an USB memory drive.

6. Installation

Unpack the equipment and visually check that the contents are in good con-

ditions. Keep the package for some days.

6.1 Location

Place the equipment on a flat level stable surface, suitable for the equipment 

weight. 

To work in a comfortable way, please leave a free space of 50cm around the 

equipment and a minimum of 20cm at the rear part.

6.2 Connection to the mains

Plug the equipment to a near socket suitable for the equipment power. Use the 

connection cable supplied or a similar one.

For your safety, the equipment must be earthed.

Before plugging the machine, check that the voltage supply and the frequency 

corresponds to the one indicated in the equipment characteristics plate.

7. Operation

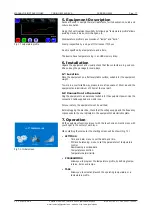
All the equipment functions are set with the touch screen. Gently press with 

your finger in the center of each icon.

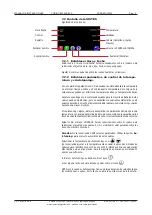
When starting the computer, the starting screen will be shown (Fig 7.1).

• 

SETTINGS:


Time and date: menu to set the date and time.


PID and Autotuning: menu to set the parameters of temperature  


control.


Downloading recorded data. 


Temperature correction.


Temperature alarm limits.

• 

PROGRAMMING


Allows you to program the temperature profile, by defining tempe- 


ratures, times and ramps.

• 

TASK


Allows you to select and launch the operating temperature or a  


temperature profile.

Fig 1. Temperature profile

Fig 7.1. Initial screen

Содержание Digitheat-TFT 2001251

Страница 1: ...jpselecta es Incudigit TFT Digitheat TFT 2001261 19L 2001251 19L 2001262 36L 2001252 36L 2001263 52L 2001253 52L 2001264 80L 2001254 80L 2001265 150L 2001255 150L Digitronic TFT con puerta vidrio 2005...

Страница 2: ...ci n del equipo 7 6 Instalaci n 7 6 1 Emplazamiento 7 6 2 Conexi n a la red el ctrica 7 7 Funcionamiento 7 7 1 Inicio r pido para trabajar a una temperatura 8 7 2 Pantalla de AJUSTES 9 7 3 Pantalla de...

Страница 3: ...do en el apartado de la Lista de embalaje Si se observa alg n componente da ado o la ausencia de alguno avisar r pidamente al distribuidor No instalar ni utilizar el equipo sin leer previamente este m...

Страница 4: ...0 40 40 50 60 50 Exterior alto ancho fondo cm 50 60 44 60 65 49 53 82 52 70 74 59 70 95 68 Tensi n de alimentaci n 230 VAC 50Hz 60Hz alimentaci n seg n etiqueta caracter sticas Potencia el ctrica W 60...

Страница 5: ...ra 4 Informaci n sobre seguridad en la utilizaci n del equipo 4 4 Mantenimiento Antes de quitar las tapas de la estufa para manipular en su interior desconecte la toma de red La manipulaci n de los ci...

Страница 6: ...702 362 e mail selecta jpselecta es website http www jpselecta es Hora fecha Control Registro Temperatura Unidades Idioma Castellano Ingl s Franc s Volver a la PANTALLA INICIAL Rechazar cambio Acepta...

Страница 7: ...didad dejar libre un espacio de 50cm en cada lado del equipo y un m nimo de 20cm en la parte de atr s 6 2 Conexi n a la red el ctrica Escoger una toma de corriente cercana al equipo y adecuada a la po...

Страница 8: ...azul 3Pulsar para seleccionar la tem peratura de consigna Espere unos segundos para confirmar el nuevo valor 4Pulsar sobre para iniciar el ciclo 5Pulsar sobre para finalizar el ciclo NOTA al finaliza...

Страница 9: ...cisi n El Autotunning ajusta de forma autom tica los par metros ptimos para una temperatura y una carga determinada Este proceso es largo porque realiza varias fases de calentamiento enfriamiento para...

Страница 10: ...4 Ajustar la T y las alarmas de temperatura Con cierta periodicidad por ejemplo anual se recomienda verificar la calibraci n de temperatura por ejemplo utilizando un term metro o un patr n de temperat...

Страница 11: ...un perfil de temperatura Los perfiles de temperatura deben estar previamente programados des de la pantalla PROGRAMACI N Seleccionar un perfil del 0 al 9 pulsando sobre las teclas Iniciar pulsando so...

Страница 12: ...il Seleccionar el n del perfil con entre el 0 y 10 Pulsar sobre el par metro a modificar T rampa duraci n Pulsar sobre los iconos para entrar el valor Modificar otro par metro Valores especiales Si en...

Страница 13: ...la descarga aparece el mensaje envio ok Esta operaci n se puede realizar varias veces siempre y cuando no se haya empezado otro ciclo pulsado RUN Al pulsar RUN se vac a la memoria interior del equipo...

Страница 14: ...x 2000025 Model 2000238 2000239 2000240 Shelves guides 2x 2002371 Shelves 2x 2002372 2x 2000063 2x 2000064 Model 2001251 200125 2001253 2001254 2001255 Shelves guides 2x 2000011 2x 2000012 2x 2000012...

Страница 15: ...30 25 25 40 30 30 33 47 33 50 40 40 50 60 50 External High wide depth cm 50 60 44 60 65 49 53 82 52 70 74 59 70 95 68 Power supply 230 VAC 50Hz 60Hz according to characteristics label Electrical powe...

Страница 16: ...able or explosive materials or those which chemically react with violence Hazard risk Electric risk Risk of high temperature contact 4 Information about safety in the use of the equipment 4 4 Maintena...

Страница 17: ...eight To work in a comfortable way please leave a free space of 50cm around the equipment and a minimum of 20cm at the rear part 6 2 Connection to the mains Plug the equipment to a near socket suitabl...

Страница 18: ...change to blue 3Press to select the setpoint tempe rature Wait a few seconds to confirm the new value 4Press on to start 5Press on to end the cycle NOTE at the end of the cycle a message appears sayi...

Страница 19: ...ng automatically adjusts the optimal parameters for a given tem perature and load This process is long because it performs several heating cooling phases to know the functioning of the environment Pre...

Страница 20: ...et the temperature and the temperature alarms It is recommended to verify calibration of temperature with some regularity for example annually by using for instance a thermometer or a temperature patt...

Страница 21: ...7 3 2 Operation with a temperature profile Temperature profiles must be previously programmed from the PRO GRAMMATION display Select a profile from 0 to 9 by pressing on keys Start by pressing on the...

Страница 22: ...ofile parameters input Select the profile number between 0 and 10 with Press on the parameter to be modified Temp ramp length Press on these icons to enter the value Modify another parameter Special v...

Страница 23: ...ng that a connected memory is found and the message send ok appears at the end of the download This operation can be performed several times as long as another cycle has not started press RUN When pre...

Страница 24: ...80386 REV A FEBRUARY 2020 Page 24 J P SELECTA s a u Autov a A 2 Km 585 1 Abrera 08630 Barcelona Espa a Tel 34 937 700 877 Fax 34 937 702 362 e mail selecta jpselecta es website http www jpselecta es...

Отзывы: